
Managing customer relationships effectively starts with having a well-organized contact list. Interakt’s new Contacts Page, also known as Contact Hub, gives you a clear view of all your contacts in one place, helping you take the next steps for sales, marketing, and support with ease.
In this guide, we’ll break down how the new Contacts Listing Page works, what information is displayed, and how you can take quick actions.
What is the Contact Hub?
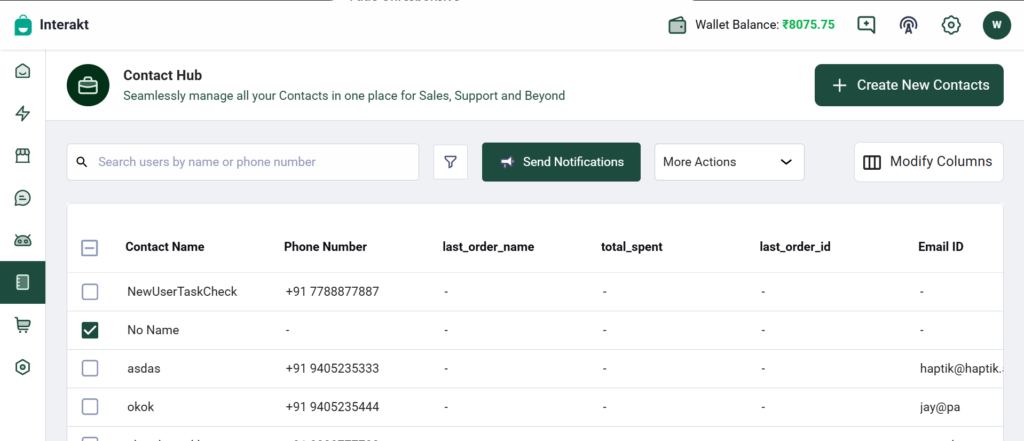
The Contacts Page is where you can see all the contacts that have been added to Interakt. It provides a list view of contacts along with key details like name, phone number, email, and lead source.
With this redesigned page, you can:
– View and manage all contacts in one place
– Take quick actions like sending a WhatsApp message or creating a task
– Customize which details you see for each contact
Defaulty Columns in the Contact Hub
When you open the Contacts Page, you’ll see the following details for each contact:
1.Contact Name – The name of the contact.
2.Contact Number – If the contact signed up via WhatsApp, their phone number will be displayed.
3.Email ID – The email address of the contact.
4.Lead Source – Where the contact came from (shown only for users on the Sell plan).
5.Account Owner – The assigned owner of the contact (shown only for users on the Sell plan).
6.Status – The stage of the contact in the sales pipeline (shown only for users on the Sell plan). This can only be selected from predefined options.
7.Tags – Labels assigned to the contact. If multiple tags exist, a “+1” indicator will appear, and hovering over it will show all tags.
8.Actions – Quick options to send a direct message (DM) or create a task for the contact.

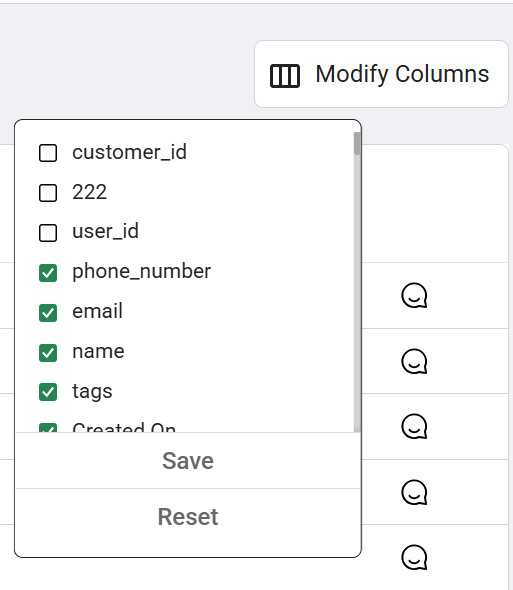
You can easily modify these columns by clicking on the button ‘Modify Contacts’ and selecting the fields from the drop-down.
Actions You Can Take
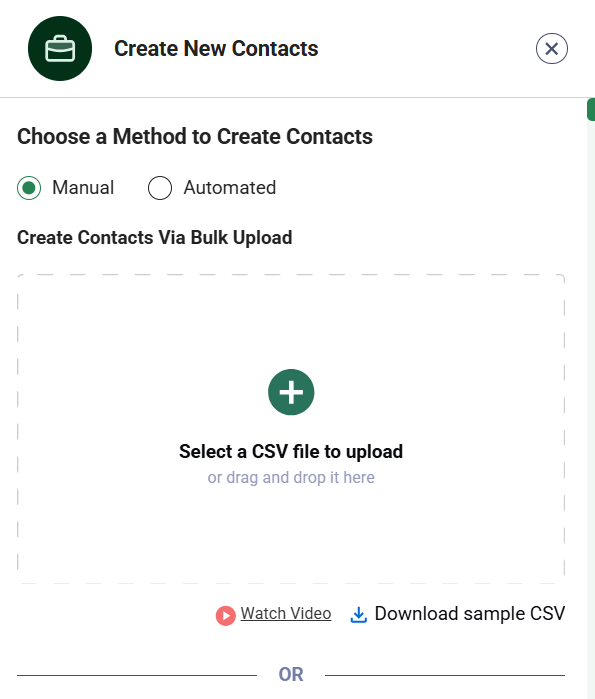
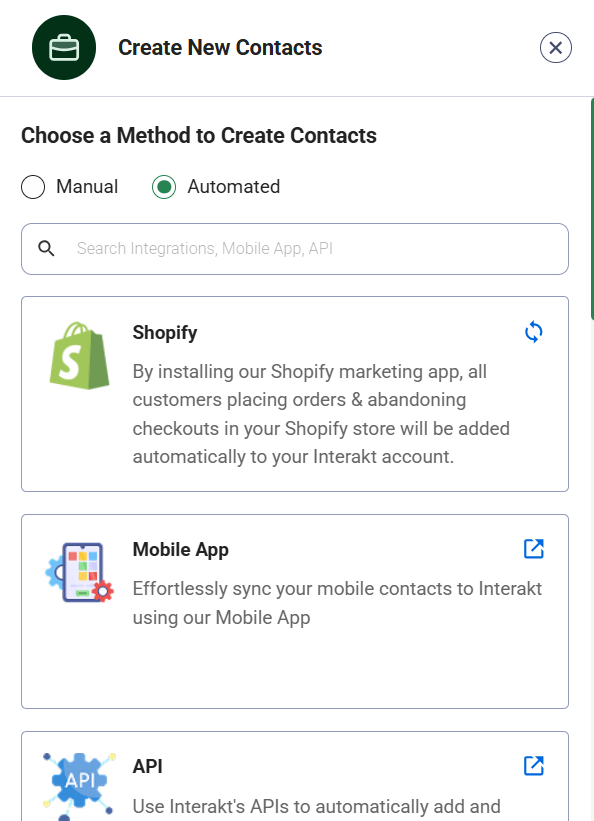
Create New Contact
– Click on the Create New Contact Button at the top.
– You will see a new pop-up
– Here you can choose to either add a new contact manually ( Via CSV file or individually) or add it with an automation(sync contacts from Shopify, WooCommerce, Mobile App, API, Google Sheet, FB Leads & Integrations, Pabbly, Instamojo, Zapier, Integromat).
Send a Direct Message (DM)
– Click the “Send DM” button next to a contact.
– If the contact is available on WhatsApp, it will open their chat in the Inbox with WhatsApp as the default selection.
– If WhatsApp is unavailable but Instagram is, it will open an Instagram DM instead.

Create a Task
– Click “Create Task” to open a task creation panel.
– The task will be automatically assigned to the selected contact.
You can track this task later in your Task Management section.
Note
– The total count of contacts is displayed at the bottom.
By default, a maximum of 20 contacts per page are shown.
Customizing Your Contact View
– Click the Modify Columns button to select which details you want to see.
– Your preferences will be saved, so they remain even after logging out and logging back in.
– The columns you can see depend on your role in the system.
More Action Items
- Your wallet balance is visible in the top right corner, as seen in the screenshot below.
- Next to the wallet balance, you have your WhatsApp Widget button. Once you click on it, you will land on the Widget page, where you can customize it for your website.
- Next to that, you have the Announcement Hub icon. If you click on it, you will end up on the Announcement page
Conclusion
The new Contacts Page makes it easier than ever to manage and interact with your contacts in Interakt. With an intuitive list view, quick actions, and customization options, you can efficiently handle your sales, marketing, and support activities.


