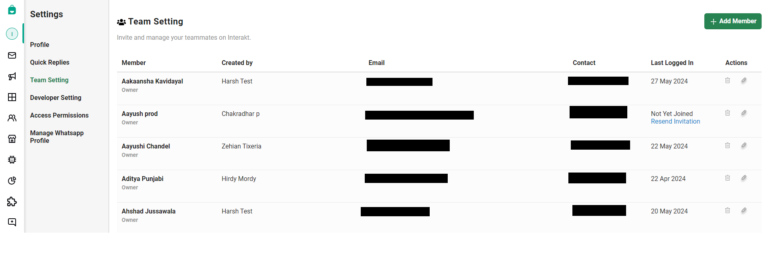
1. In this dashboard, you can see the details of all the existing team members on the Interakt account along with the role assigned to each member.
2. You can then click on ‘+Add Member’ to add a new team member on Interakt.
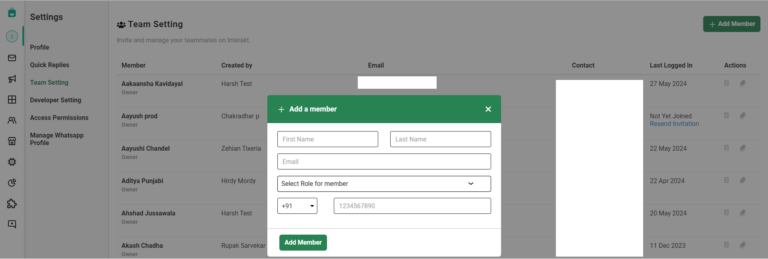
3. You will then get this pop-up box to fill in the details of your team member. Along with the contact details, you will also need to assign a role to every member. There are 3 roles on Interakt, they are – Owner, Admin and Teammate. You can see the permissions for each of these roles on the Access Permissions page.
4. Once you fill in all the details and click on ‘Add Member’, your teammate will receive an email invite with the login credentials to join your account on Interakt.
5. You also have the option to manage your team members – you can choose to edit their details or remove them from your Interakt account by clicking on the Actions button on the far right corner.
How To Change Permissions For Each Role In Your Team?
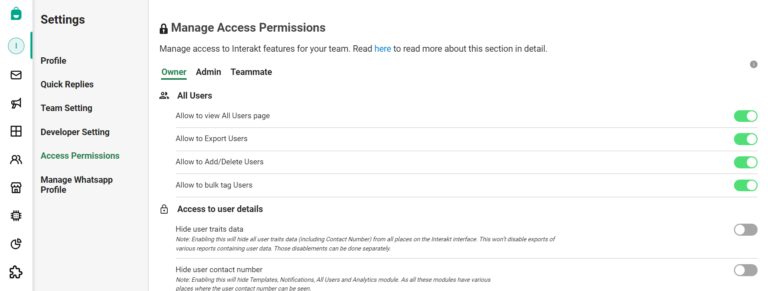
On the Access Permissions page, you will see permissions assigned to every role.
Any member assigned the role of an Owner has access to all the features by default. This cannot be changed.
For the other 2 roles which are Admin and Teammate, you can use these toggles to provide or block access to a particular feature. By default, members assigned as Admin or Teammate won’t be able to access the Team Settings and Access Permissions pages.
This means that you can change these permissions only if the role assigned to you is that of an Owner.
So, for example, if you want to restrict access to the ‘Export Users’ feature to all members whose role is Admin, you can toggle off the switch beside ‘Allow to Export Users’. Once that is done, all members in your team having the role of Admin will not be able to Export Users from the All Users page.
Similarly, you can restrict access to some other features like Adding Users, Bulk Tagging Users from the All Users page, Access to the Billing Section, Access to your organization’s API key, and access to the WhatsApp Business Setup for your profile.
In this way, you can create a 3-level hierarchy for permissions in your organization, which can help you keep your Interakt account more secure.
Interakt allows users to change the permissions of other users based on the role assigned to them. There is another section referred to as Access to user details within permission settings.
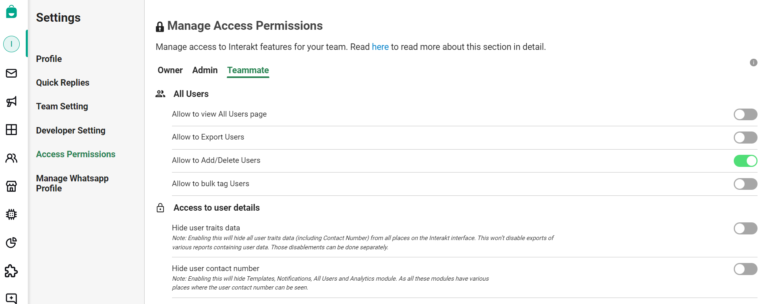
The permission changes applied to this section supersede the changes that would have happened. Let us understand this from an example.
Currently, under Access to user details, users can enable “Hide user contact number” & “Hide user traits data”
By default the customer phone number is visible for all Interakt users to see and this is Disabled.
When enabled, it ensures that the customer’s phone number is masked for the roles mentioned as per the permissions defined.
The “superseding effect” defined above is as follows:
1. Inbox: The customer phone number will be masked as shown below where only the country code is visible. This masking will be across User card details, the chat list, and the chat header.
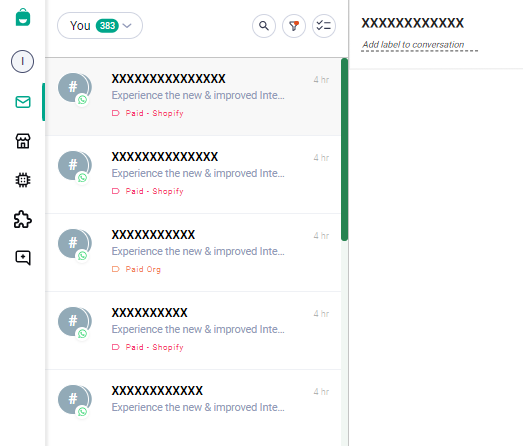

Note: This masking does not in any way impact the ability of an Interakt user to converse with an end customer using Inbox.
Notifications: The module is hidden for the users for whom the end customer contact number is masked. This is irrespective of whatever roles are assigned in the other section as per permissions settings. If the phone number masking is switched on, the notification module won’t be available for those users.
Note: It is only that the module will not be available for the specified user. The Ongoing or One-time campaigns set already for the org will continue to happen and the org owners continue to have the ability to set up campaigns via.
Templates: The module is hidden for the users for whom the end customer contact number is masked. This is irrespective of whatever roles are assigned in the other section as per permissions settings. If the phone number masking is switched on, the template module won’t be available for those users.
Note: It is only that the module will not be available for the specified user. The templates created already for the org will continue to be available for users to use via. inbox and the org owners continue to have the ability to create and submit templates via. the module.
All users: The module is hidden for the users for whom the end customer contact number is masked. This is irrespective of whatever roles are assigned in the other section as per permissions settings. If the phone number masking is switched on, the All users module won’t be available for those users.
Analytics: The module is hidden for the users for whom the end customer contact number is masked. This is irrespective of whatever roles are assigned in the other section as per permissions settings. If the phone number masking is switched on, the All Users module won’t be available for those users.
In the below example, you’ll notice that the teammate does not have access to the Users, Templates, Notifications, & Analytics.

We hope this article helped you understand how to add team members, how to assign roles to them, and change their access permissions.


