The integration between Google Sheets and Interakt platform enables businesses to automate WhatsApp messaging workflows directly from spreadsheet data. This powerful combination allows you to trigger automated WhatsApp notifications whenever new customer information is added to your sheets or send scheduled messages based on specific date and time conditions. Whether you’re managing appointment reminders, order confirmations, or customer follow-ups, this integration streamlines communication and eliminates manual messaging tasks.
This comprehensive guide will walk you through every step of setting up and configuring the Google Sheets integration with Interakt, covering both available workflows: triggering messages on new row additions and scheduling messages based on date-time conditions. By the end of this tutorial, you’ll have a fully functional automated messaging system that reads data from your Google Sheets and sends personalized WhatsApp messages to your customers.
Understanding Interakt and Google Sheets Integration
Interakt is a comprehensive WhatsApp Business API platform designed to help businesses automate customer engagement, send bulk notifications, and manage conversations at scale. The platform offers features including shared team inbox, WhatsApp automation, campaign analytics, chatbot functionality, and seamless integrations with various business tools. As an official WhatsApp Business service provider, Interakt enables businesses to leverage WhatsApp as a sales and customer service channel.
The Google Sheets integration serves as a bridge between your customer data stored in spreadsheets and Interakt’s messaging capabilities. This integration supports two primary use cases that address common business communication needs:
Use Case 1: New Row Trigger – Automatically sends WhatsApp template messages or triggers events whenever a new row is added to your Google Sheet. This is ideal for instant notifications when new leads, orders, or bookings are recorded.
Use Case 2: Date-Time Trigger – Sends messages when a specific date and time in your spreadsheet matches predefined conditions. This workflow excels at appointment reminders, scheduled follow-ups, and time-sensitive notifications.
Both workflows enable field mapping from your spreadsheet columns (such as customer name, phone number, country code) to WhatsApp message variables, ensuring personalized communication at scale. The integration reads your Google Sheet at configurable intervals (minimum 5 minutes) and automatically triggers messages based on your specified conditions.
Prerequisites and Requirements
Before beginning the integration setup, ensure you have the following components ready:
Required Accounts and Access
Interakt Platform Account – You need an active Interakt account with access to the integrations section. Integrations are available starting from the Growth plan and above.
Google Account – You must have a Google account with permission to access and manage the Google Sheets you want to integrate. The Google account used for authentication should own or have edit access to the spreadsheet.
Interakt API Key – This authentication credential is essential for connecting your Interakt account to the integration. To obtain your API key, navigate to Settings > Developer Settings in your Interakt platform and copy the secret key. This key acts as your password for API access and should be stored securely. You need to be on Growth plan and above for getting API key access
WhatsApp Business Setup
Approved WhatsApp Template – You need at least one pre-approved message template in your WhatsApp Business account. WhatsApp requires all business-initiated messages to use approved templates to prevent spam. Templates can include variables (parameters) that get replaced with actual data from your spreadsheet when messages are sent.
WhatsApp Business API Access – Your Interakt account must be connected to WhatsApp Business API. This is automatically configured when you set up your Interakt account and complete the Facebook business verification process.
Google Sheets Preparation
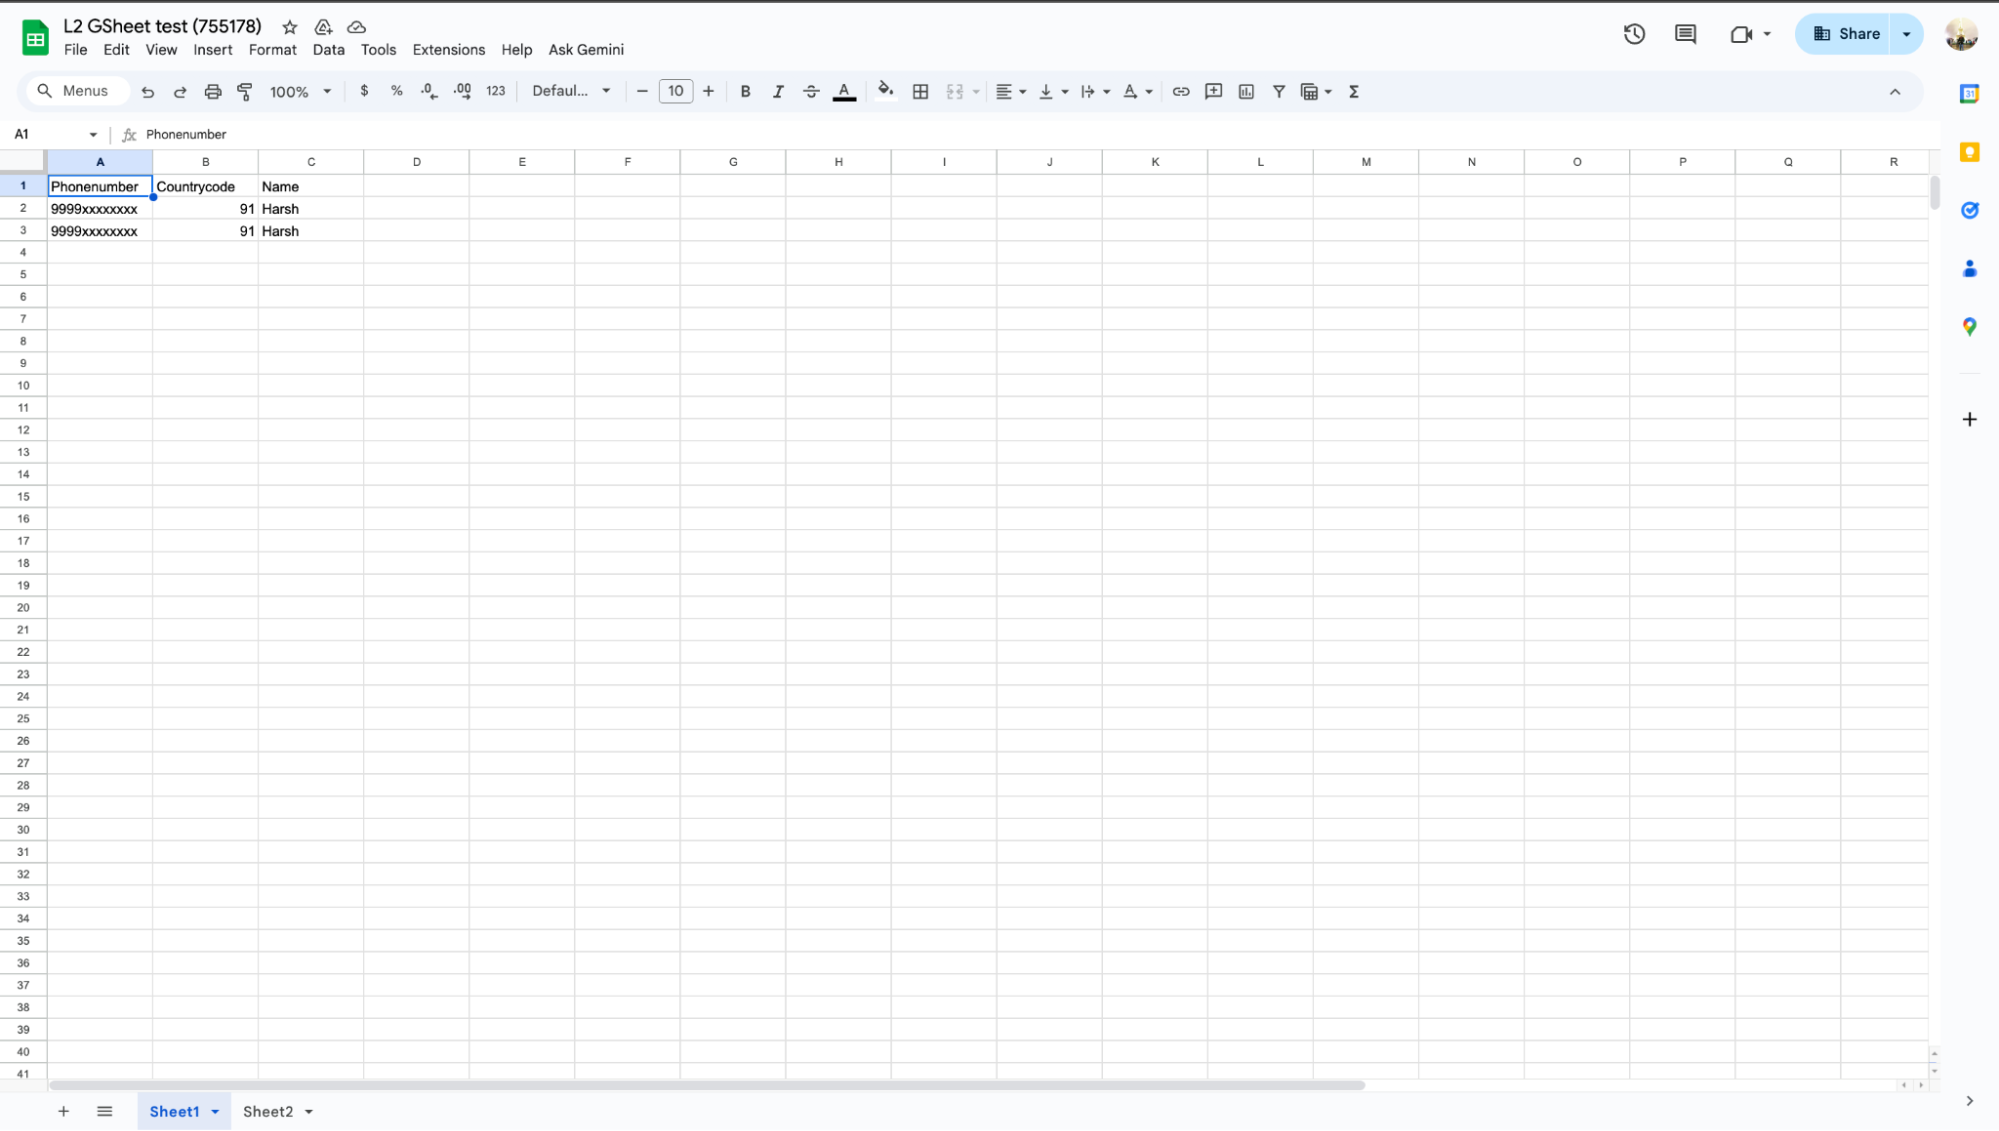
Properly Structured Spreadsheet – Your Google Sheet must contain columns for all the data fields you plan to use in your messages. At minimum, you’ll need columns for phone numbers and country codes. Additional columns might include customer names, appointment dates, or any other variables referenced in your WhatsApp templates.
Spreadsheet ID – You’ll need to identify your Google Sheet’s unique ID, which is found in the spreadsheet URL. The ID is the alphanumeric string located between /d/ and /edit in the URL. For example, in the URL https://docs.google.com/spreadsheets/d/abc1234567/edit#gid=0, the spreadsheet ID is abc1234567.
Date Format Requirements – If using the date-time trigger workflow, ensure your appointment time column uses the format YYYY-MM-DD HH:MM (e.g., 2025-10-28 14:30). This standardized format is required for the system to properly parse and compare dates.
Column Headers – Use clear, descriptive column names like “Country Code,” “Phone Number,” “Name,” and “Appointment Time” to make field mapping easier during configuration.
Workflow 1: Triggering WhatsApp Templates on New Row Addition
This workflow automatically sends WhatsApp template messages whenever a new row is added to your Google Sheet. It’s the simpler of the two workflows and perfect for immediate customer notifications such as order confirmations, new lead acknowledgments, or booking confirmations.
Step 1: Access Interakt Integrations
Log into your Interakt platform using your credentials. Once logged in, navigate to the Integrations section located on the left-hand sidebar menu. This section displays all available integration options that Interakt offers.
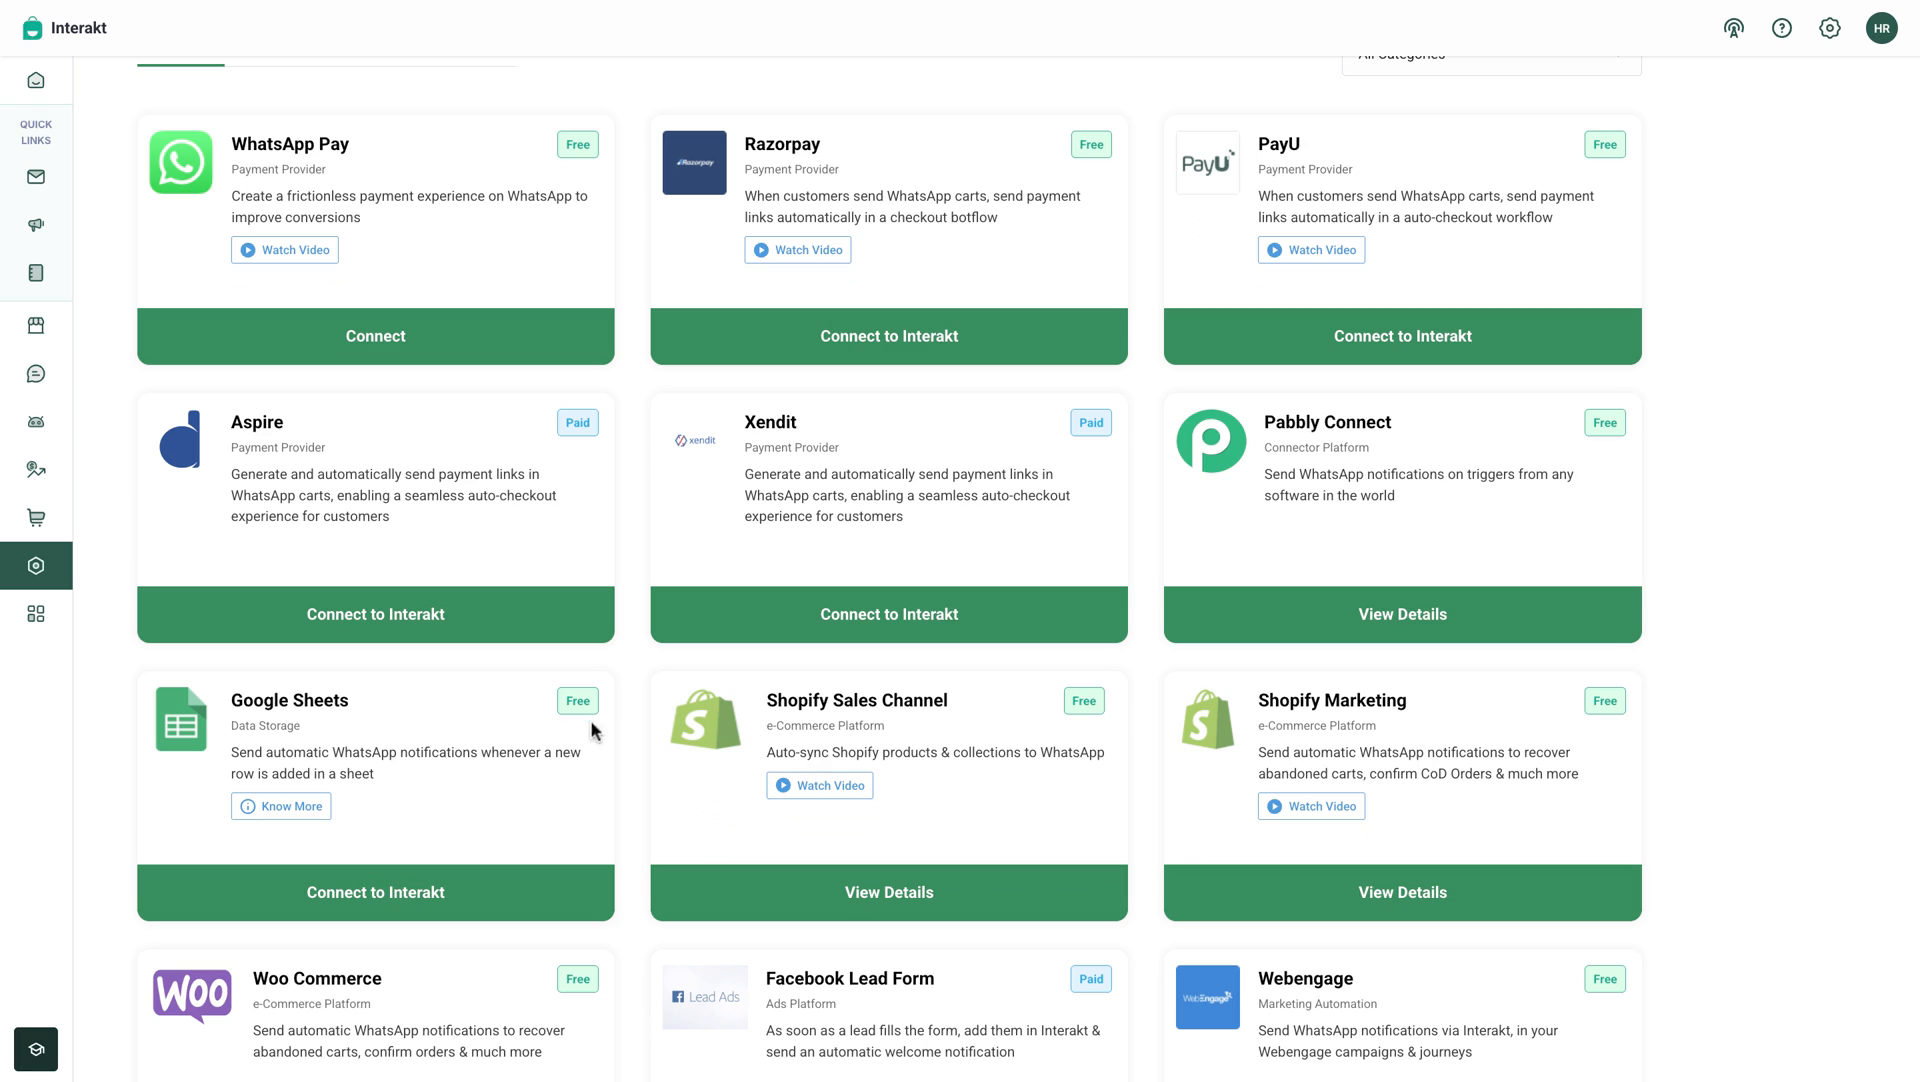
Within the integrations marketplace, locate the Google Sheet app card. The Google Sheets integration is available as a free application within Interakt’s integration ecosystem. Click on the Connect to Interakt button on the Google Sheet card, then click Next to proceed to the workflow selection screen.
Step 2: Select and Install the Workflow
On the workflow selection screen, you’ll see the two available integration options. For this workflow, select the option that says “Trigger a WhatsApp Template on New Row Addition” or “Trigger WhatsApp template when a new row is added”.
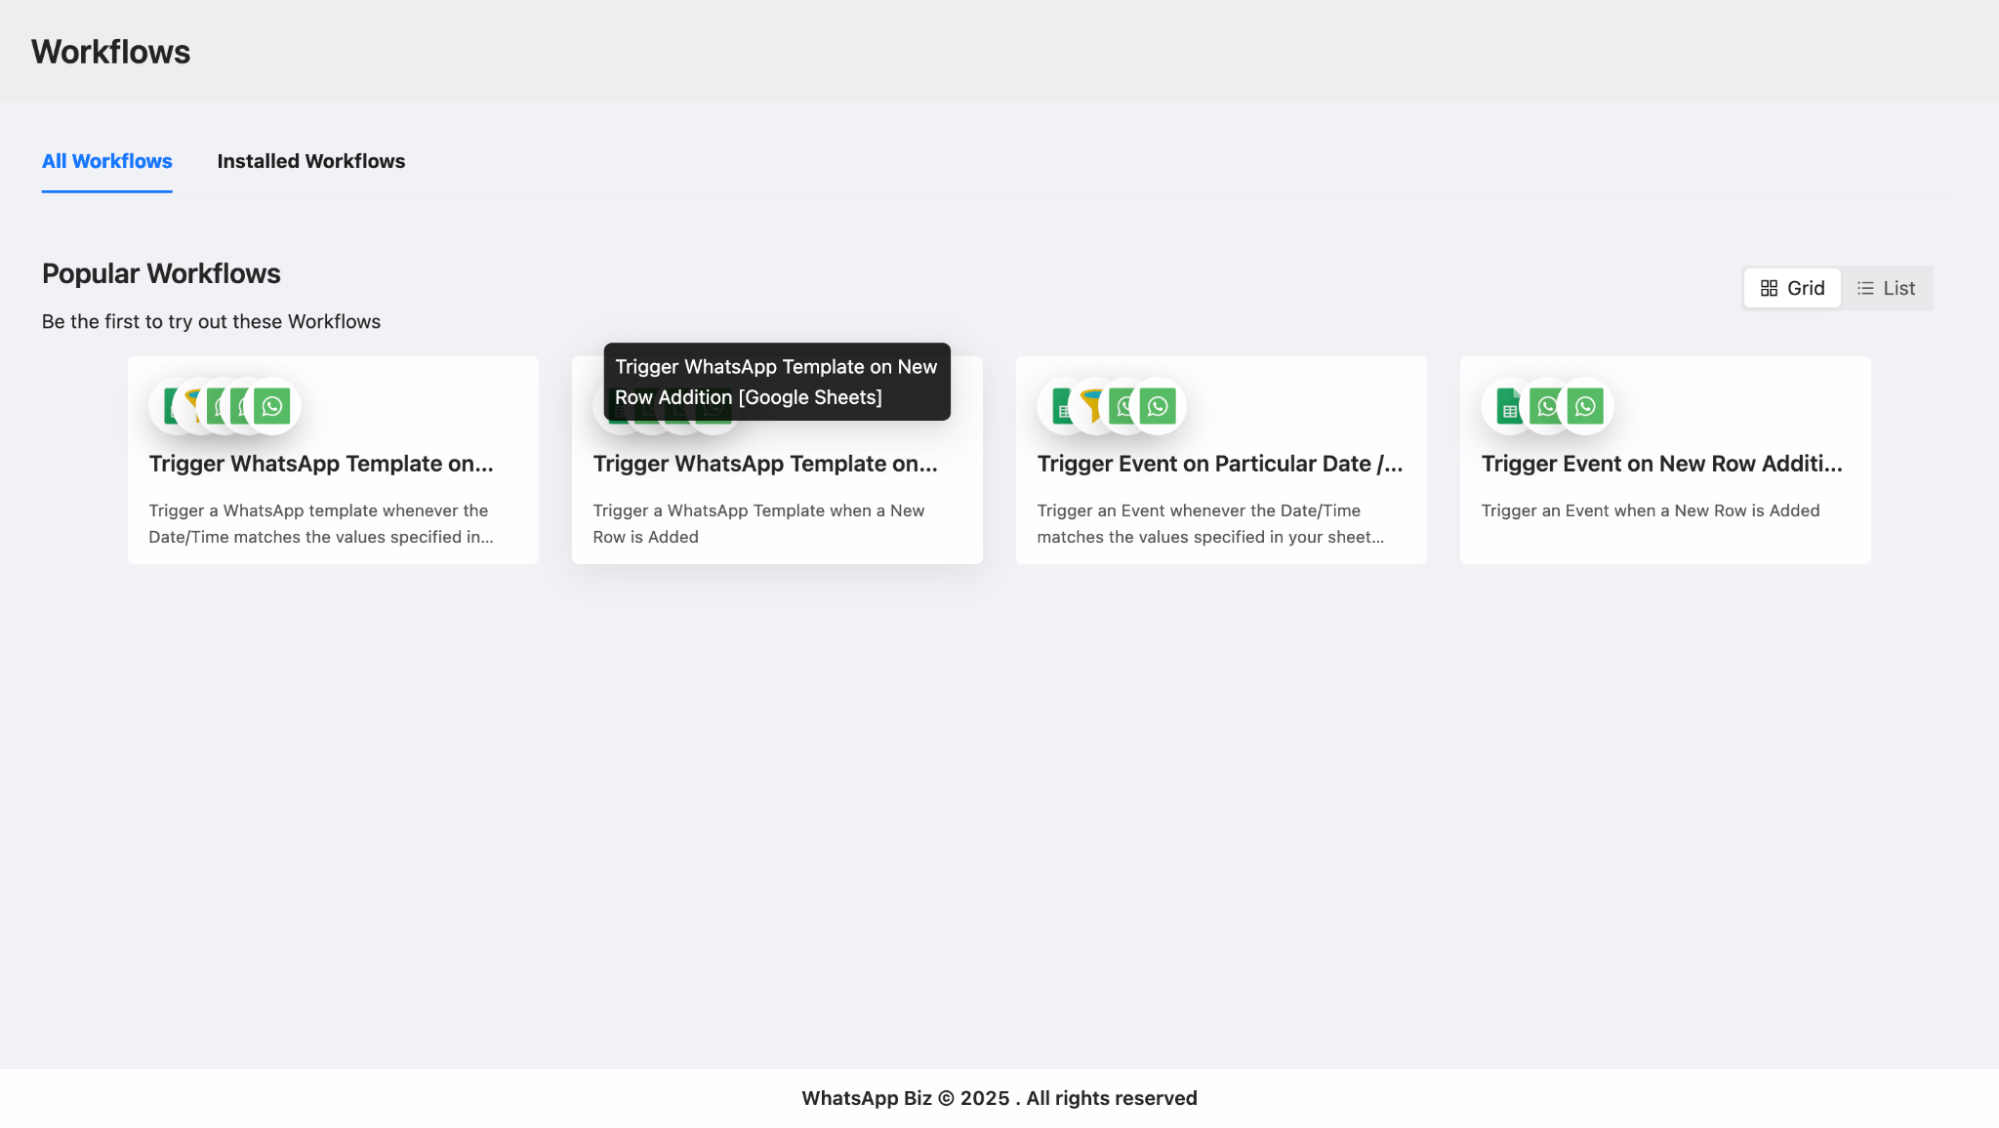
Click the Install button to install this particular workflow to your Interakt account. The installation process takes just a few seconds and prepares the workflow for configuration.
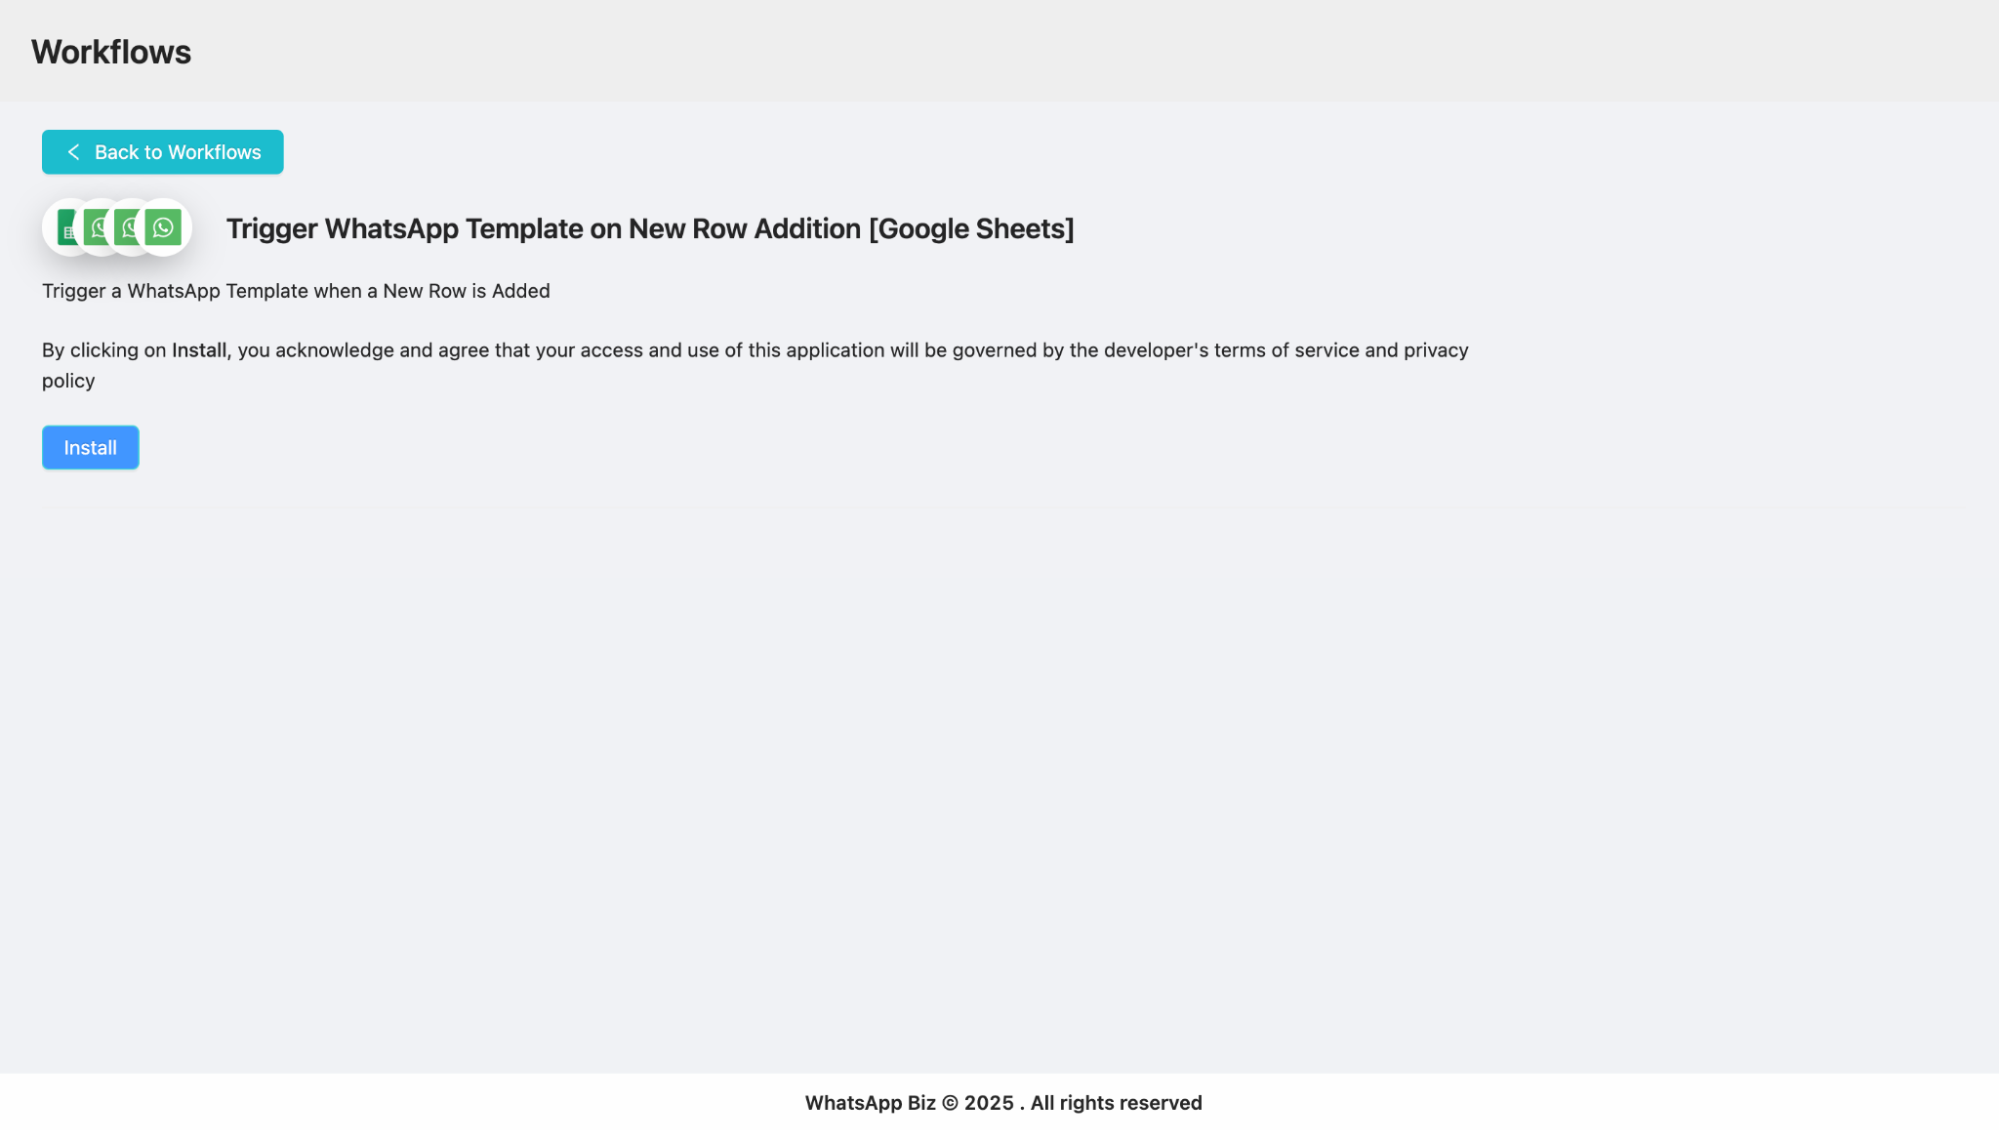
After installation completes, click Edit Settings to begin the authentication and configuration process. This opens the workflow configuration interface where you’ll set up all the necessary connections and parameters.
Step 3: Authenticate Google Account
The first authentication step involves connecting your Google account to Interakt. On the authentication screen, you’ll see a Sign in with Google button. Click this button to initiate the Google OAuth authentication flow.
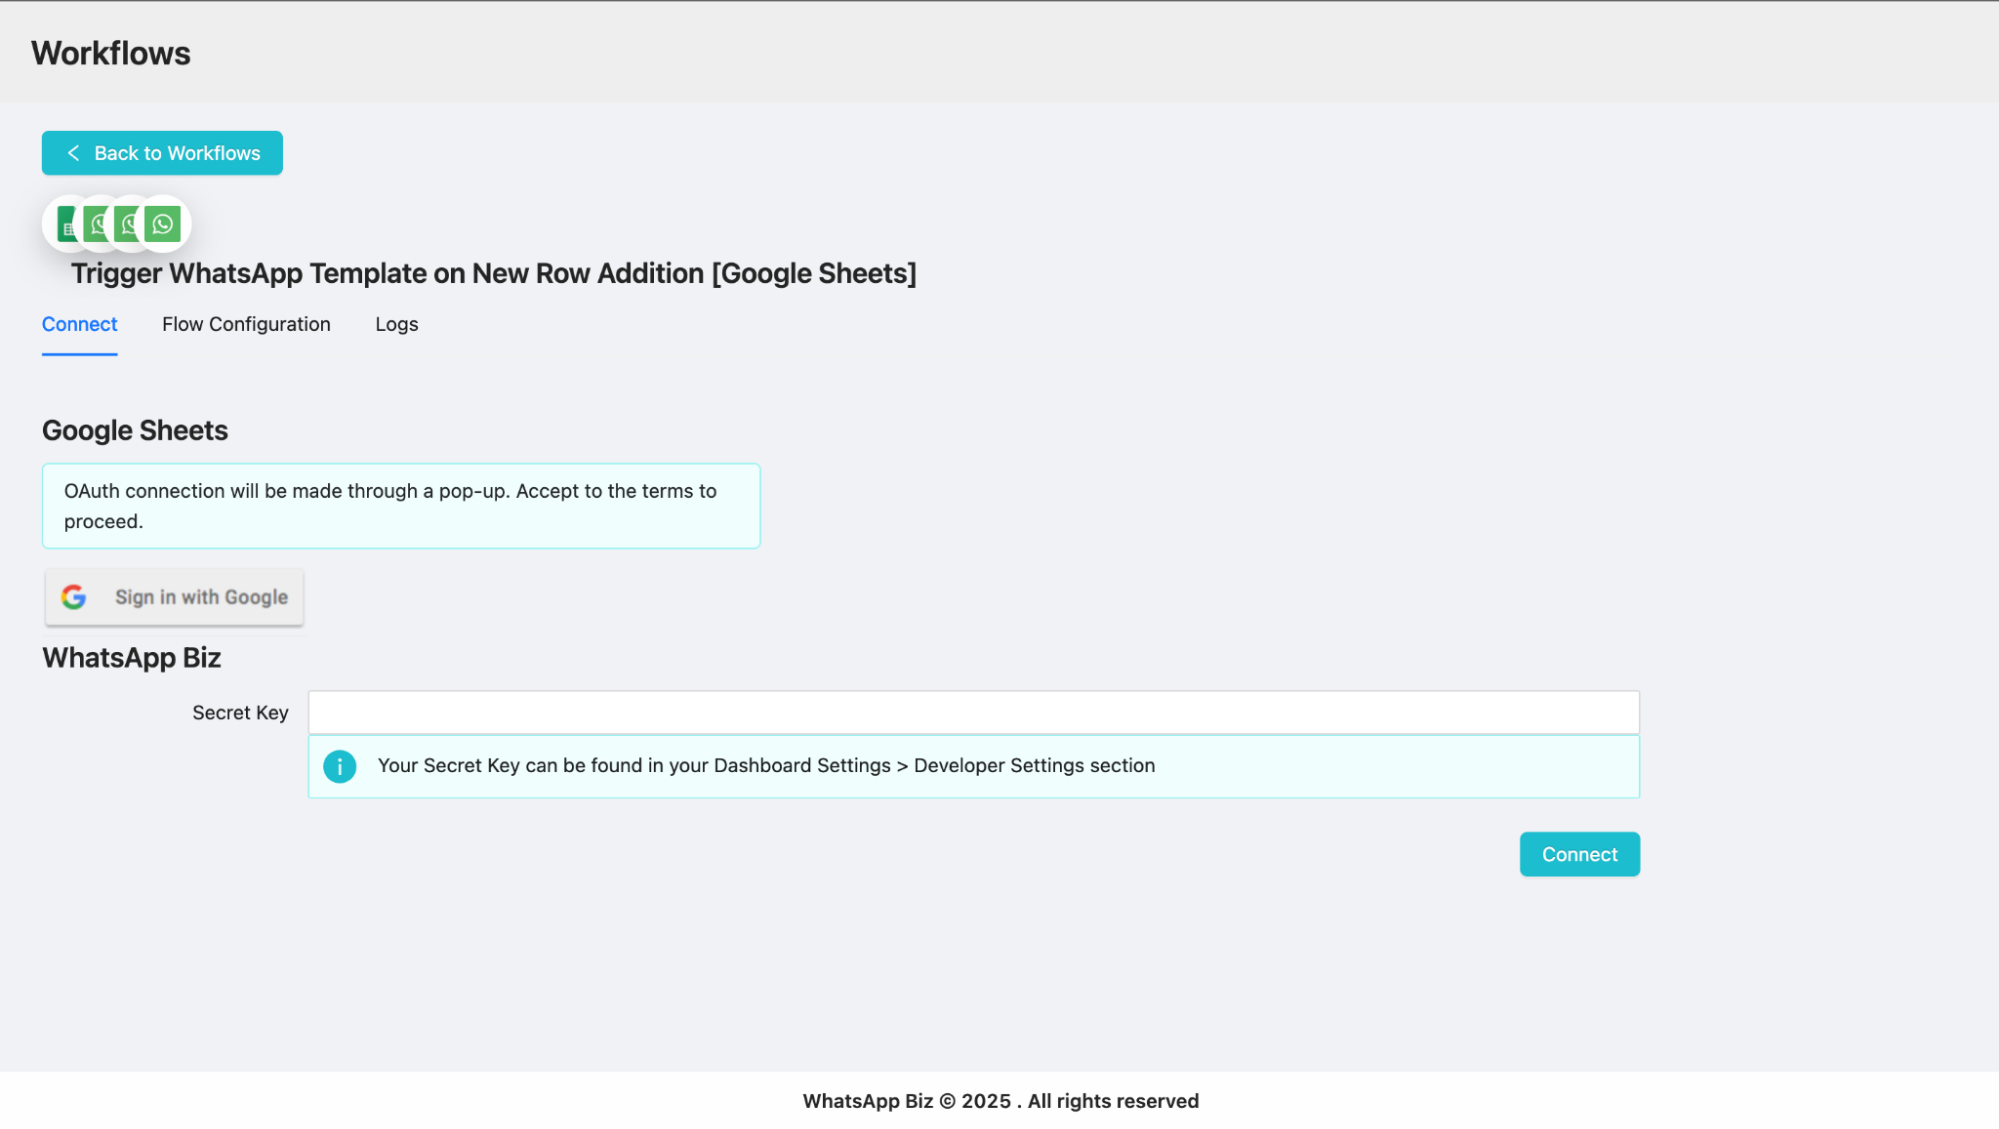
A Google sign-in popup window will appear, showing all Google accounts currently logged into your browser. Select the Google account that owns or has access to the spreadsheet you want to integrate. This is crucial – ensure you select the correct account that has edit permissions for your target Google Sheet.
After selecting your account, Google may ask you to review the permissions that Interakt is requesting. These permissions typically include reading and accessing your Google Sheets data. Review these permissions and click Allow or Continue to grant access.
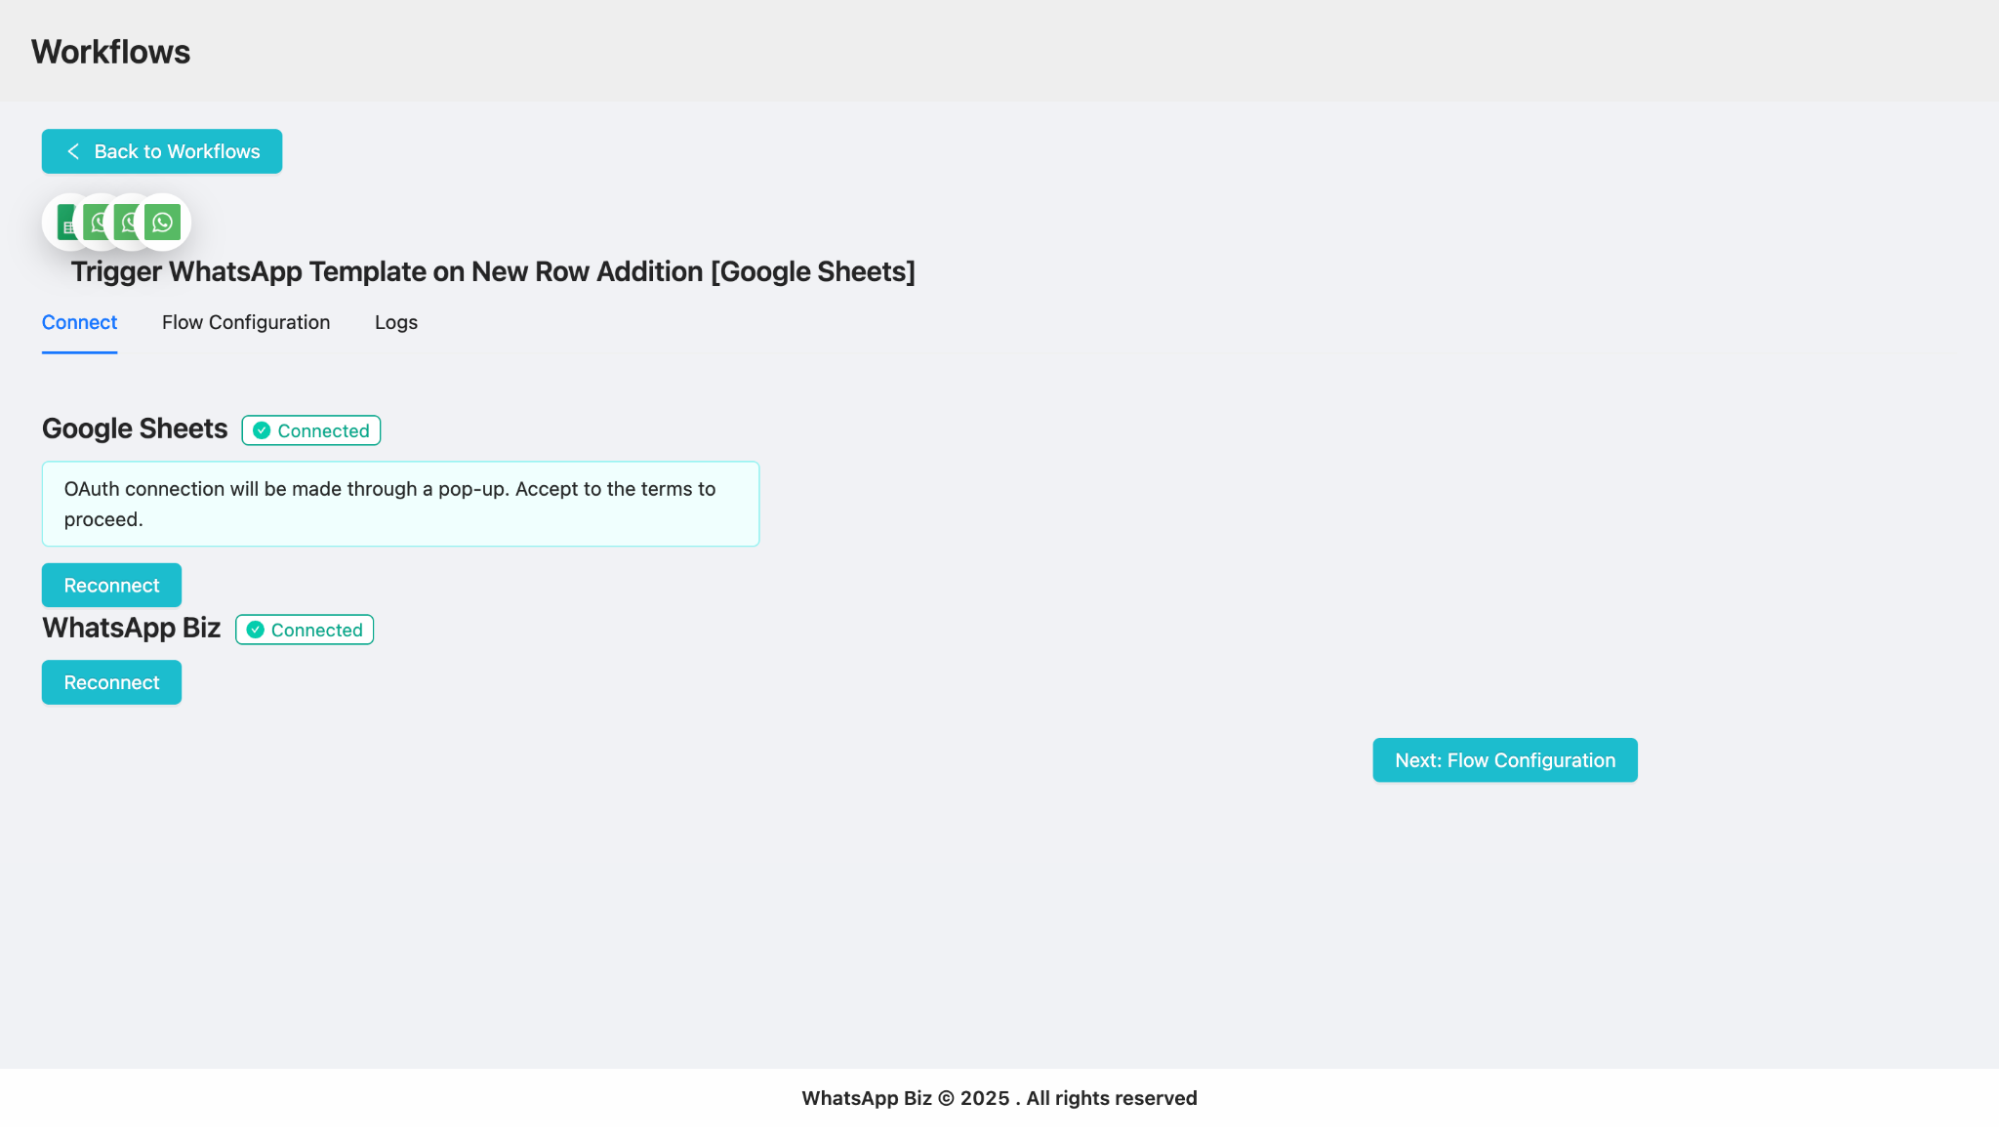
Once authentication is successful, you’ll see a confirmation message or indicator showing that your Google account is now connected. The interface will automatically advance to the next authentication step.
Step 4: Authenticate Interakt Account
Now you need to authenticate your Interakt account by entering your API key. On the same authentication screen, you’ll see a field labeled API Key or Secret Key.
To obtain your Interakt API key if you haven’t already, open a new browser tab and navigate to your Interakt platform. Click on Settings (represented by a gear icon), then select Developer Settings or Developer from the menu. On the Developer Settings page, you’ll find your Secret Key or API Key displayed. Copy this key to your clipboard.
Return to the integration setup tab and paste the API key into the designated field. Click Connect or Save to authenticate your Interakt account. The system will verify the API key and establish the connection between the Google Sheets integration and your Interakt account.
Upon successful authentication of both accounts, you’ll see confirmation indicators or checkmarks showing that both Google and Interakt are now connected. Click Next to proceed to the flow configuration section.
Step 5: Configure the Spreadsheet
The flow configuration section is where you define which Google Sheet to monitor and how to process the data. The first required field is the Spreadsheet ID.
Open your target Google Sheet in a new browser tab. Look at the URL in the address bar. The Spreadsheet ID is the long string of characters located after /spreadsheets/d/ and before /edit. For example, in the URL
https://docs.google.com/spreadsheets/d/1QPvcIcmNU1QbZYRF__rrjIC4C1F0Ir3KI-YtIRCCWws/edit#gid=0, the Spreadsheet ID is 1QPvcIcmNU1QbZYRF__rrjIC4C1F0Ir3KI-YtIRCCWws

Carefully copy this entire Spreadsheet ID (ensuring no extra characters or spaces are included) and paste it into the Spreadsheet ID field in the Interakt configuration.
After entering the Spreadsheet ID, the integration will automatically fetch and display all available sheets (tabs) within that spreadsheet. A dropdown menu will appear showing options like “Sheet 1,” “Sheet 2,” etc. Select the specific sheet tab that contains the data you want to use for triggering messages.
Step 6: Select WhatsApp Template and Campaign Name
Next, you need to specify which WhatsApp template message should be sent when a new row is added. Click the WhatsApp Template dropdown menu, which displays all the pre-approved templates available in your WhatsApp Business account.
Select the appropriate template for your use case. For example, if you’re sending order confirmations, select your order confirmation template. If sending welcome messages to new leads, select your welcome template.
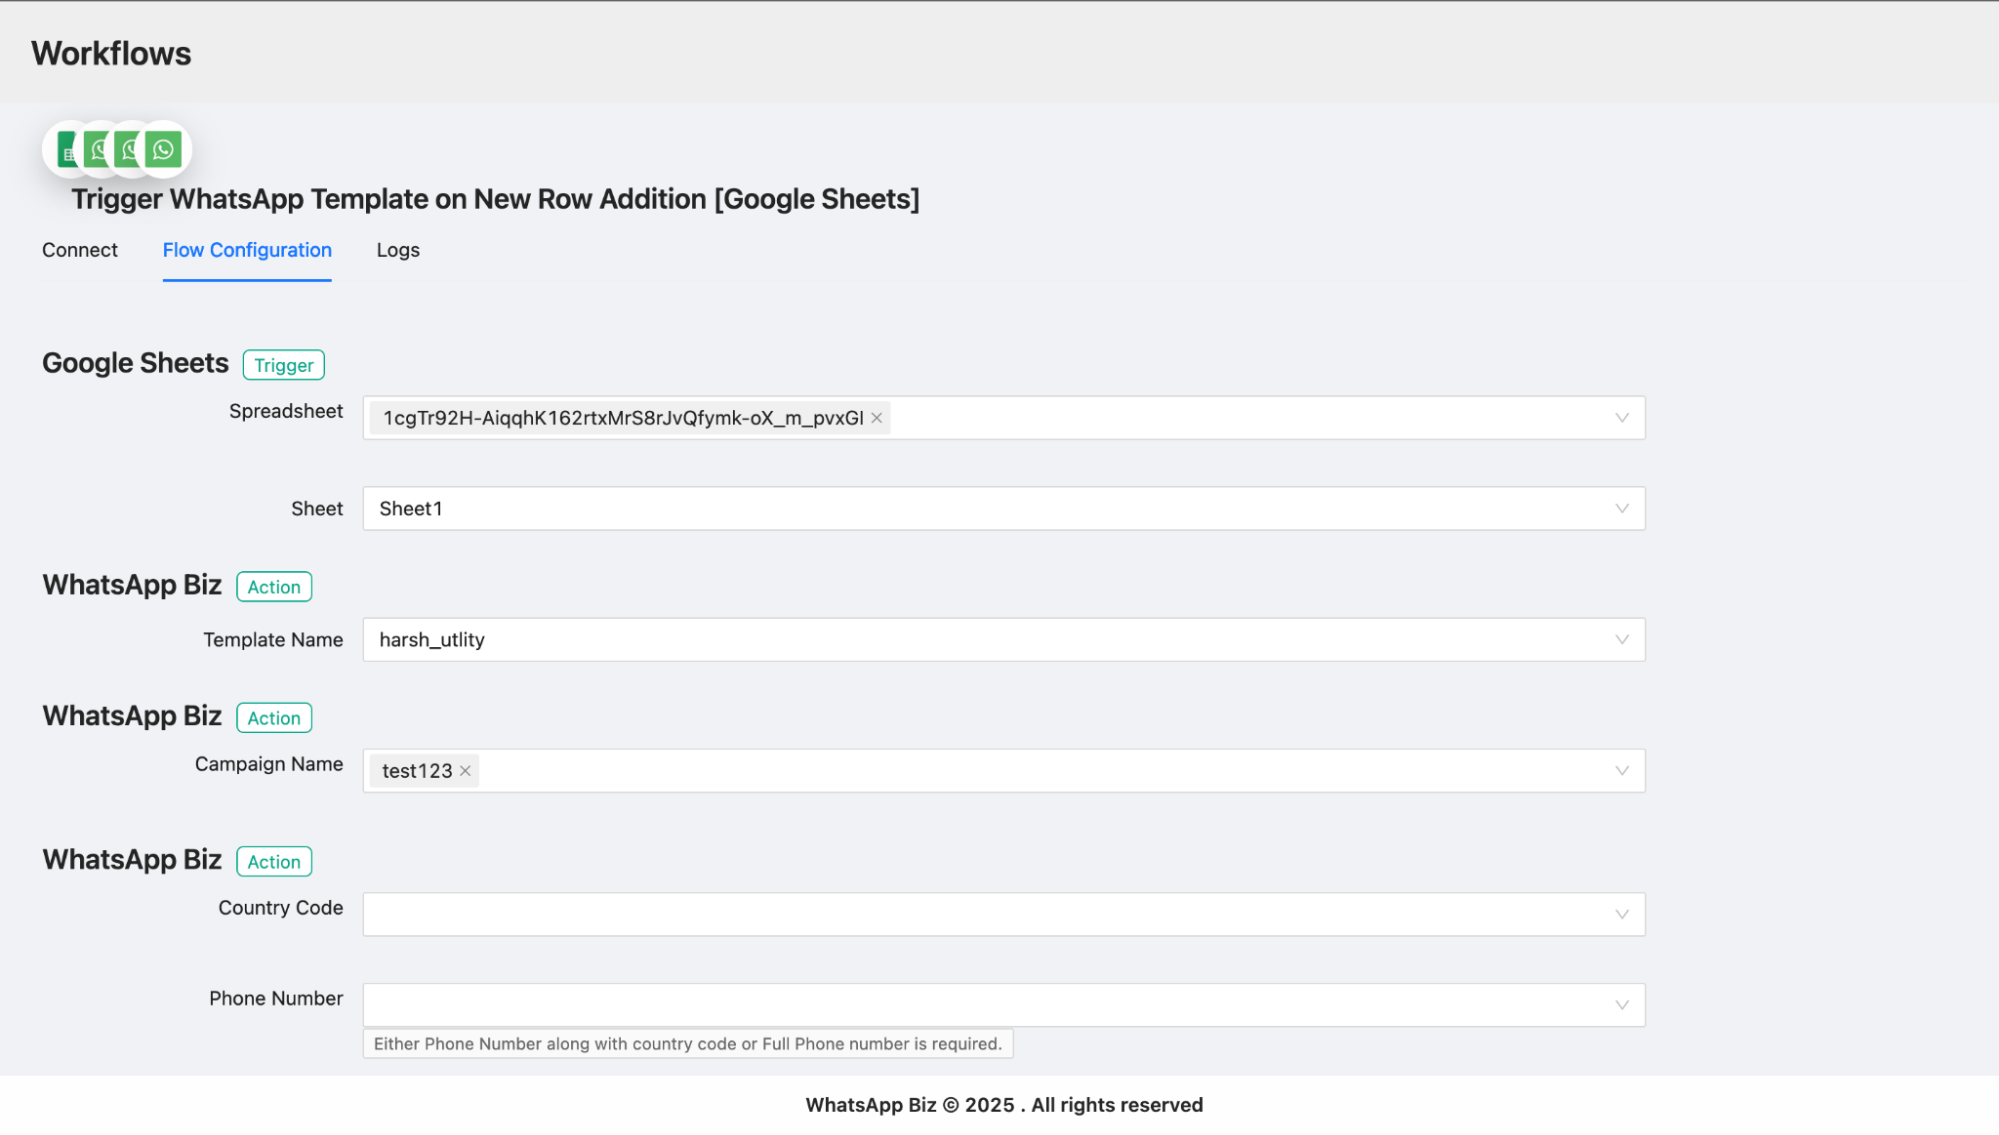
After selecting the template, enter a Campaign Name in the designated field. This name is used for tracking purposes and will help you identify and analyze the performance of messages sent through this workflow. Choose a descriptive name like “Google Sheet New Customer Notifications” or “GSheet Order Confirmations 2025”. The campaign name you enter here will appear in your Interakt dashboard under Campaigns > API Campaigns, where you can view delivery statistics.
Step 7: Map Spreadsheet Fields to Message Variables
Field mapping is the crucial step that connects your Google Sheet columns to the variables in your WhatsApp template. This ensures that personalized information from your spreadsheet appears correctly in each message.
Start by mapping the Country Code field. Click on the country code mapping button or dropdown, and you’ll see a list of available column names from your Google Sheet. Select the column that contains the country codes (e.g., a column named “Country Code” containing values like “91” for India or “1” for USA).
Next, map the Phone Number field by clicking the phone number mapping button and selecting the corresponding column from your spreadsheet. This column should contain the customer phone numbers without the country code if you’re using separate columns, or the full number including country code if you’ve combined them.
If your selected WhatsApp template contains variables (placeholders), you’ll see additional mapping fields for each variable. For example, if your template says “Hello {{1}}, thank you for your order,” you need to map the {{1}} variable to the appropriate column. Click the mapping button for this variable and select the column containing customer names.
The system displays all column headers from your Google Sheet, making it easy to match each template variable to the correct data field. Common mappings include customer name, order number, appointment date, or any other personalized information you want to include in the message.
Important: The values you map here (Country Code, Phone Number, Name, etc.) must exactly match the column names in your connected Google Sheet. The integration will read data from these columns for each new row and insert the values into your WhatsApp message template.
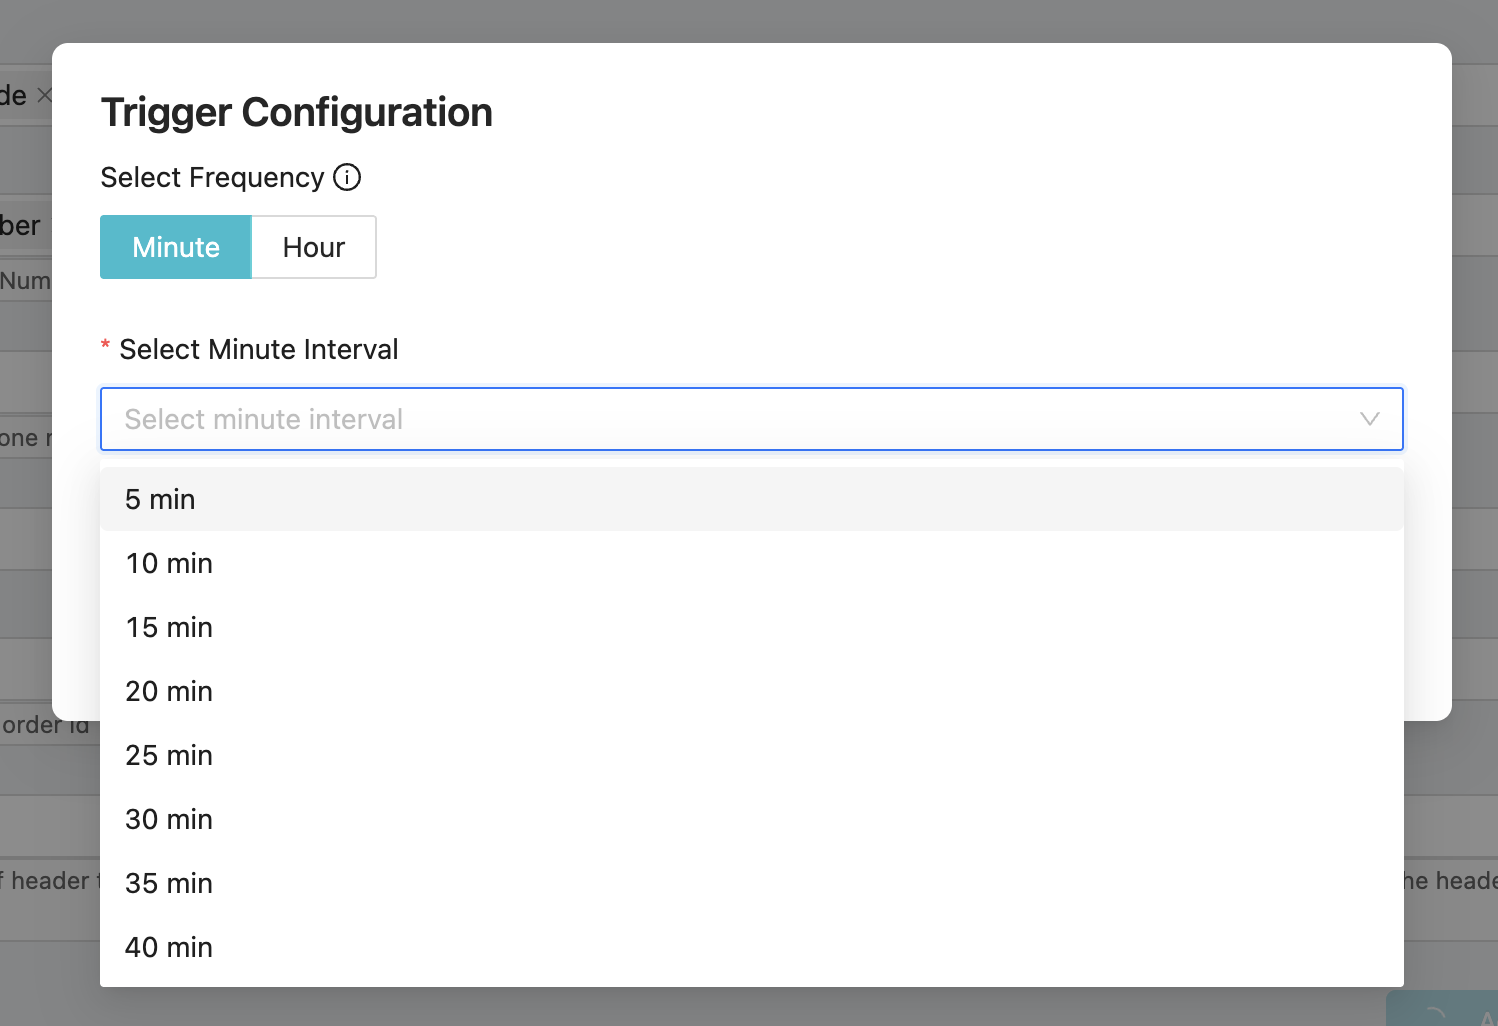
Step 8: Configure Frequency and Activate
Before activating the workflow, you must specify how frequently the system should check your Google Sheet for new entries. This frequency setting determines the interval between automatic scans of your spreadsheet.
Click the Frequency or Interval setting. The system will present options for how often to check the sheet, with the minimum interval being 5 minutes. Select an appropriate interval based on your business needs:
- 5 minutes: For time-sensitive notifications where immediate response is critical
- 15-30 minutes: For moderate urgency scenarios like new lead notifications
- Hourly or longer: For less urgent batch processing situations
After setting the frequency, carefully review all your configuration settings: Spreadsheet ID, sheet name, template selection, campaign name, and field mappings. Verify that everything is correct before proceeding.
Once you’ve confirmed all settings are accurate, click the Save button to save your configuration. Then click the Activate button to enable the workflow. Upon activation, you’ll see a success message confirming that the workflow has been activated successfully.
The integration is now live and will begin monitoring your Google Sheet at the specified interval. Whenever a new row is added to the bottom of your selected sheet, the system will automatically read the data, populate your WhatsApp template with the mapped fields, and send the message to the specified phone number.
Step 9: Testing and Verification
After activation, it’s important to test the workflow to ensure it’s functioning correctly. The simplest way to test is to add a new row to your Google Sheet with sample data.
Open your Google Sheet and add a new row at the bottom with test information, including a valid phone number (preferably your own for testing purposes), country code, and any other required fields. Make sure the data follows the correct format, especially for phone numbers.
Wait for the specified interval time to pass. If you set the frequency to 5 minutes, wait at least 5-6 minutes for the system to read the new entry. The integration scans the sheet at the configured intervals and processes any new rows it finds.
To monitor the workflow execution in real-time, navigate to the workflow settings and click on Logs or view the log screen. The logs display all execution attempts, showing successful message sends as well as any errors encountered. Successful executions will show confirmation that the WhatsApp template was executed successfully.
Check the phone number where you sent the test message. You should receive the WhatsApp message with the personalized information from your spreadsheet. Verify that all the variables are correctly populated with the data from your Google Sheet.
To view campaign statistics and delivery metrics, navigate to Notifications > API Campaigns in your Interakt dashboard. Find the campaign name you created earlier in the list. Click on it to see detailed statistics including attempted count, delivered count, read rate, and other engagement metrics. You may need to refresh the data or wait a few minutes for all statistics to populate.
Workflow 2: Triggering Events Based on Date and Time Conditions (Birthday, Anniversary, Appointment Reminders etc)
The second workflow enables you to send WhatsApp messages when specific date and time conditions are met in your Google Sheet. This is particularly powerful for appointment reminders, scheduled follow-ups, deadline notifications, and any time-based communication needs.
Step 1: Install the Date-Time Workflow
Following the same initial steps as Workflow 1, log into your Interakt platform and navigate to the Integrations section on the left sidebar. Locate the Google Sheet app card and click Connect to Interakt, then click Next.
On the workflow selection screen, this time select the workflow titled “Send a WhatsApp Template on a particular Date” or “Trigger event on a particular date and time”. This workflow is specifically designed for time-based triggering rather than new row additions.
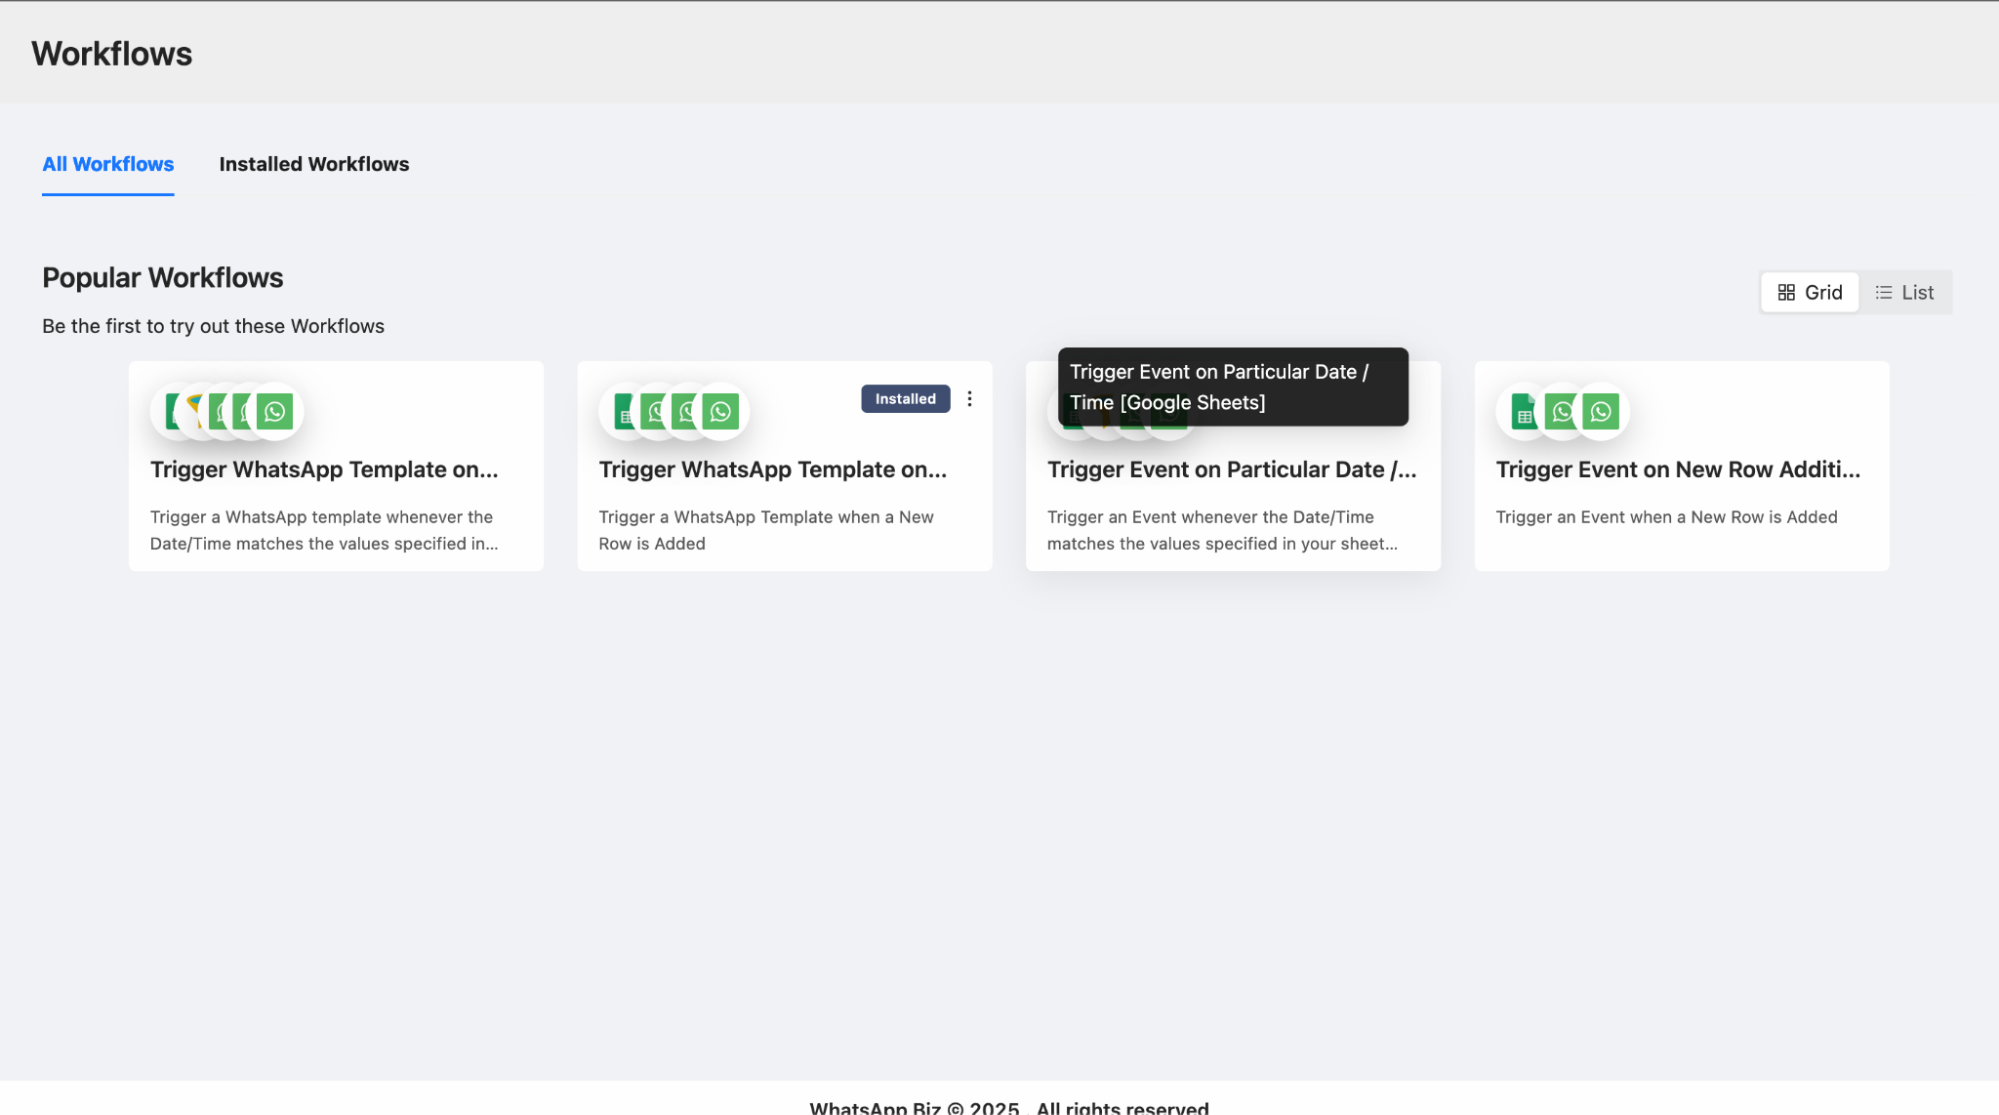
Click Install to install this workflow to your account. After installation completes, click Edit Settings to begin configuration.
Step 2: Authenticate Both Accounts
The authentication process for this workflow is identical to Workflow 1. You’ll need to authenticate both your Google account and your Interakt account.
Click the Sign in with Google button and select the Google account that has access to your target spreadsheet. Grant the necessary permissions when prompted by Google. Once Google authentication is successful, proceed to the Interakt authentication.
Enter your Interakt API Key in the designated field. If you followed Workflow 1, you should already have this key available. Otherwise, retrieve it from Settings > Developer Settings in your Interakt dashboard. Paste the API key and click Connect.
After both accounts are successfully authenticated, click Next to proceed to flow configuration.
Step 3: Configure Spreadsheet and Sheet Selection
Enter the Spreadsheet ID in the first configuration field. As before, you can find this ID in your Google Sheet’s URL – it’s the long alphanumeric string between /d/ and /edit. Copy the Spreadsheet ID carefully and paste it into the field.
The system will automatically fetch all available sheet tabs from your spreadsheet. Select the sheet that contains your date-time data from the dropdown menu. For this workflow, ensure your selected sheet contains a column with date and time information formatted as YYYY-MM-DD HH:MM.
Step 4: Understanding Column Requirements
For the date-time trigger workflow to function properly, your Google Sheet must have specific columns configured correctly:
- Phone Number Column: Contains the recipient’s phone number
- Country Code Column: Contains the country calling code (e.g., 91 for India, 1 for USA). Note that if you prefer, you can combine the country code and phone number in a single column.
- Name Column: Contains the customer or recipient name for personalization
- Appointment Time Column: This is the critical column for this workflow. It must contain date and time values in the format YYYY-MM-DD HH:MM (for example: 2025-10-28 14:30). This standardized format is essential for the system to properly parse and compare dates.
Any additional custom fields you want to include in your messages can also be added as separate columns.
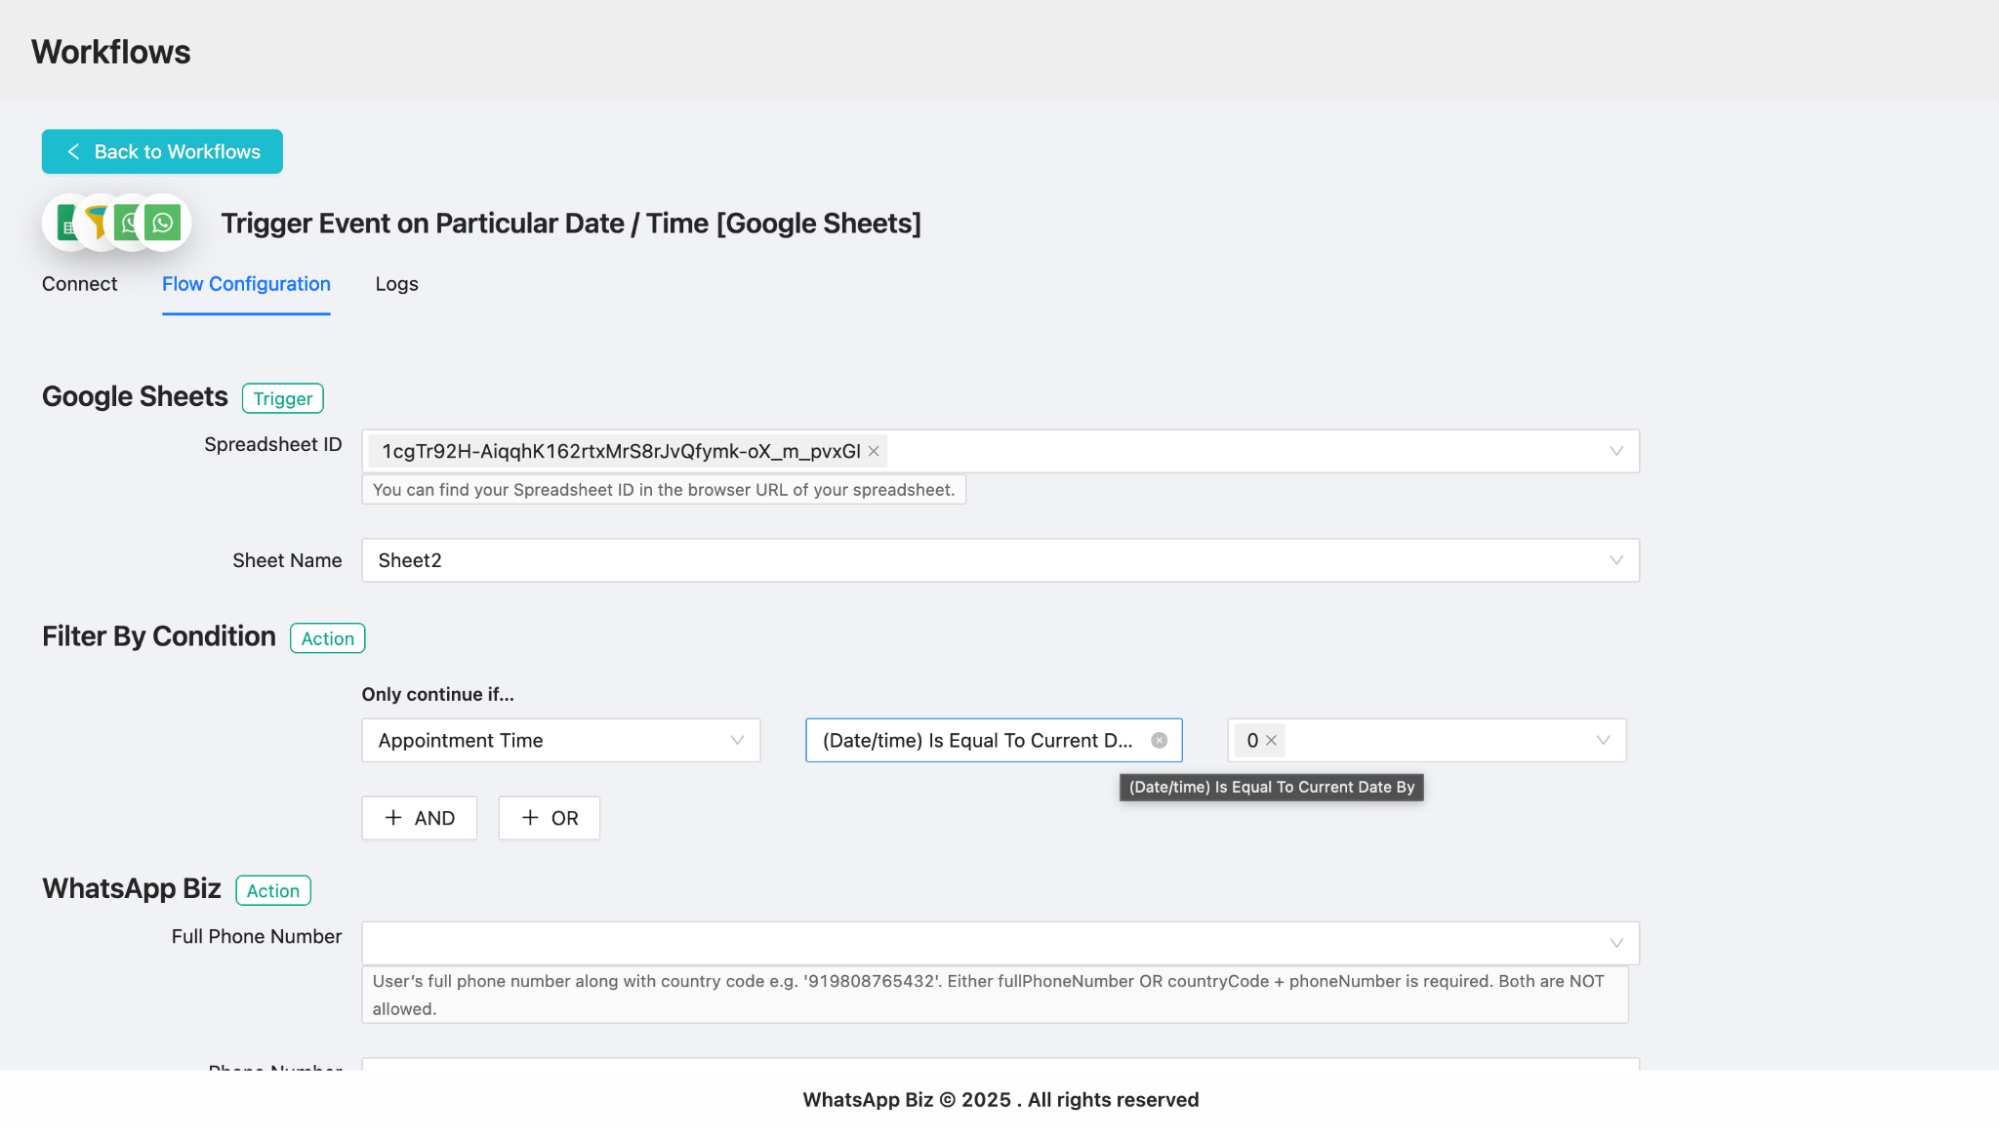
Step 5: Configure Date-Time Filter Conditions
The date-time filter is what makes this workflow powerful – it allows you to specify exactly when messages should be sent based on the dates in your spreadsheet.
In the flow configuration, locate the Filter by Condition section. This is where you define the logic for when messages should trigger.
Click to add a filter condition. You’ll see options to select which column to filter on – choose your Appointment Time column.
Now configure the condition logic. Common scenarios include:
Send reminders before an appointment: Set the condition to “Date time is equal to current date with future minutes by 45” (or any number of minutes/hours before). For example, if an appointment is scheduled for 12:00 PM, this condition with 45 minutes would trigger a message at 11:15 AM.
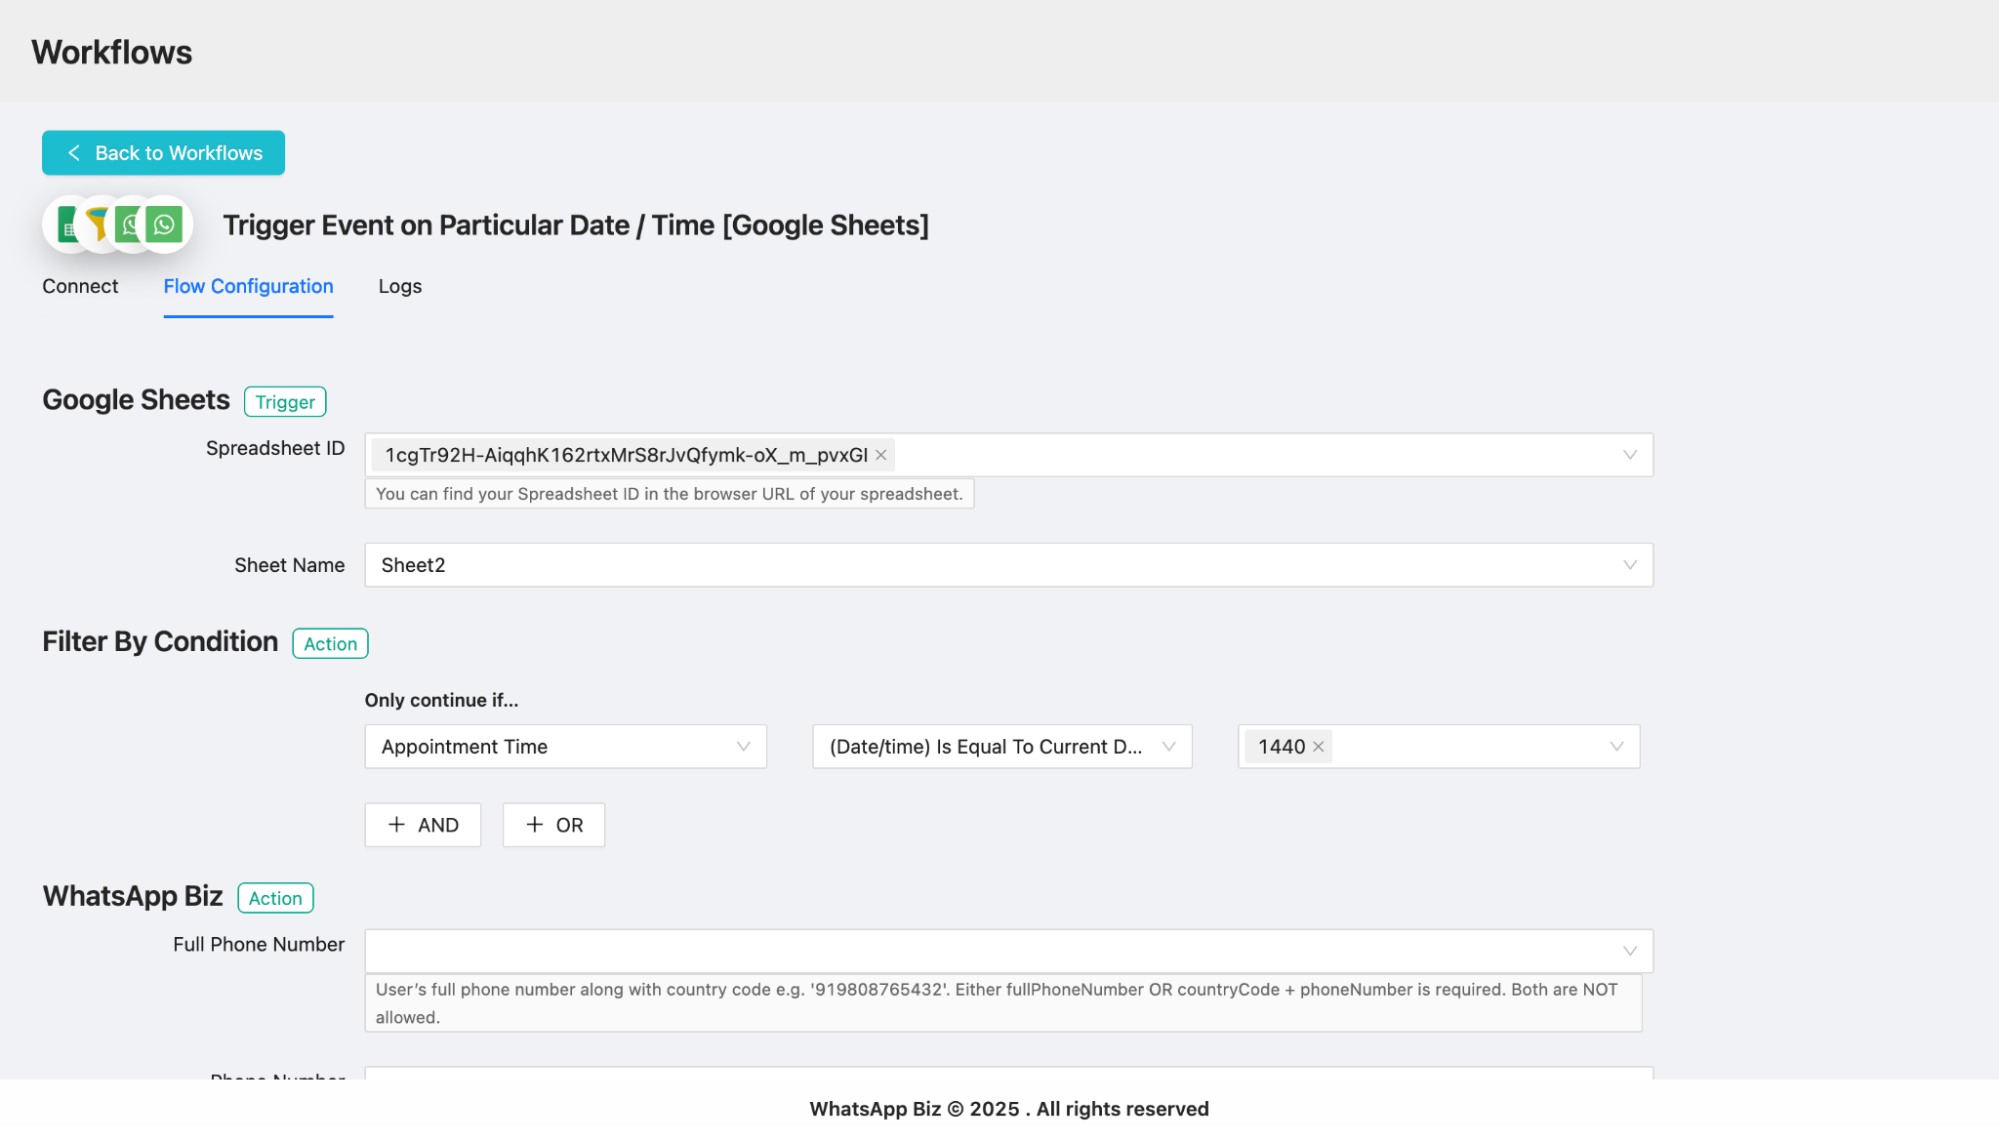
Send notifications on the exact date: Set the condition to “Date time equals current date by“. For Example: If you want to send a Birthday wishes, this condition with 0 value ensures that the event will be triggered when the current Date matches the Date mentioned in the sheet.
Send follow-ups after an event: Use conditions like “Date time is equal to current date with past minutes by 1440” to send messages one day after an appointment.
The condition format typically follows this pattern: select the column (Appointment Time), choose the comparison operator (equals, greater than, etc.), and specify the time offset (e.g., 45 minutes before, 1 day after).
Note: In case you want to send messages after or before a particular Date and Time, you will need to pass the values in minutes. You can convert hours/days to minutes and mention the value in the last field.
Step 6: Map Phone Number and Custom Fields
With the date-time condition configured, now map the fields from your Google Sheet to your message template.
Map the Phone Number field by clicking the mapping button and selecting the column containing phone numbers. Similarly, map the Country Code field by selecting the appropriate column.
If you have the phone number and country code combined in a single column, you can map both fields to the same column, and the system will parse the data accordingly.
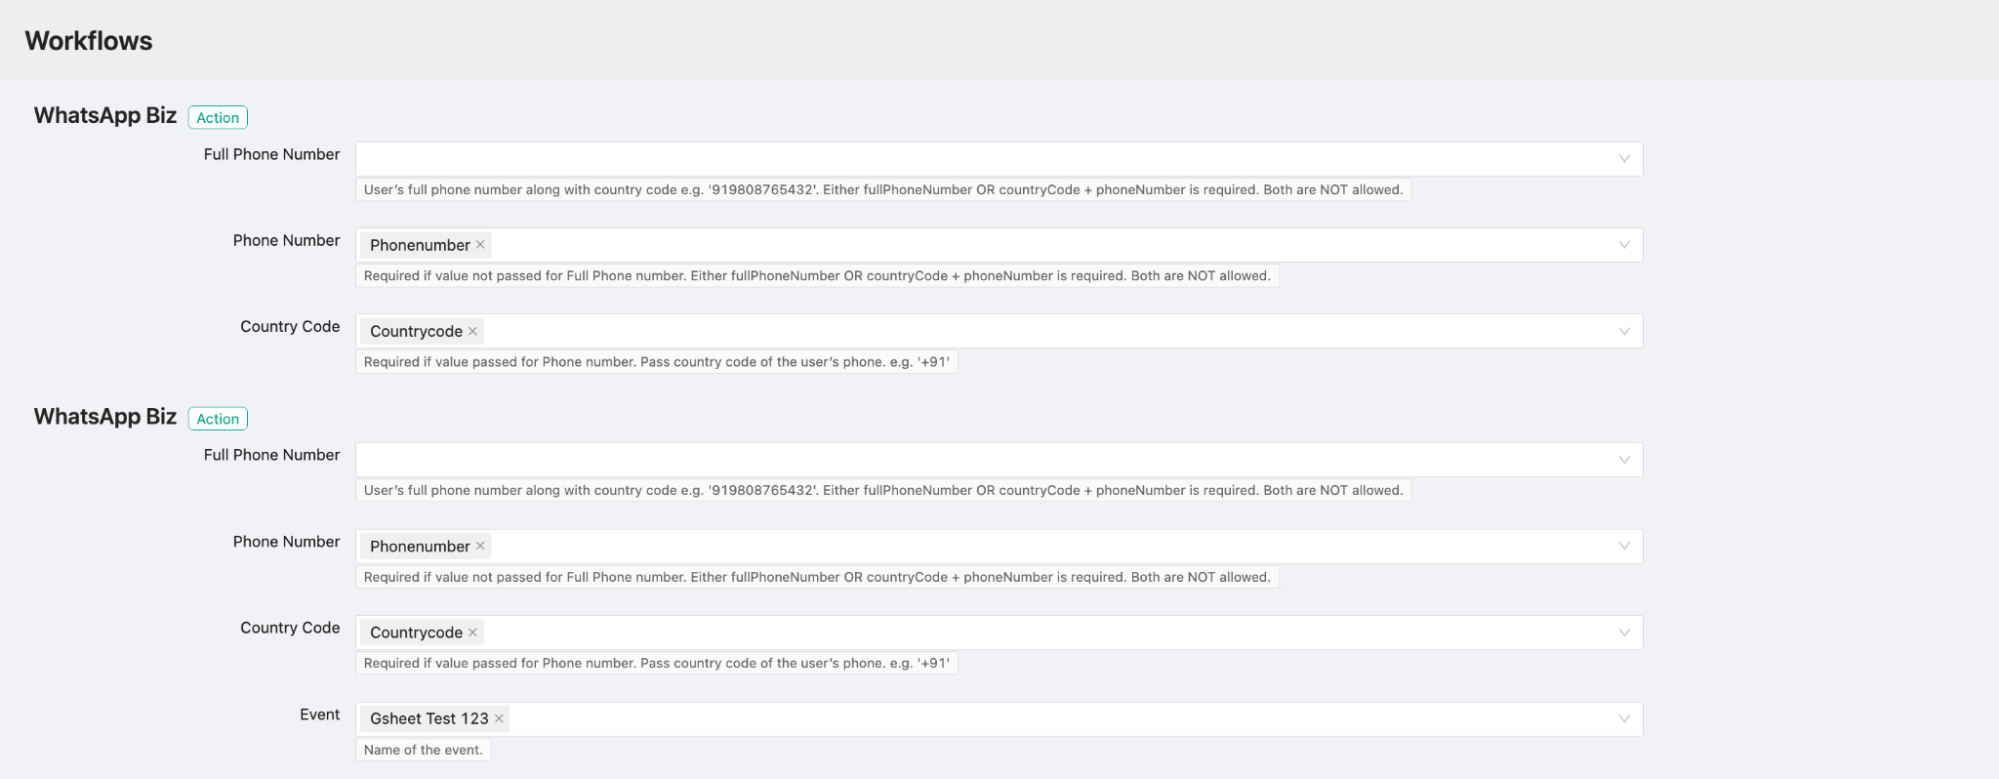
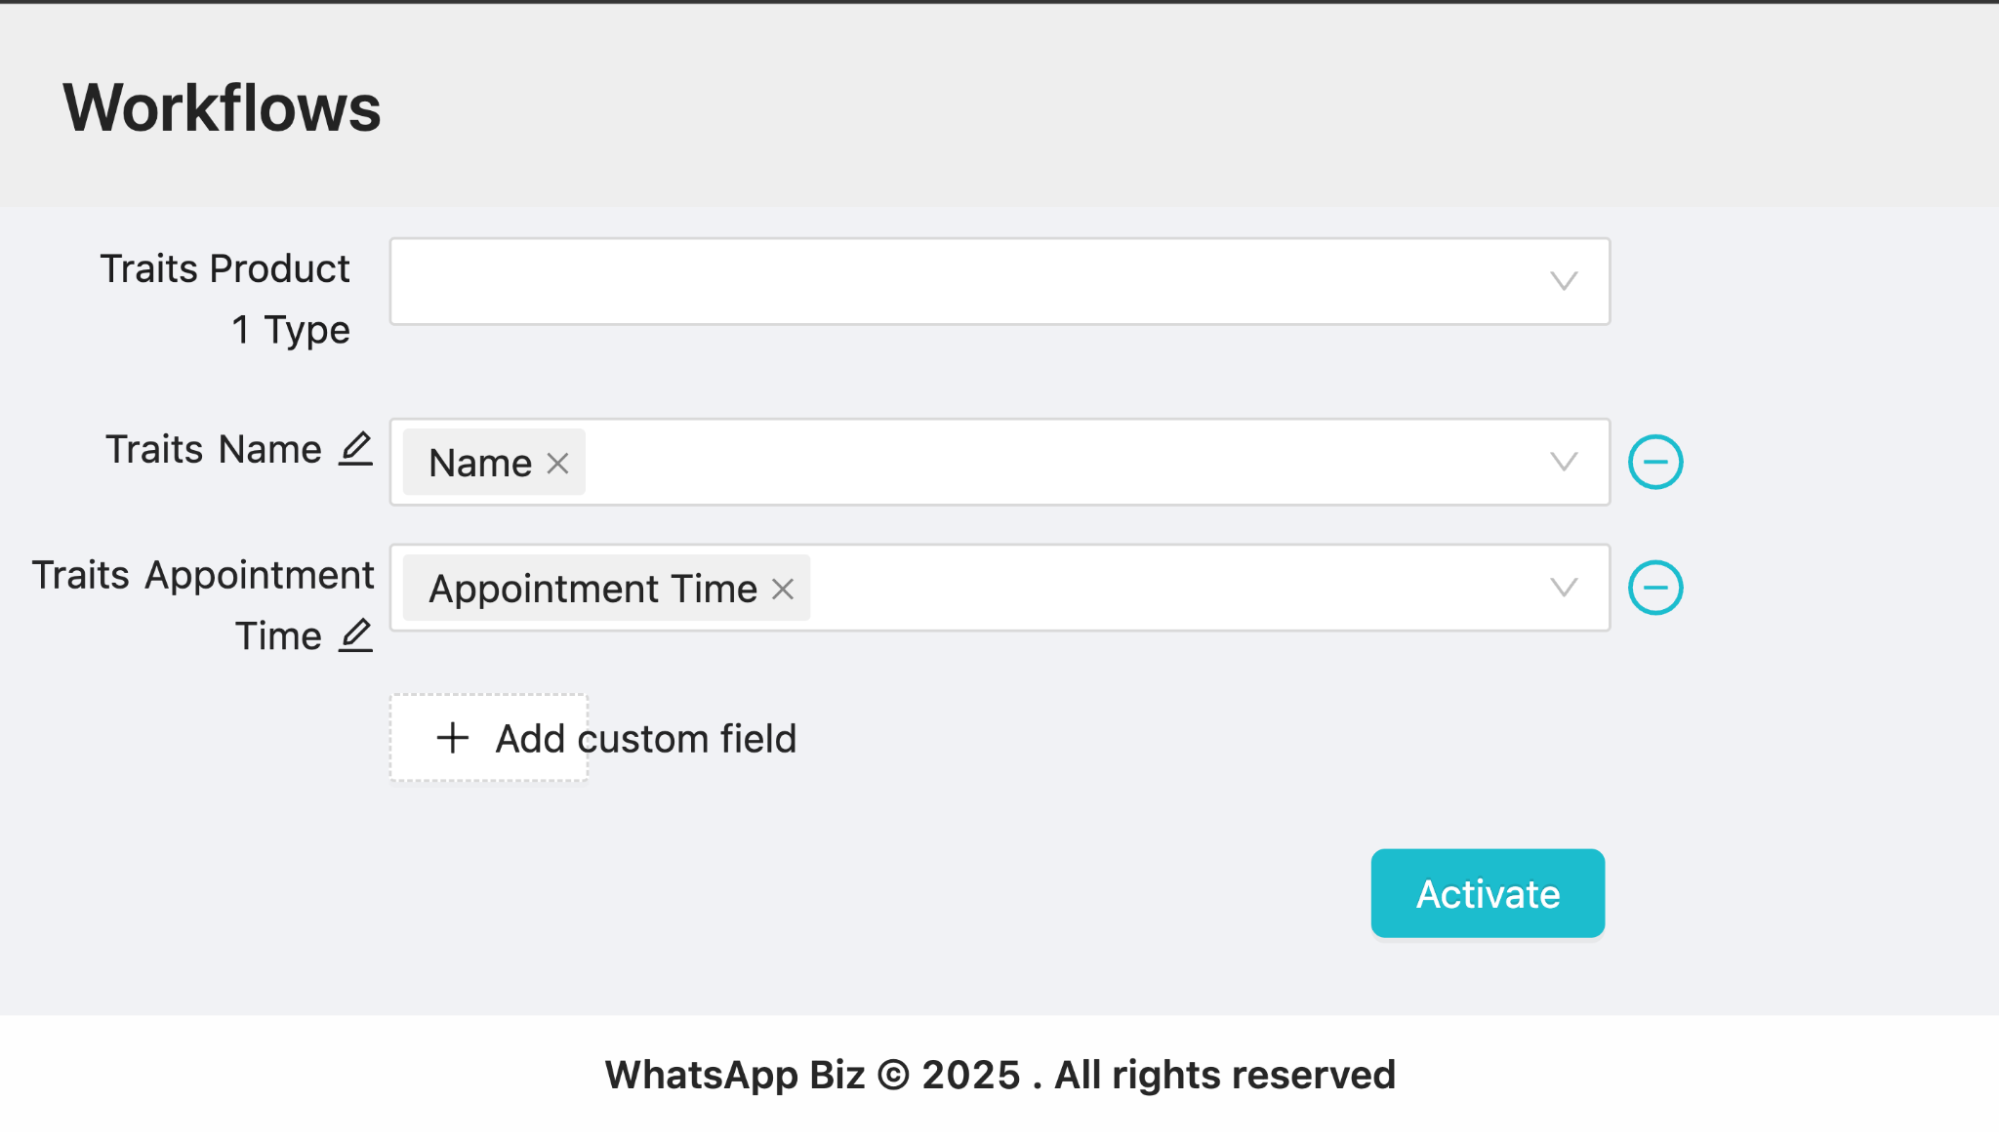
Next, add Custom Fields that you want to include in your WhatsApp message. Click Add Custom Field and select fields like:
- Name: Map to your customer name column to personalize the message
- Appointment Time: Map to your appointment time column to include the scheduled time in the message
- Any other relevant fields from your spreadsheet that correspond to variables in your WhatsApp template
Each custom field you add will be available to use as a variable in your message template, allowing for rich personalization.
Step 7: Set Frequency and Activate
Configure how frequently the system should scan your Google Sheet to check for matching date-time conditions. Click the Frequency setting and select an interval. The minimum is 5 minutes.
For appointment reminders, a frequency of 5-10 minutes ensures timely delivery without excessive API calls. For less time-sensitive scenarios, you can choose longer intervals.
After setting the frequency, review all your configuration settings: Spreadsheet ID, sheet selection, date-time filter conditions, field mappings, and frequency interval. Verify everything is correct.
Click Save to save the configuration, then click Activate to enable the workflow. You’ll receive a confirmation message that the workflow has been activated successfully.
Step 8: Testing and Monitoring
Testing the date-time workflow requires careful planning since it depends on specific time conditions being met.
To test the workflow, add a test row to your Google Sheet with an appointment time that will match your filter condition soon. For example, if your condition is “45 minutes before appointment time,” create a test entry with an appointment time 45 minutes from now.
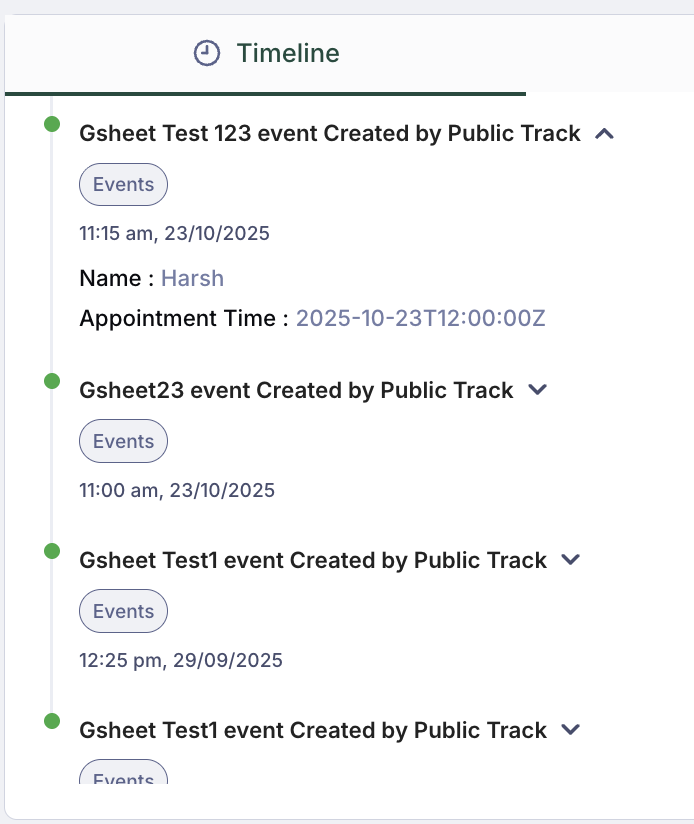
Navigate to the Logs section in the workflow settings to monitor execution. Initially, you may see errors in the logs showing that no rows matched the condition – this is normal when the date-time conditions haven’t been met yet.
When the current time reaches the point where your filter condition is satisfied, the workflow will execute. For instance, if you have an appointment scheduled for 12:00 PM with a 45-minute advance reminder, at 11:15 AM the system will detect the match and trigger the event.
In the logs, you’ll see a successful execution entry showing the event was triggered. The log will display details including the time of execution, the matched row data, and confirmation that the message was sent.
Check the recipient phone number to verify the Event was received with the correct personalized information from your spreadsheet.
For the Event based workflow, you can check whether the Event was created or not by searching for the customer’s number in the “Contacts Section”
Once the Event is visible, you can set up Automated Ongoing Campaigns which can trigger based on the Event created from the Trigger Event Google Sheet workflow.
You can know more about Ongoing Campaigns here
Monitoring Campaign Performance and Analytics
Once your workflows are active, Interakt provides comprehensive analytics to track performance and optimize your messaging campaigns.
Accessing Campaign Statistics
To view detailed statistics for your Google Sheets integration campaigns, navigate to Campaigns in your Interakt dashboard. Then click on API Campaigns to see all campaigns triggered through integrations and API calls.
Locate your campaign by the campaign name you assigned during setup (e.g., “GSheet 12345” or “Test123”). Click on the campaign name to open detailed analytics.
The analytics dashboard may take a few minutes to update after messages are sent, so refresh the data if metrics don’t immediately appear. These insights enable you to refine your messaging strategy, identify optimal send times, and improve template content based on actual performance data.
Best Practices and Tips
Spreadsheet Management
Use clear column headers: Name your columns descriptively (e.g., “Customer Name,” “Mobile Number,” “Country Code”) to make field mapping intuitive and reduce configuration errors.
Maintain data consistency: Ensure phone numbers follow a consistent format throughout your sheet. Either include country codes in the phone number column or use a separate country code column, but be consistent.
Validate date formats: For date-time workflows, always use the YYYY-MM-DD HH:MM format for appointment times. Inconsistent date formats will cause the filter conditions to fail.
Add data validation: Use Google Sheets’ data validation features to ensure users enter phone numbers and dates in the correct format, preventing integration errors.
Template Design
Create meaningful templates: Design WhatsApp message templates that are clear, concise, and provide value to recipients. Remember that all templates must be approved by WhatsApp before use.
Use variables effectively: Incorporate personalization by using template variables for customer names, dates, order numbers, or other dynamic information. This increases engagement and makes messages feel personal rather than automated.
Include clear call-to-actions: If appropriate for your use case, add buttons or calls-to-action in your templates to drive specific customer behaviors like booking confirmations or order tracking.
Test templates before full deployment: Always test new templates with a small audience or internal team members before sending to your entire customer base.
Workflow Configuration
Start with longer intervals: When first setting up a workflow, begin with longer check intervals (like 15-30 minutes) to monitor system behavior and avoid excessive API calls. You can reduce the interval once you’re confident the workflow is functioning correctly.
Use descriptive campaign names: Choose campaign names that clearly indicate the purpose, date, or data source (e.g., “October2025_NewLeads_GSheet” rather than “Campaign1”). This makes tracking and analysis much easier.
Set up separate workflows for different purposes: Rather than trying to handle multiple use cases in one workflow, create dedicated workflows for different message types (e.g., one for order confirmations, another for appointment reminders). This provides clearer analytics and easier troubleshooting.
Troubleshooting Common Issues
Authentication Problems
“Invalid API Key” Error: If you receive an error stating your API key is invalid, verify that you copied the entire key from Settings > Developer Settings without any extra spaces or characters. Try regenerating your API key if the problem persists.
Google Account Connection Fails: Ensure you’re selecting the correct Google account that owns or has edit access to your target spreadsheet. If authentication continues to fail, try logging out of all Google accounts in your browser and sign in again with only the required account.
Configuration Errors
Spreadsheet Not Found: This error occurs when the Spreadsheet ID is incorrect. Double-check that you copied the entire ID from the URL between /d/ and /edit with no extra characters.
Sheet Names Not Appearing: If the integration doesn’t display your sheet tabs after entering the Spreadsheet ID, verify that the Google account you authenticated has permission to access the spreadsheet. Also confirm the Spreadsheet ID is correct.
Field Mapping Issues: If mapped fields aren’t populating correctly in messages, ensure your column headers in Google Sheets exactly match what you selected during configuration. Column names are case-sensitive in some systems.
Message Delivery Problems
Messages Not Sending: If workflows are active but messages aren’t being sent, check the logs for error messages. Common causes include invalid phone numbers, unapproved WhatsApp templates, or incorrectly formatted data in your spreadsheet.
“Template Not Found” Error: This indicates the WhatsApp template you selected has been deleted or is no longer approved. Go to your WhatsApp Business Manager to verify the template status and reselect an active template in your workflow configuration.
Wrong Message Content: If messages are sending but contain incorrect information, review your field mapping configuration. Ensure each template variable is mapped to the correct column in your Google Sheet.
Date-Time Workflow Issues
Events Not Triggering at Expected Time: For date-time workflows, verify that your appointment time column uses the exact format YYYY-MM-DD HH:MM. Also check that your filter condition logic is correct – for example, “45 minutes before” should use “future minutes by 45,” not “past minutes”.
Too Many or Too Few Triggers: If you’re getting duplicate messages or messages at wrong times, review your frequency setting and filter conditions. Ensure the condition logic matches your intended behavior.
“No Rows Match Condition” in Logs: This is normal when no rows in your sheet currently satisfy the date-time filter condition. Messages will only send when the condition is met. If you believe rows should match but don’t, verify your date format and condition logic.
Performance Issues
Slow Workflow Execution: If there’s a significant delay between adding a row and message delivery, check your frequency interval setting. Remember that the minimum check interval is 5 minutes, so there will always be at least that much delay.
Workflow Not Reading New Rows: Ensure new rows are being added at the bottom of your sheet, not inserted in the middle. Most integration triggers detect new rows added to the bottom of the spreadsheet.
If you encounter issues not covered here, consult Interakt’s support documentation or contact their customer support team, which offers premium support with rapid response times for troubleshooting.
Conclusion
The Google Sheets–Interakt integration offers a powerful no-code way to automate WhatsApp workflows—saving time, improving communication, and enabling personalization at scale. This guide covered two key setups: triggering messages when new rows are added and scheduling messages based on date/time for timely reminders.
Success depends on clean sheet data, a secured Interakt API key, and compliant WhatsApp templates. Configure field mappings carefully, set check frequencies, and test thoroughly before going live.
Once running, monitor analytics like delivery and read rates to refine your strategy. Start with simple alerts and expand to advanced workflows as you grow. Whether for support, order updates, reminders, or lead engagement, this integration turns your spreadsheet into a smart communication hub—boosting efficiency, customer experience, and business growth through WhatsApp automation.