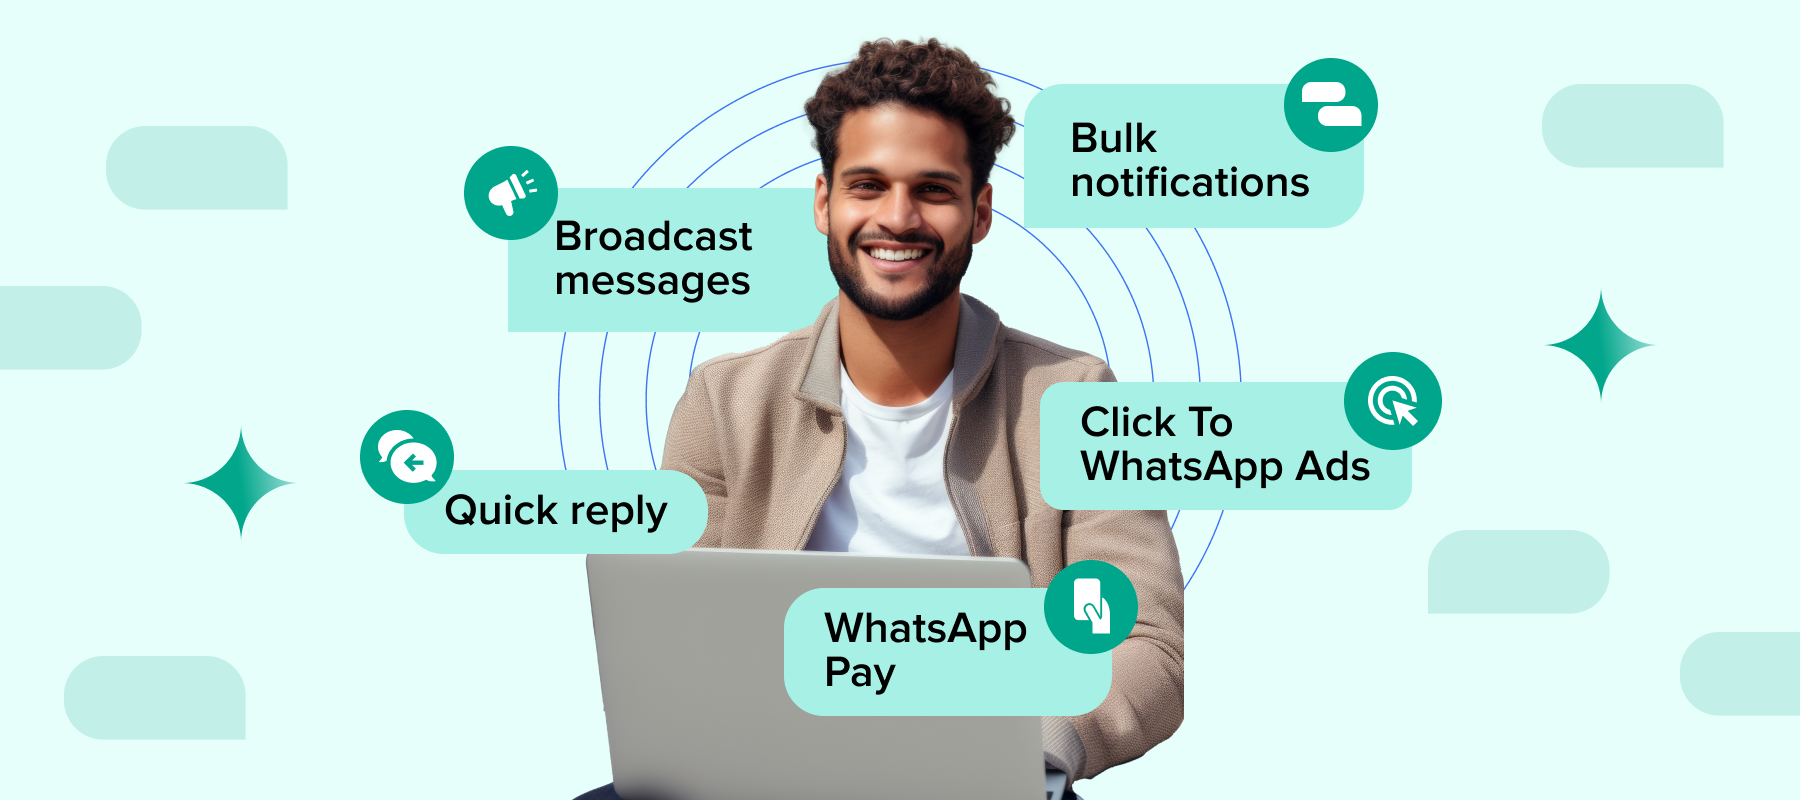
Click to WhatsApp ads are an advertising format on Facebook and Instagram that combines the strengths of both social media and WhatsApp messaging. These ads have a “WhatsApp” button as the call-to-action, rather than a conventional website link, to bridge the two together.
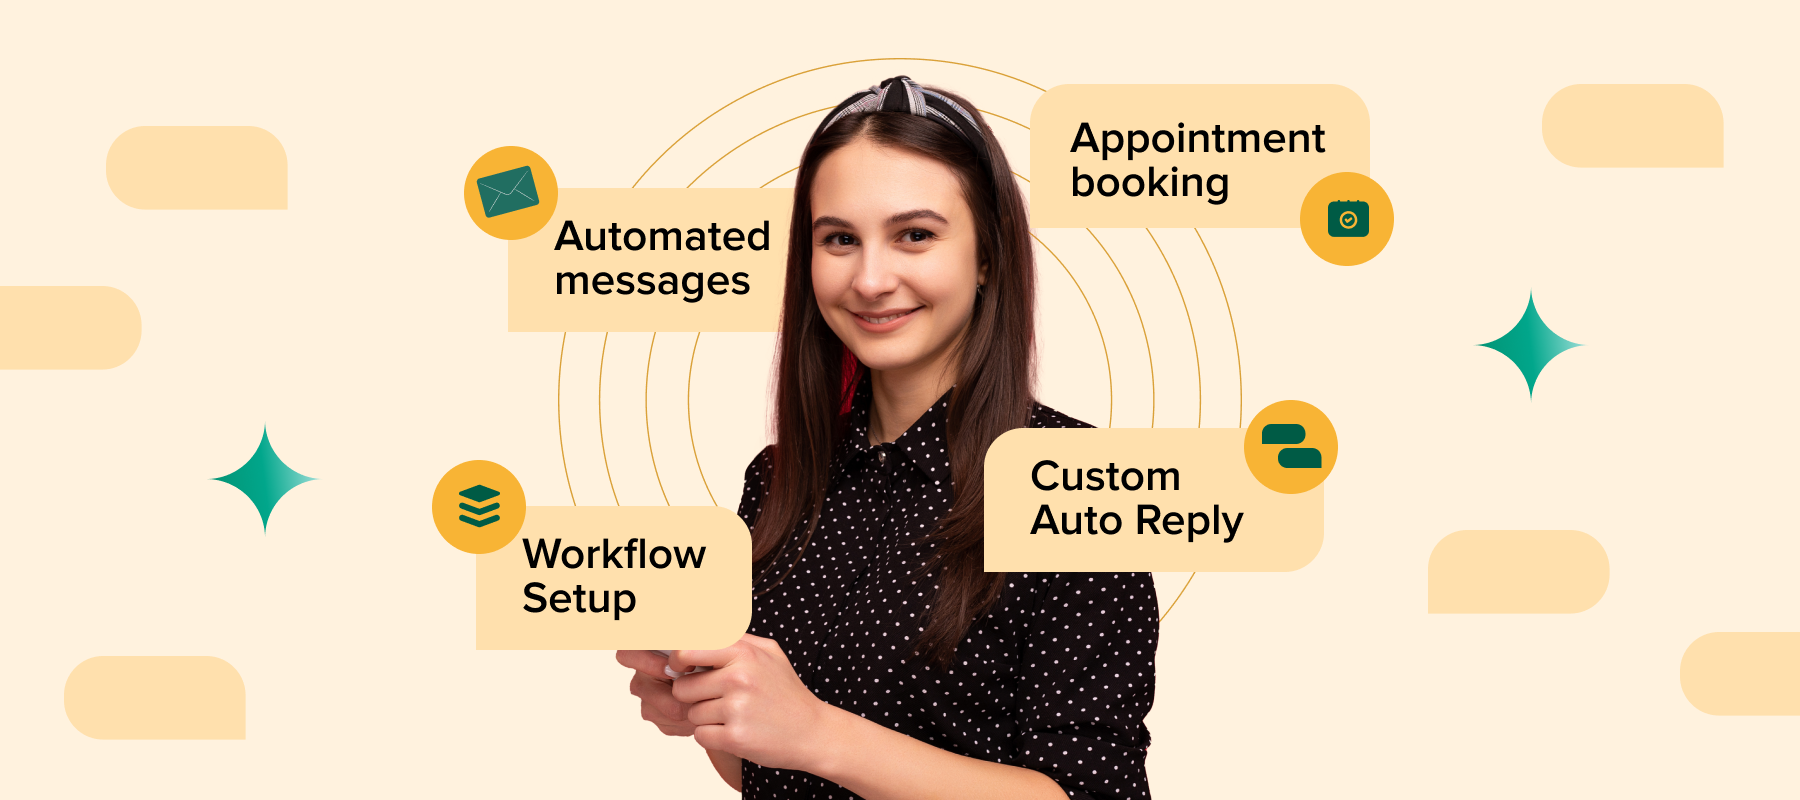
Running Click to WhatsApp (CTWA) ads just got simpler. With Interakt’s CTWA Ad Launcher, you can now create and manage WhatsApp ads without needing a Meta Ads Manager, technical know-how, or multiple tools.
Why Use Interakt’s CTWA Ad Launcher?
Running Click to WhatsApp (CTWA) ads can be a powerful way to generate leads, but the traditional process is often complex, especially for small and mid-sized businesses. Here’s how Interakt simplifies it for you:
Traditional Challenges
-Manual Setup of Meta Ads Manager
Before you can even create an ad, you need to set up a Meta Business Manager and Ads Manager — a process that involves multiple steps, technical approvals, and often requires help from an expert.
-Confusion around Chat Flows Integration
Even if you manage to launch a CTWA ad, connecting it to a WhatsApp chatbot is not straightforward. Most platforms don’t offer a native way to link your ad to a chat flow, leading to lost leads and poor customer experience.
-No Visibility of Ad Metrics within a single platform
Ads created on Meta platforms remain disconnected from other platform. You can’t track leads, performance metrics, or manage your campaigns unless you jump between tools — making it hard to optimize or measure impact.
What Interakt’s CTWA Ad Launcher Solves
-Auto-Creates Meta Ad Accounts
No ads manager? No problem. Interakt will automatically create a Meta Ads Manager Account for you in the background — saving time and avoiding errors during setup.
-End-to-End Ad Creation on Interakt
You don’t need to leave Interakt to run WhatsApp ads. Everything from ad copy, creatives, audience targeting to budget setting can be done from a single, guided interface.
-WhatsApp Chatbot Integration & Conversion Tracking — Built Right In
Easily design and link a WhatsApp chatbot to your ad during setup — so every lead who clicks your ad is instantly engaged in an automated conversation. This boosts engagement and reduces the need for manual follow-ups.
You can also define and track key conversion events, and pass them back to Meta for better ad performance insights.
-Unified Dashboard for All CTWA Ads
Track and manage all your CTWA ads — even those created outside Interakt — as long as they’re tied to the same Facebook page. Get complete visibility into leads, spends, clicks, and conversions without switching tabs.
With Interakt’s CTWA Ad Launcher, the entire process of running high-performing WhatsApp ads is simplified, automated, and optimized — making it easier than ever for businesses to convert ad clicks into conversations.
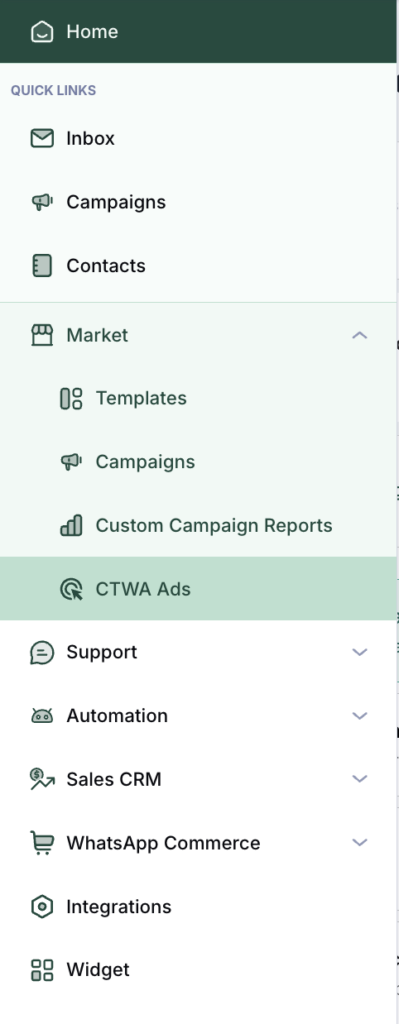
Step-by-Step Guide to Create/Connect Facebook Business Page & Meta Ads Manager
Navigate to the Ads Section
Login to Interakt and go to Market > CTWA Ads section
Here’s a detailed step-by-step guide to help you run Click-to-WhatsApp (CTWA) ads directly from Interakt, tailored for different scenarios—whether you already have a Meta Ads Manager or need one created through Interakt. This guide will walk you through each setup path to ensure your ads are successfully launched and connected to WhatsApp.
Scenario 1: You already have a Meta Ads Manager A/c & a Facebook Business page
1. Go to CTWA Ads Homepage on Interakt.
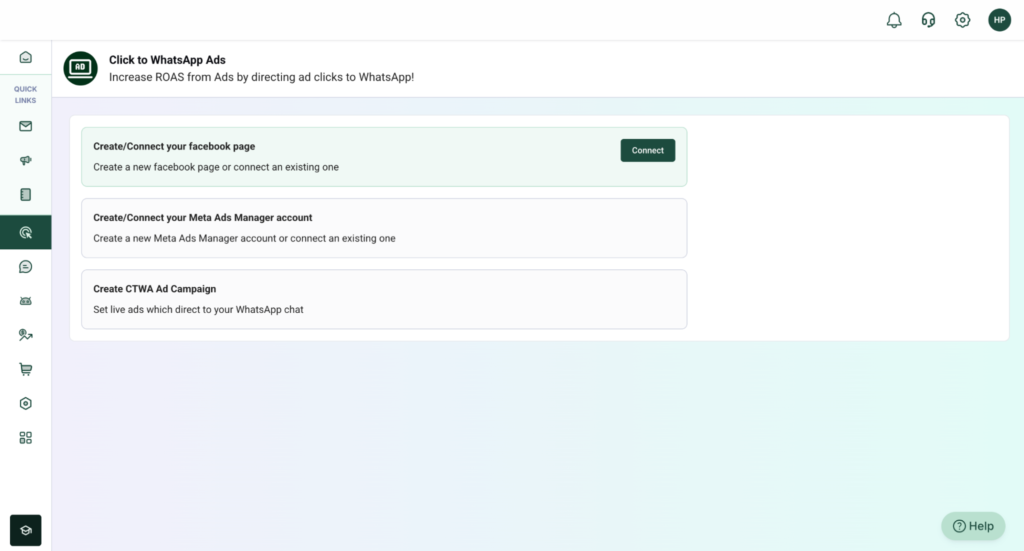
2.Click the “Connect” button.
3.When prompted “Do you already have a Page for your business?”, select “Yes”.
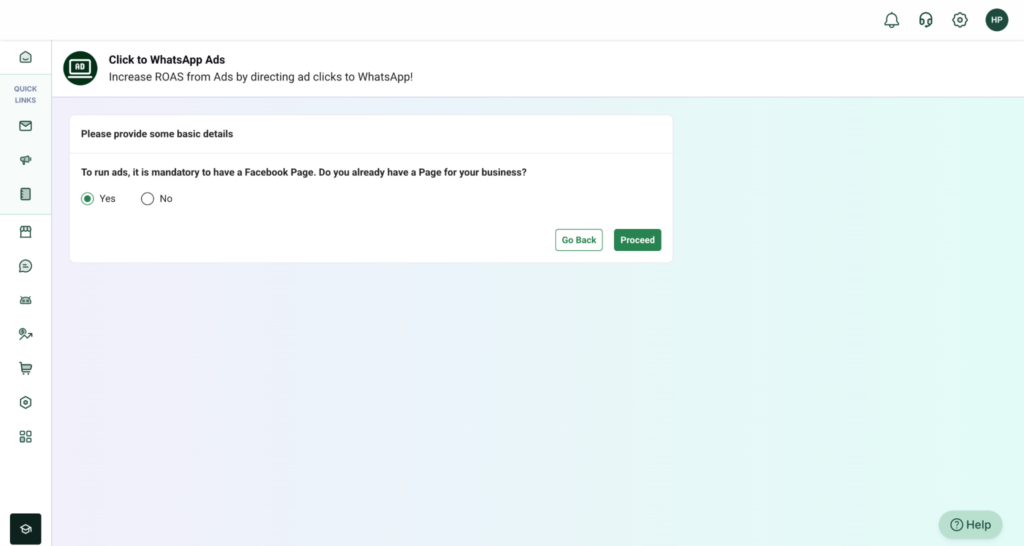
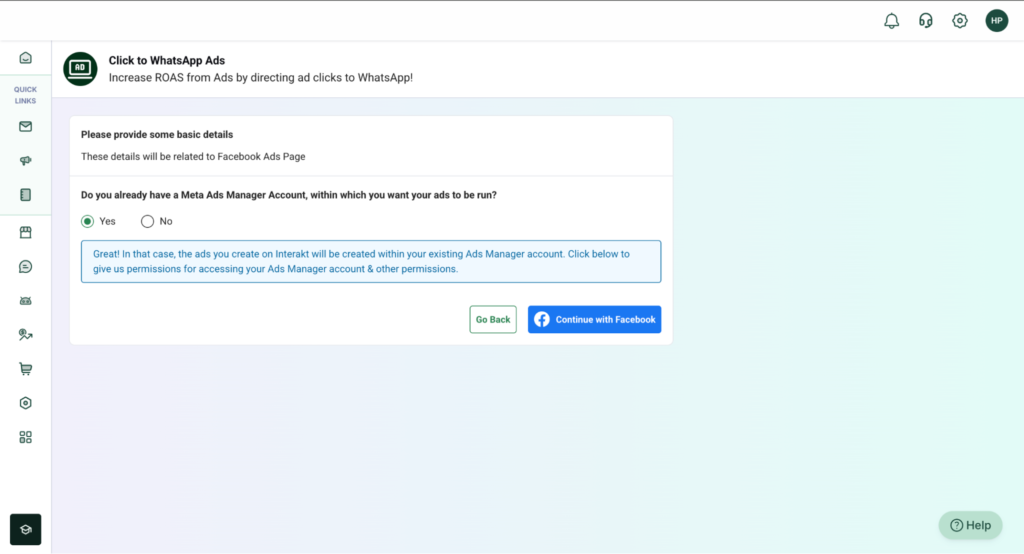
4.On the next step, you’ll see “Do you already have a Meta Ads Manager Account, within which you want your ads to be run?”
-If you have one, select “Yes” and click “Continue with Facebook”.
5.A Facebook login popup will appear. Log in using your Facebook credentials.
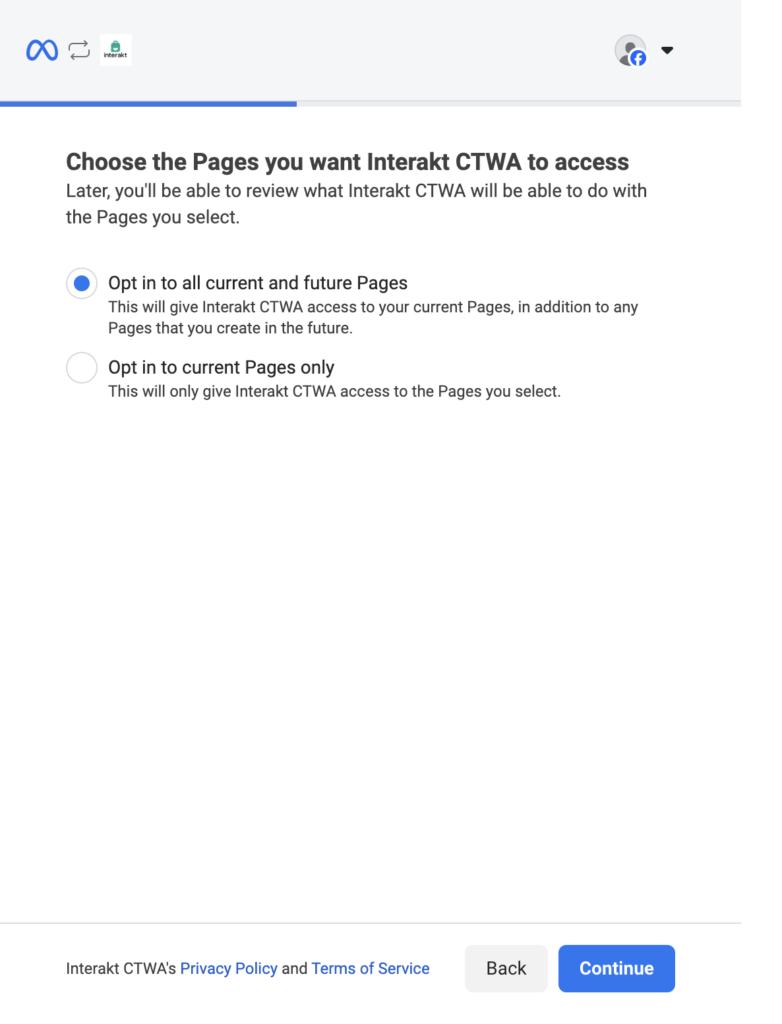
6.You’ll be asked to grant permissions for:
-Facebook Pages
-Business Account
-Instagram Account
✅ Make sure to Opt in to all current and future Pages, Businesses and Instagram & grant all permissions and click “Save”.
7. Interakt will now fetch your:
-Business Pages
-Meta Ads Accounts
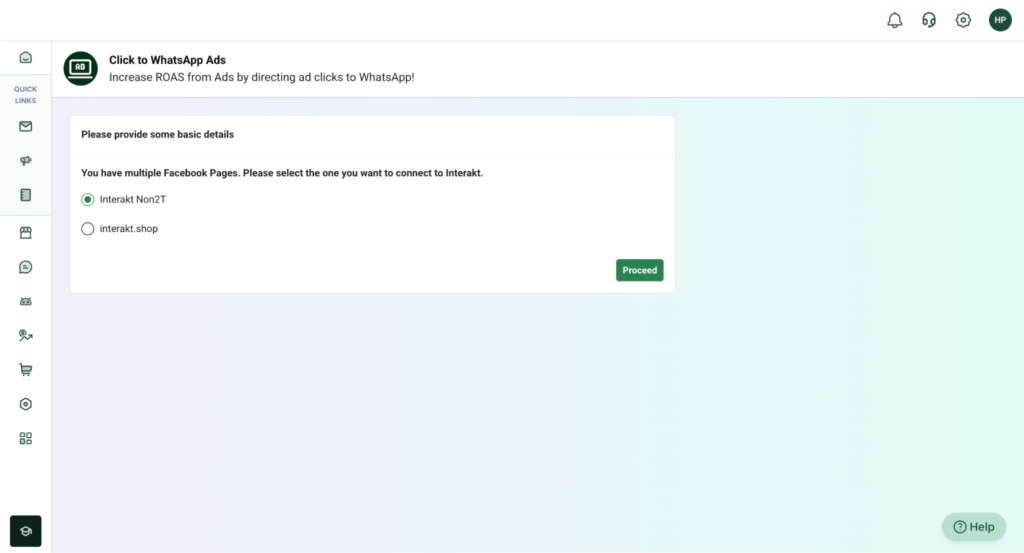
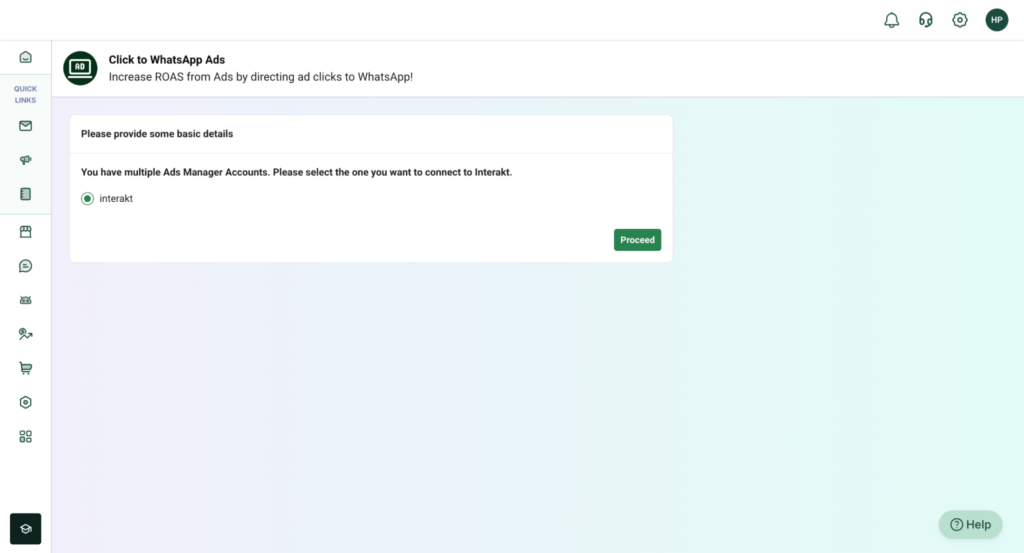
8. Select the correct Page and Ad Account you want to connect and hit Proceed
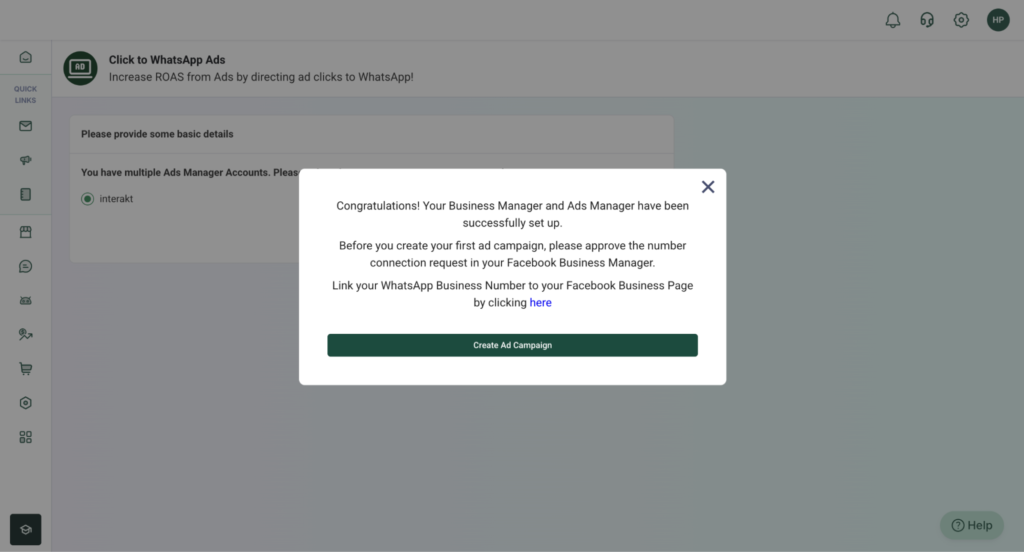
🎉Your Facebook Business Page and Meta Ads Account are now connected to Interakt, and you can start running ads.
Scenario 2: You don’t have a Meta Ads manager nor do you have a FB Business Page.
1.Head to the CTWA Ads Homepage on Interakt.
2.Click the “Connect” button.
3.When prompted “Do you already have a Page for your business?”, select “No” & Tap on the “Create Facebook Page” CTA button.

4.Fill in the following details to create your Page:
-Page Name
-Page Description
-Page Category
-Profile Picture
-Cover Image
-Business Location & Address

5.Once all fields are filled, click on “Create Facebook Page” (top-right corner).
6.Interakt will then prompt you to “Continue with Facebook”.

7. Log in to your Facebook account and grant all necessary permissions to allow Interakt to create your business page.
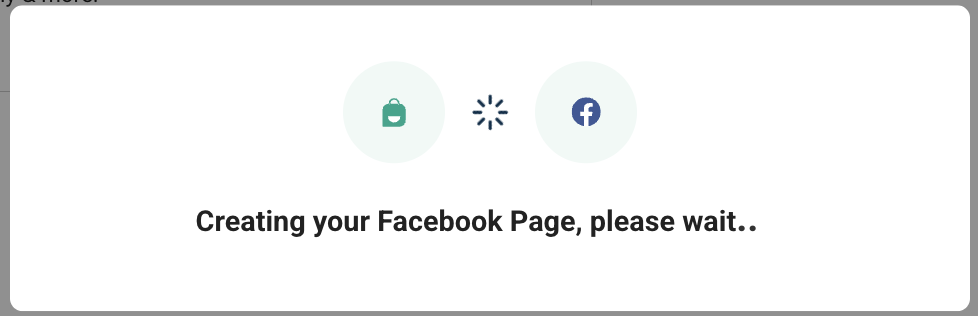
That’s it! You’ve now created and connected a new Facebook Page to Interakt.
Once your Facebook Business Page has been successfully created through Interakt, the next step is to set up your Meta Ads Manager. This is essential for running and managing Click-to-WhatsApp Ads directly from the Interakt platform.
Interakt simplifies this by creating the required Meta Ads Manager Account on your behalf.
⚠️ Important Note: Instagram Ads
If you plan to run ads on Instagram (in addition to Facebook) and you do not already have a Facebook Business Page:
Before creating the Ad Manager, make sure to:
- ✅ Have a Business or Professional Instagram Account
- 🔗 Connect that Instagram account to your newly created Facebook Business Page
Steps to Create Meta Ads Manager
– Click on the “Connect” button
You’ll find this next to “Create/Connect your Meta Ads Manager account” on the CTWA Ads setup screen.
-Log in using your Facebook credentials
Use the same Facebook account that you used to create your Facebook Business Page in the previous step.
Grant all required permissions
-A Facebook popup will request access to create and manage ads.
-Ensure you grant all permissions, including managing your business assets and running ads.
-Click “Save” to proceed.
That’s it! Interakt will now automatically create a Meta Ads Manager account so you can start creating and managing CTWA ads directly within Interakt.
Setting up Ad Destinations (WhatsApp & Instagram)
Connect Your WhatsApp API Number to Your Facebook Business Page
1.Log in to Facebook and click on your profile picture in the top right corner.
2.Click on “See all profiles” and switch to your desired Facebook Page.
3.Go to Settings & privacy → then click Settings.
4.In the left sidebar, scroll down to Permissions and click Linked accounts.
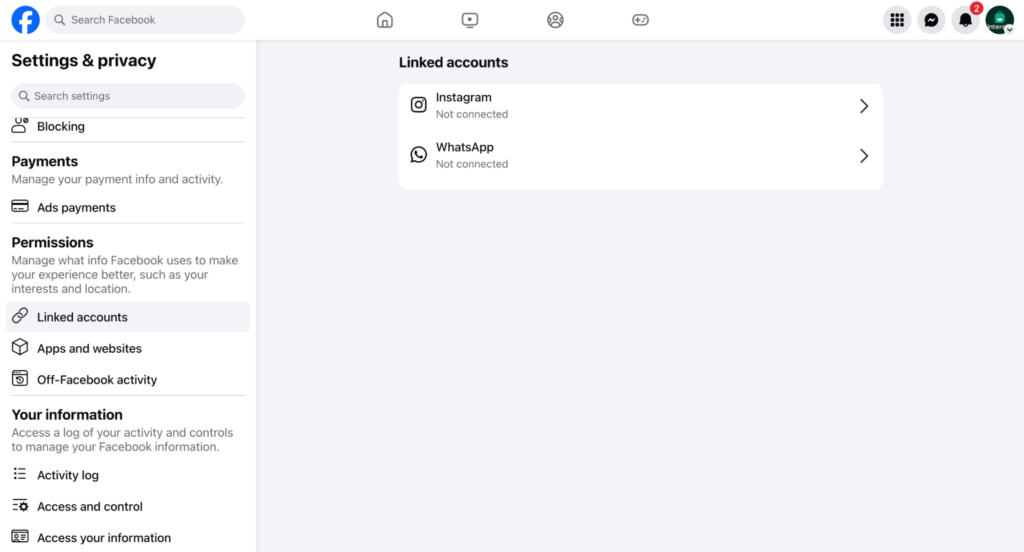
5. Click View next to WhatsApp.
🔔 Note: You’ll only see the WhatsApp option inside a Facebook Page — not in your personal profile.
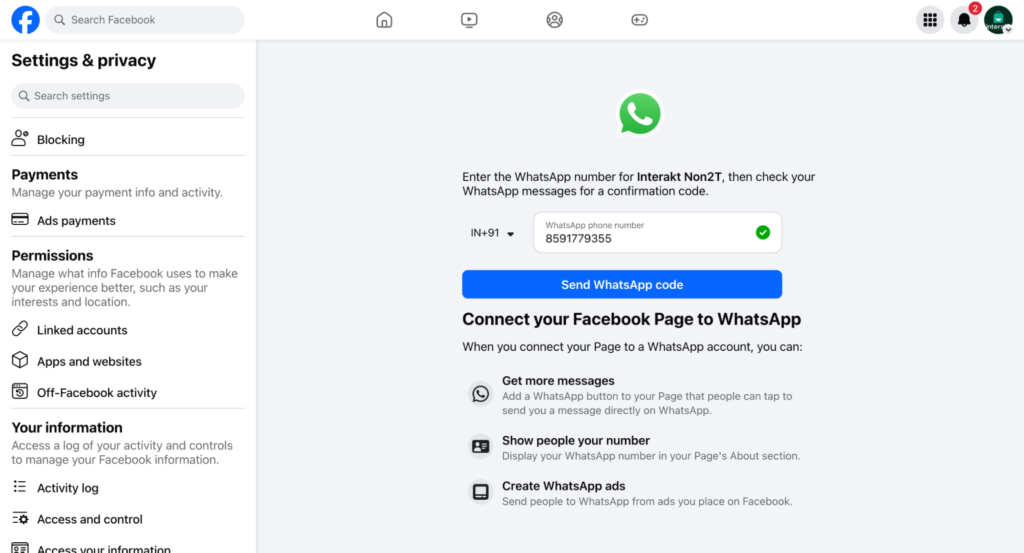
6. Select your country code and enter your WhatsApp Business API number (the number connected to Interakt).
7. Click Send WhatsApp code.
8.A request will be sent to the Facebook Business Manager who owns the WhatsApp API number.
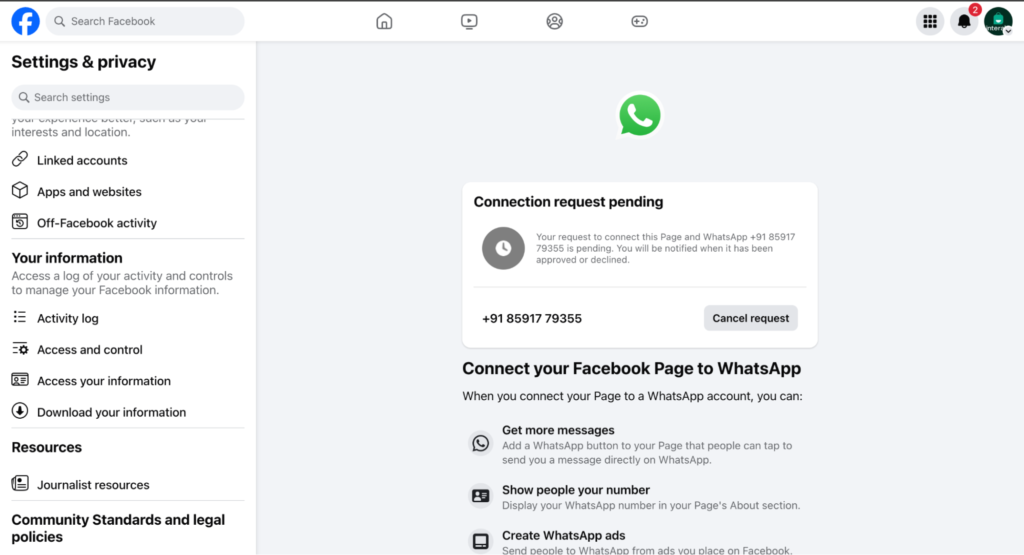
9. Go to Business Manager and approve the request.
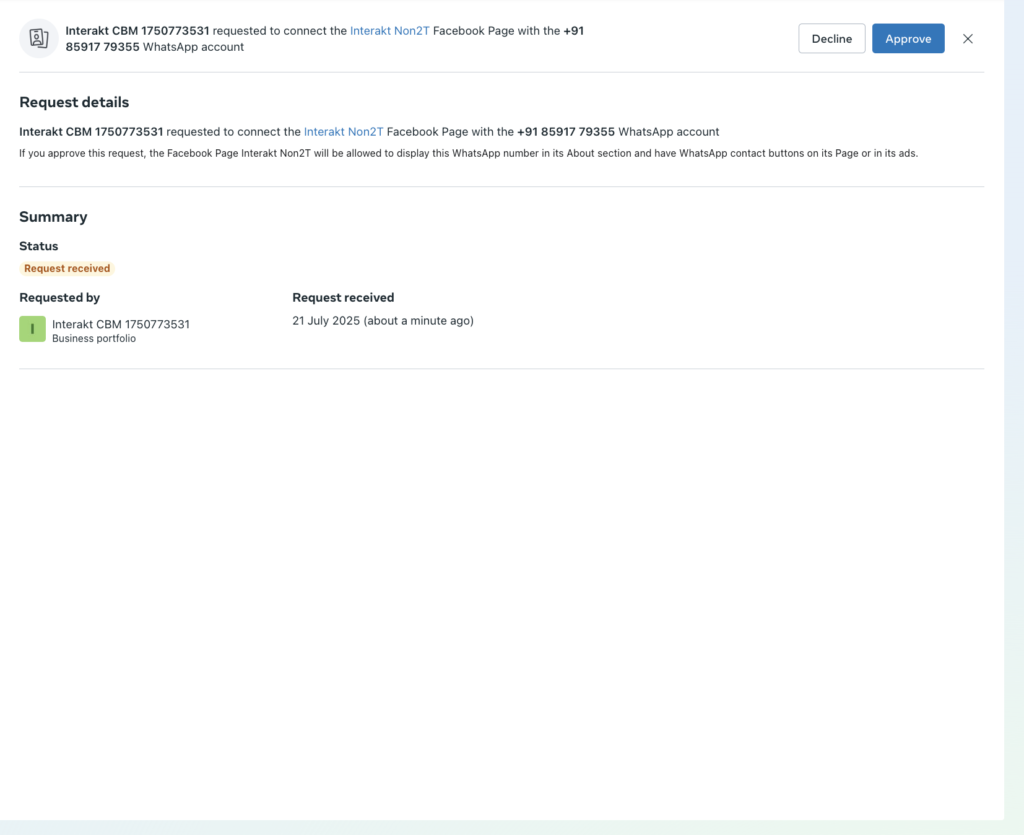
🎉 Your Facebook Page is now connected to your WhatsApp API number!
Connect Your Facebook Page to Your Instagram Business Account
1. Log in to Facebook, click on “See all profiles”, and switch to your Facebook Page.
2. Click your Page’s profile picture in the top right.
3. Navigate to Settings & privacy → then Settings.
4. Under the Permissions section, click Linked accounts.
5. Next to Instagram, click Connect.
6. Tap on Connect account and follow the on-screen steps to link your Instagram Business account.
⚠️ Only professional/business Instagram accounts can be connected.
Need to convert your personal IG to business? 👉 Learn how here

Once both WhatsApp and Instagram are linked to your Facebook Page, you’re all set to launch high-converting CTWA Ads from Interakt! 🚀
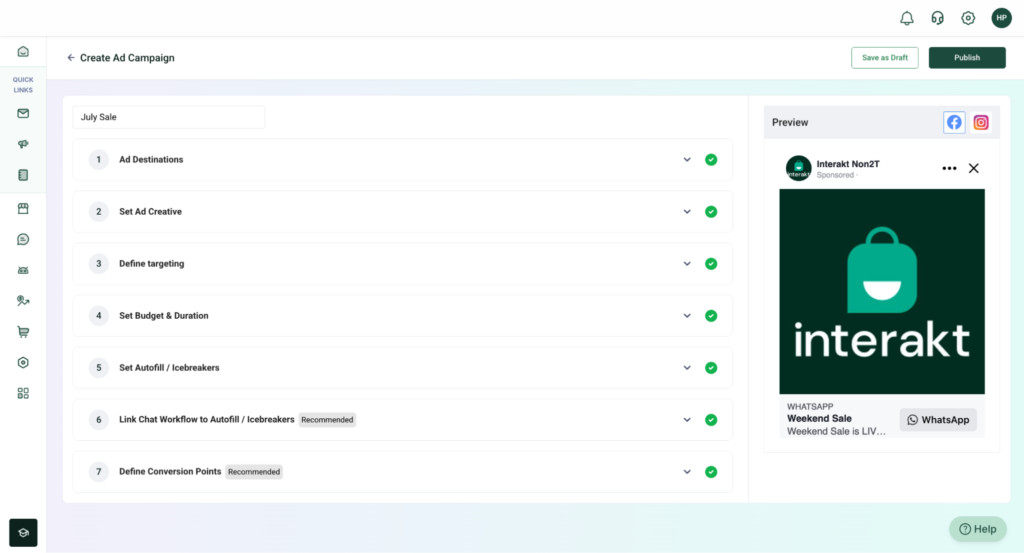
Step-by-Step Guide to Set Up & Publish CTWA Ad Campaign
1. Select Ad Destinations
Start by choosing where you’d like your ad to appear. By default, Facebook is selected as a destination. You can also choose to run the same ad on Instagram for added reach. This helps ensure your business gets visibility across Meta’s key platforms.
-Facebook (selected by default)
-Instagram (optional – you can enable/disable it)
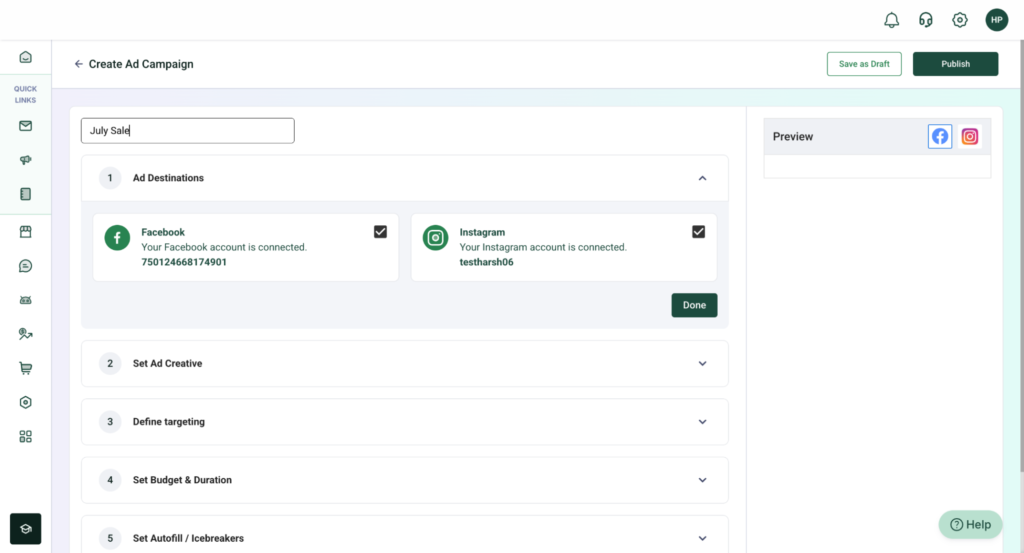
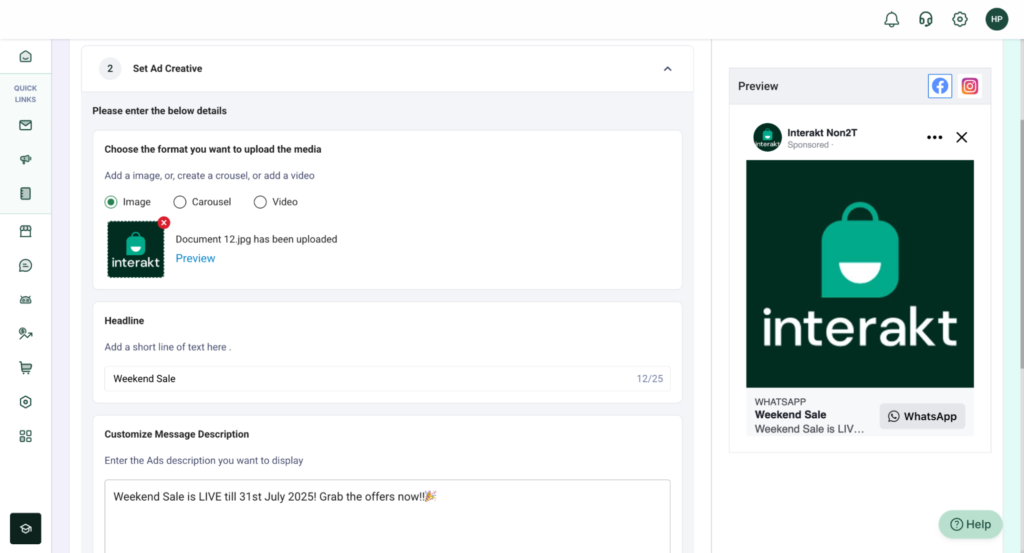
2. Set Ad Creatives
Your ad creative is what users will see — it needs to be attention-grabbing and relevant. Here, you’ll define:
-A Headline: Short and catchy message
-A Description: A bit more context or call-to-action
–Media: Upload an image, carousel, or video to make your ad stand out in the feed
Tip: Use high-quality visuals and clear messaging for best results.
Note: Max upto 10 carousel cards can be added
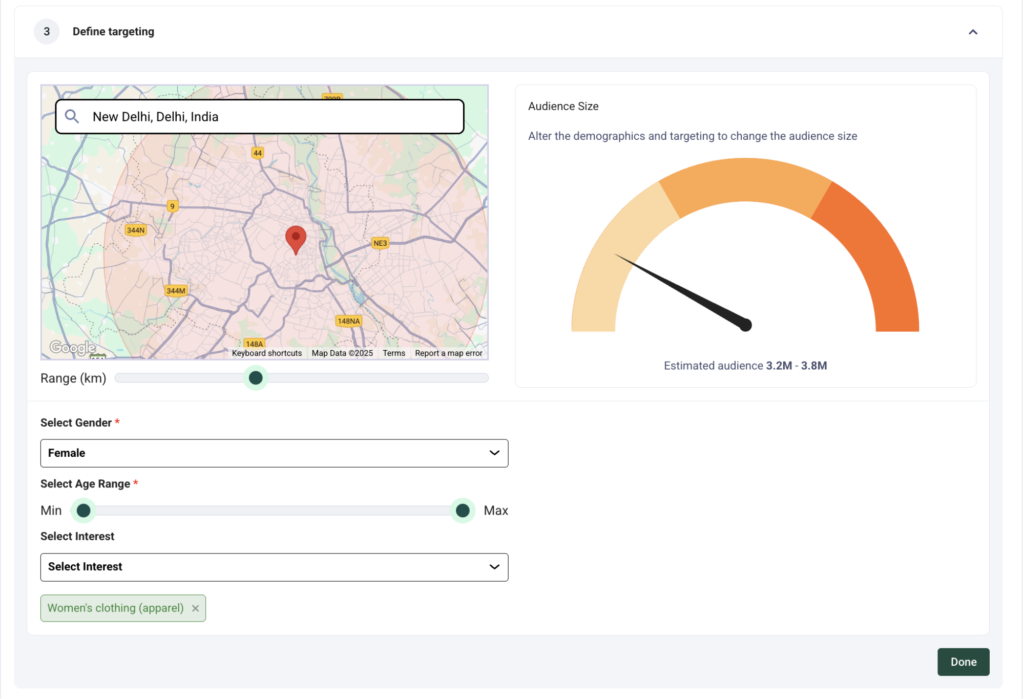
3. Define Your Target Audience
Targeting the right audience is key to ad performance.
Location Targeting:
-Search and select your target location (e.g., New Delhi)
-Adjust the radius around that location
Demographics (Optional):
-Gender
-Age range
-Interests
This ensures your ad reaches the most relevant customers likely to engage with your business.
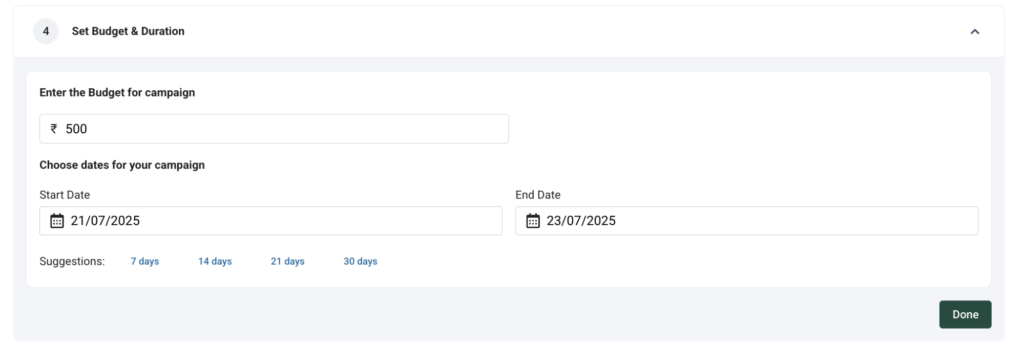
4. Set Budget & Ad Duration
This step determines how much you want to spend and for how long your ad will run.
Budget Options (Lifetime):
-Scenario 1 – Using your your existing Ad Manager A/c:
–The budget amount will be charged directly from the payment method linked to your Meta Ad Account.
The currency used will match the one configured in your Meta Ad Manager.
Scenario 2: Created a new Meta Ads Manager A/c via Interakt
In this case, the ad budget will be deducted from your Interakt Wallet balance.
Set Duration: Select the start and end dates for your campaign or choose a total number of days the ad should be active.
5. Add Prefilled Message or Ice Breakers
This defines how users will initiate the conversation when they click on your ad.
-Prefilled Message: A default message auto-filled in WhatsApp that users can send with a tap (e.g., “Hi, I’m interested!”).
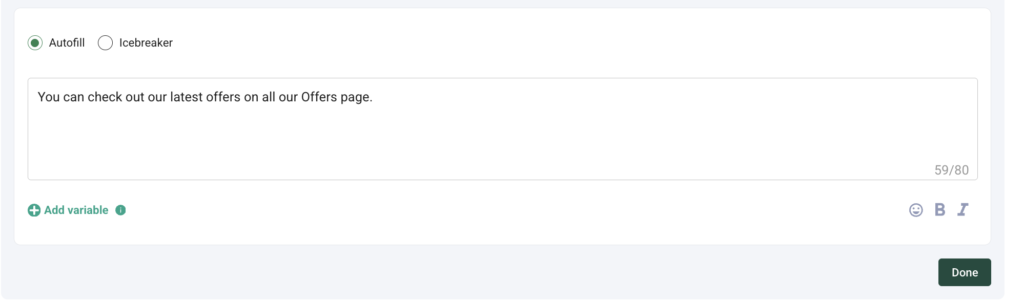
-Ice Breakers: Add up to 3 FAQs as buttons (e.g., “Know more”, “Price please”) for users to choose from when engaging with your business.
This improves engagement and guides users on what to ask.

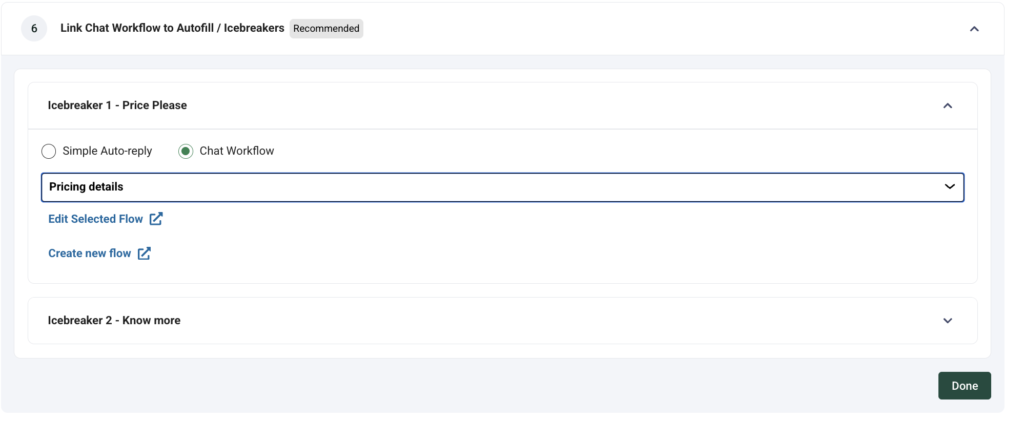
6. Link Chat Workflows to Ice Breakers
Automate responses to ice breakers for a seamless user experience. You can set responses for each ice breaker:
-You can set a simple auto-reply (e.g., “Sure! Let me help you with that.”)
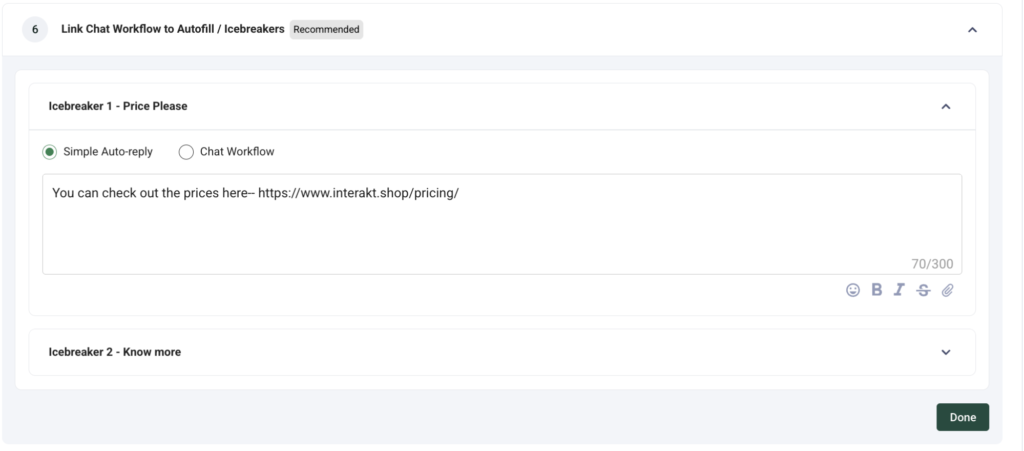
-Or, link a custom Interakt Chat Workflow to handle conversations dynamically (e.g., product recommendation flows, lead capture, FAQs)
This reduces manual effort and speeds up response time.
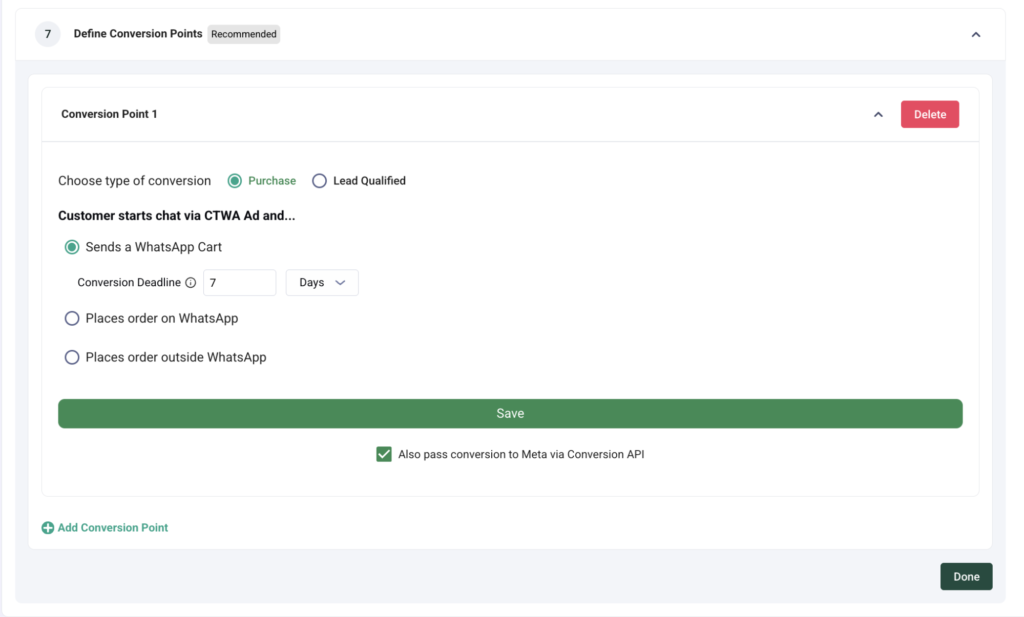
7. Define Conversion Points
Conversion tracking helps you measure success and optimize your ad spend.
-Mark important actions like Lead Qualified, Purchase Completed, or Form Submitted as conversion events.
-These events will be passed back to Meta, helping you analyze ad performance and refine targeting over time.
Review & Publish the Ad
Once you’ve completed all the above steps:
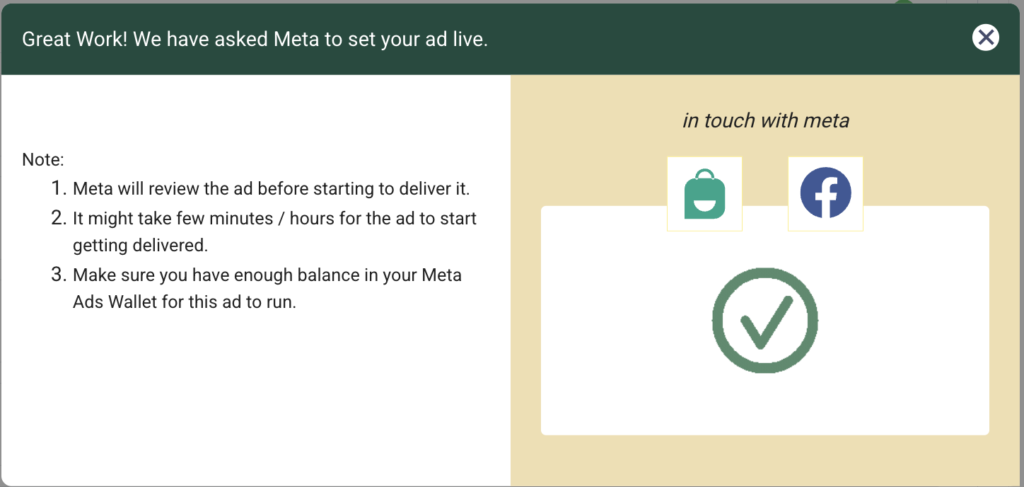
-Click “Publish” to submit your ad.
-The ad will be sent to Meta for review.
-Upon approval, your ad will go LIVE on the selected platforms.
⏱️ Note: Meta typically reviews ads within a few hours, but this process may take up to 24 hours
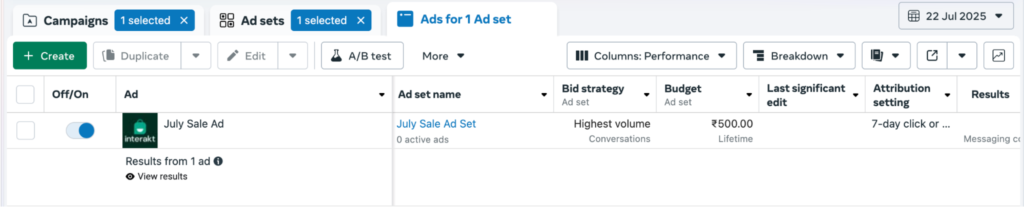
📊 Where to View and Track Your Ad Performance
Depending on how your Facebook Business Page and Ad Account were set up, ad tracking and performance visibility will differ:
✅ If you used an Existing Facebook Business Page & Ad Account:
You can track and manage your ad performance directly via the Meta Ads Manager as usual along with Interakt CTWA Ad Platform. All metrics and analytics will be visible there.
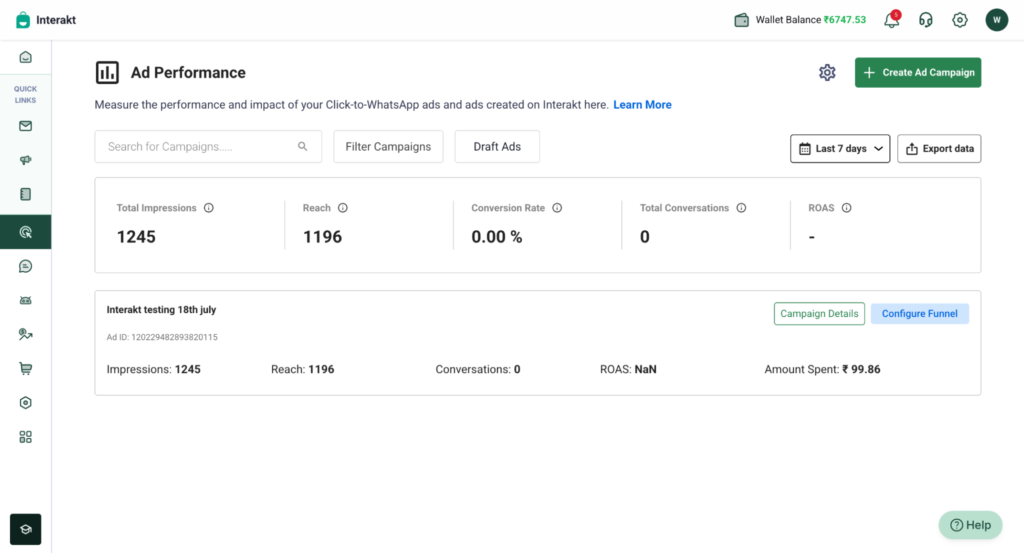
🟠 If you created a New Facebook Business Page & Ad Account via Interakt:
The ad campaign will not be visible on Meta Ads Manager. Instead:
-All ad metrics, including impressions, clicks, conversations, and conversions, will be tracked and displayed within Interakt itself.
–You will manage and monitor performance exclusively through the Interakt platform.
🔒 This ensures a seamless, end-to-end experience for merchants who don’t already have an Ads Manager setup, but note that analytics will be limited to Interakt in this case.