
Separate campaigns / notifications need to be created on Interakt for an order placed via COD, order placed through prepayment (cards and otherwise), order shipped and checkout abandonment.
In this module, we’ll share a step-by-step guide on how you can set up campaigns within Interakt for each of the below scenarios:
Shopify Integration: Setting up Notifications
Case 1: Create a notification / campaign in cases when an order is placed and the payment mode is card/ banking/ UPI etc. (anything apart from COD)
Step 1: Go over to the notifications section on Interakt and create a new campaign.

Notification Home Page
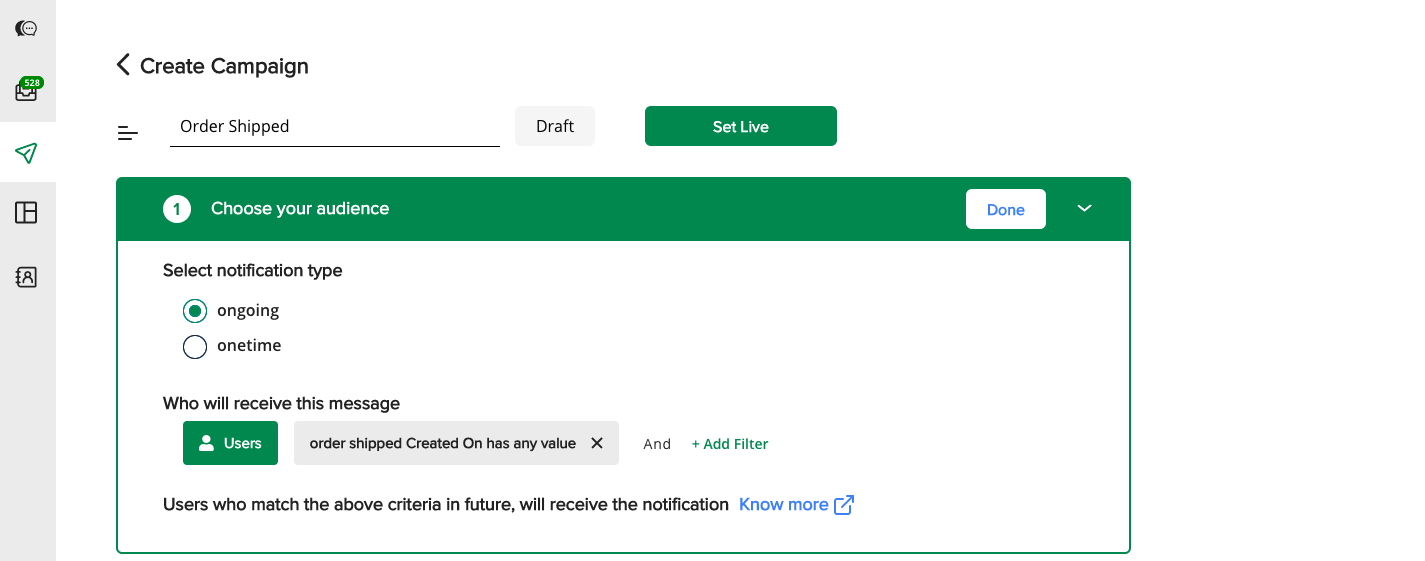
Step 2: Enter campaign details. On Interakt, you can set up two types of campaigns – “One time” and “Ongoing”. Know more about it here.
This will be an ‘Ongoing Campaign’. Since the intention here is that every time someone places an order on your Shopify store, you want a WhatsApp notification to be sent to them.
While entering user details, add filter “order placed”, then select “created on” and within the drop down select “has any value”.
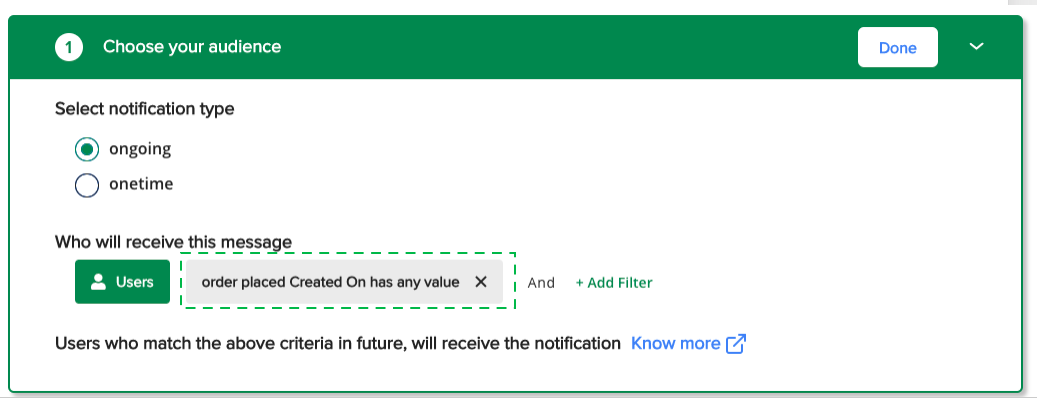
Applying users filter
Step 3: The next step is to choose the approved WhatsApp template that you want to send to your users.

Choose WhatsApp template
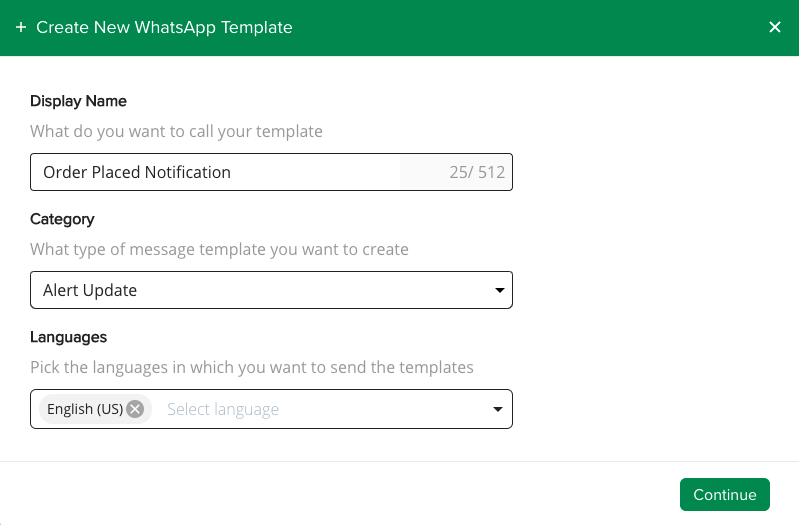
Please note that you can either choose to select an already existing approved template here OR create a new template.
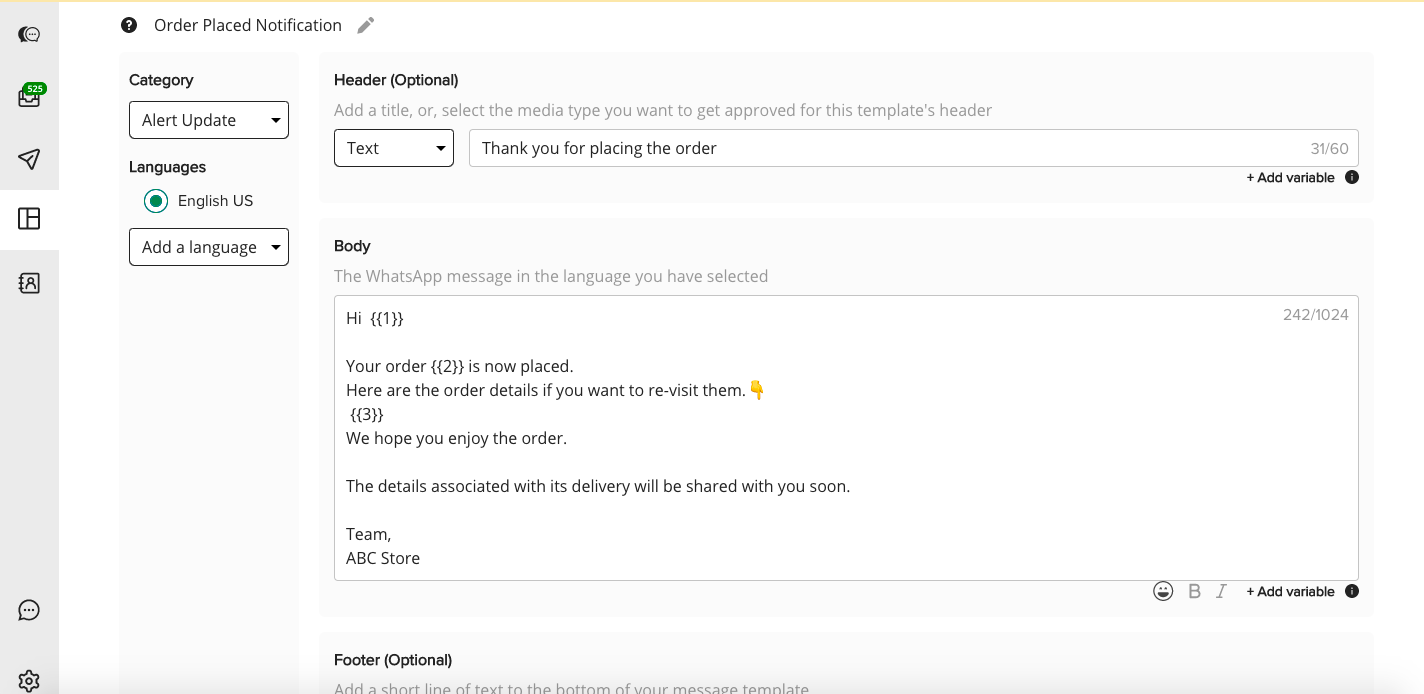
If you don’t have a template created for the same. Please refer to the example below that can be used in this scenario.

New template creation (in case pre-approved template doesn’t exist, can’t be used)

Sample template for Order Placed (Non-COD)
Step 4: Post submission and WhatsApp approval, this template will be available when you click on “Choose template”. If your message templates include variables, you will then need to define the values and set the fall back values as shown below. You can choose to add different variables depending on the message template you want to share with the users.
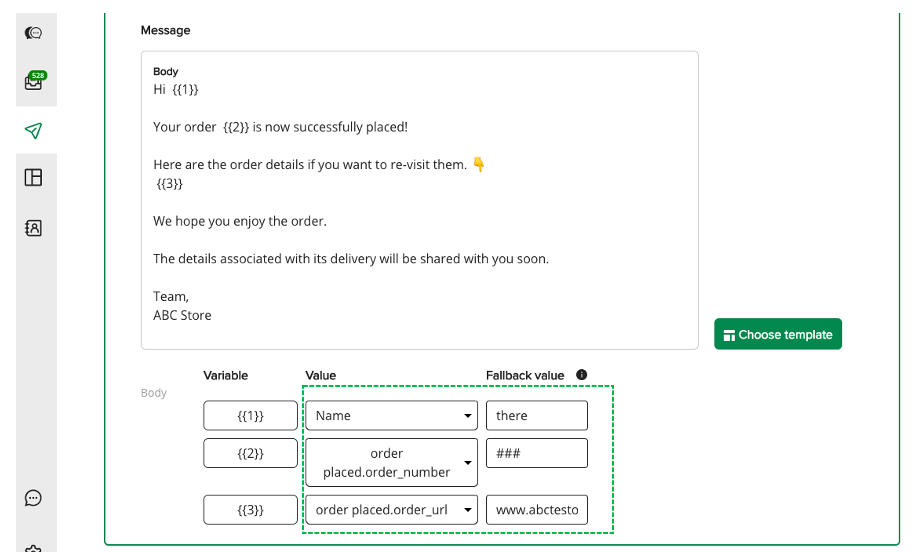
Order placed campaign (Sample message template using attributes for your reference)
Following are the attributes that can be picked from Shopify “order placed event” as per your message template:
• Order Number
• Order URL (Can be used in the message template body or CTA buttons)
• Order Date
• Payment Mode
• Total
• Discount Code
• Item Code
Note: When selecting these attributes, defining a fallback value is mandatory. Also, the URL attribute above cannot be added as a CTA.
These are dynamic in nature and their addition within the template is done through the “Add variable” option. In case you want a refresher on how to set campaigns, refer to this.
Step 5: Post this, you will have to schedule your campaign. You can choose to set the campaign live immediately or provide a custom date. You will then need to click on “Send & Set live”.
Note: All sub-fields under order placed are fetched from Shopify and can be added as a dynamic value in the message template. This can be done by including them in the message body of the template. Once these templates are created they need to be approved by WhatsApp for them to be leveraged in the campaign / notification.
Case 2: Create a notification / campaign in cases when an order is placed and the payment mode is COD
Note: The steps done as part of this are similar to Case 1. The only difference is the payment mode (i.e. COD) which reflects in the event details.
Step 1: Go over to the notifications section and create a new campaign.

Notification Home Page
Step 2: Enter campaign details. This will be an ongoing campaign. Since the intention here is that every time someone places a COD order on your shopify store, you want a WA notification to be sent to them.
While entering user details, add filter “order cod”, then select “created on” and within the drop down select “has any value”.
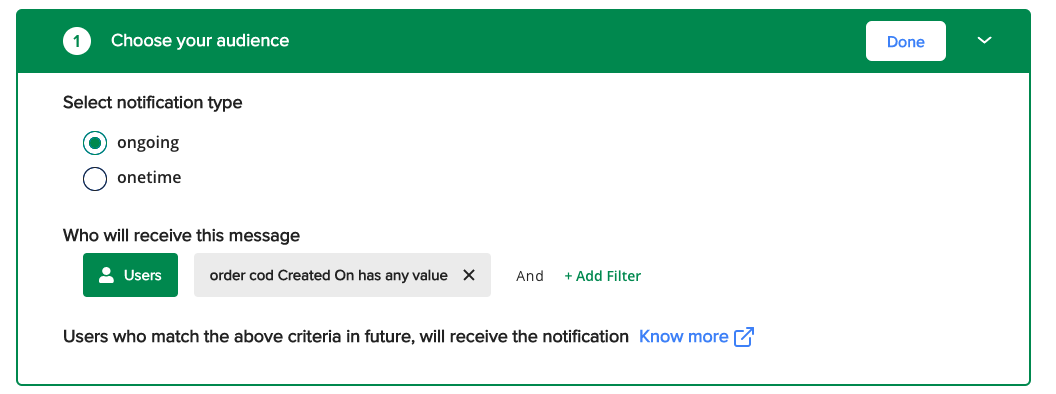
Applying users filter
Step 3: The next step is to choose the approved WA template that you want to send to your users.

Choose WhatsApp template
Please note that you can either choose to select an already existing approved template here OR create a new template.
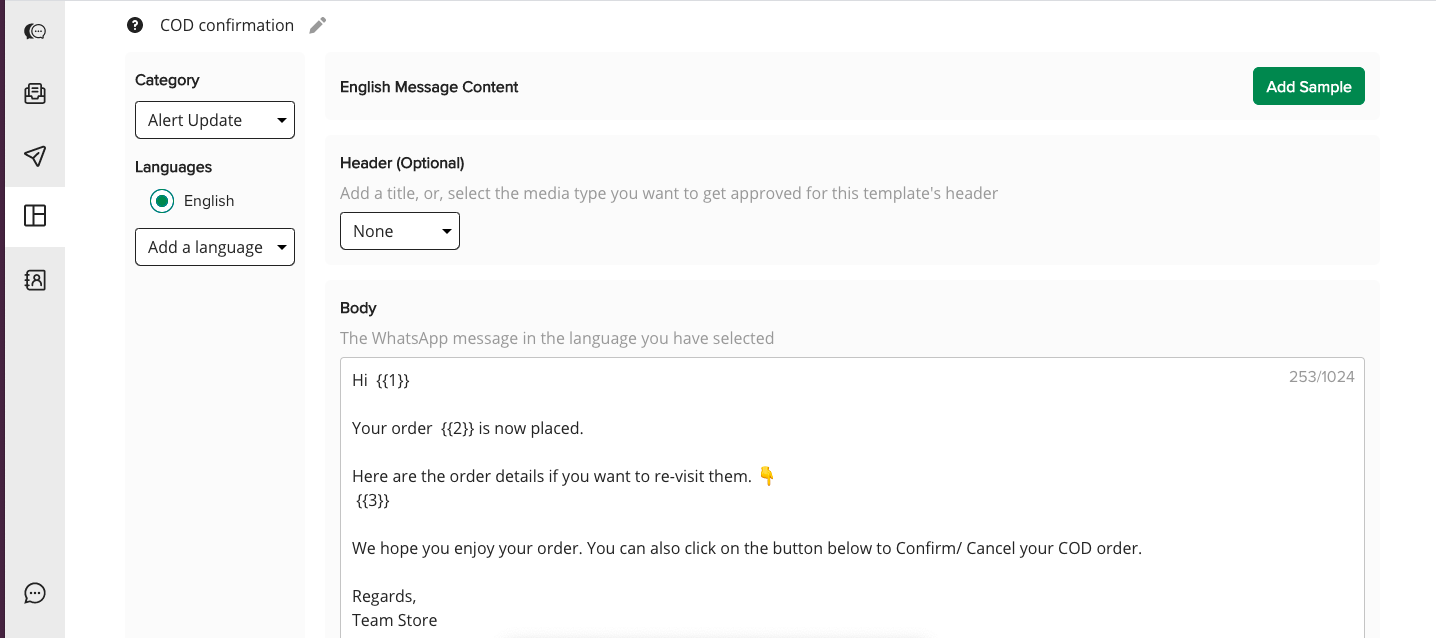
If you don’t have a template created for the same. Please refer to the example below that can be used in this scenario.
New template creation (in case pre-approved template doesn’t exist, can’t be used)
Sample template for Order Placed (COD)
You can also choose to have the COD confirmation URL as part of the template. In the below example, it is used as a CTA.
Template message
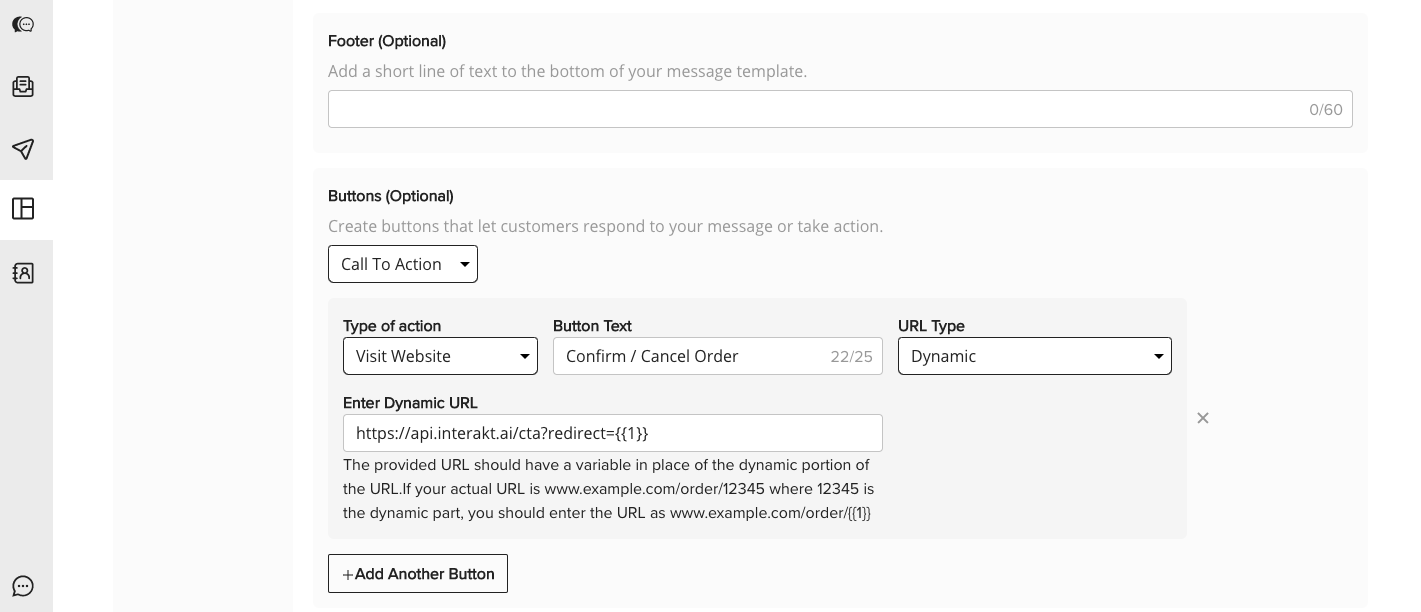
COD confirmation URL in CTA.
Note:
1. To use a shopify based URL in the CTA of template messages. Enter the dynamic URL as, “https://api.interakt.ai/cta?redirect={{1}}”.
2. This dynamic URL is to be used in case of all Shopify URLs or otherwise i.e. Shipment tracking URL, Abandoned checkout URL, Order URL etc.
Step 4: Post submission and WA approval. This template can be selected while creating a campaign where you need to define the values and set the fall back values as shown below. Please note the value and the fallback value entered in case of a CTA button where dynamic URL is used depends on the type of URL as shown below.
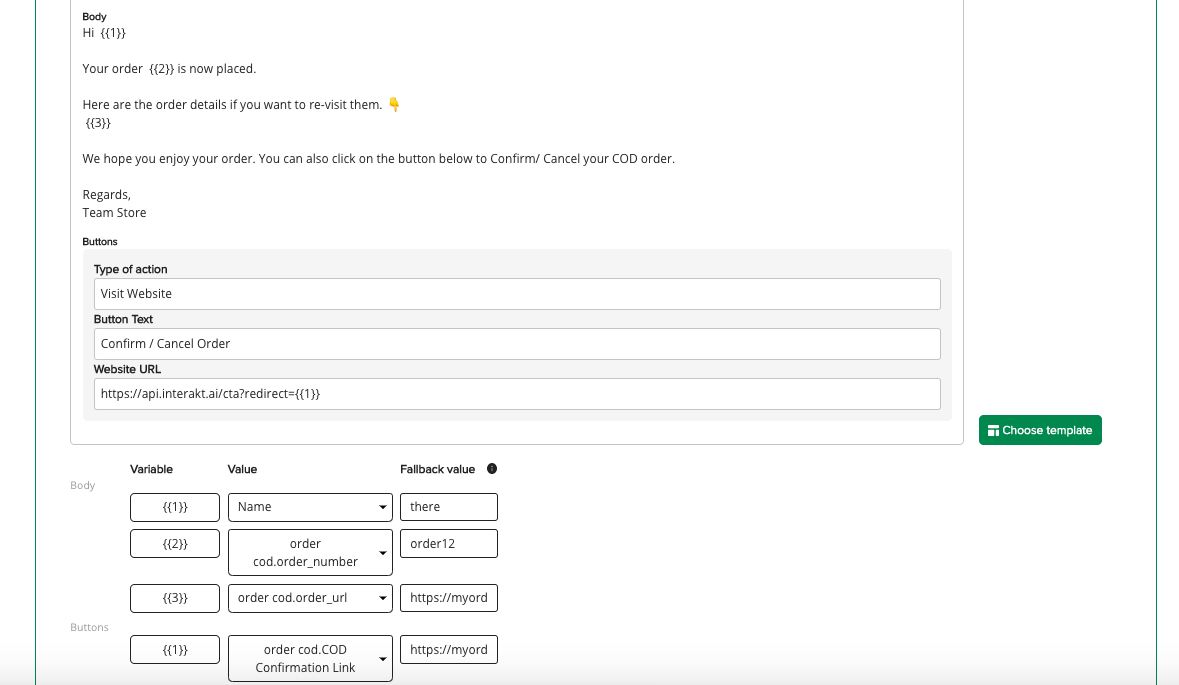
Order COD campaign (Sample Message template using attributes for your reference)
While in the above example we used the COD confirmation link as a CTA button. You can choose to add it as part of the message body as well. Additionally different variables can be added in the message depending on the template you want to share with the users.
In our scenario, the following are the attributes that can be picked from shopify “order cod event” as per your liking.
• Order Number
• Order URL (Can be used in the message template body or as CTA button)
• Order Date
• Payment Mode
• Total
• Discount Code
• Item Code
• COD confirmation URL (Can be used in the message template body or as CTA button)
These are dynamic in nature and their addition within the template is done through the “Add variable” option. In case you want a refresher on how to set campaigns, refer to this.
Step 5: Once the WA template is approved. Set campaign live.
Note: All sub-fields under order placed are fetched from shopify and can be added as a dynamic value in the message template. This can be done by including them in the message body of the template. Once these templates are created they need to be approved by WA for them to be leveraged in the campaign/ notification.
Case 3: Create a notification / campaign based on order shipped
Note: Orders marked as “fulfilled” on your Shopify store are referred to as Order shipped.
Step 1: Go over to the notifications section and create a new campaign.
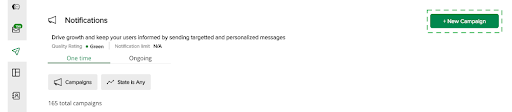
Notification Home Page
Step 2: Enter campaign details. This will be an ongoing campaign. Since the intention here is that every time an order is shipped from your Shopify store, you want a WhatsApp notification to be sent to the users.
While entering user details, add filter “order shipped”, then select “created on” and within the drop down select “has any value”.
Applying users filter
Step 3: The next step is to choose the approved WhatsApp template that you want to send to your users.
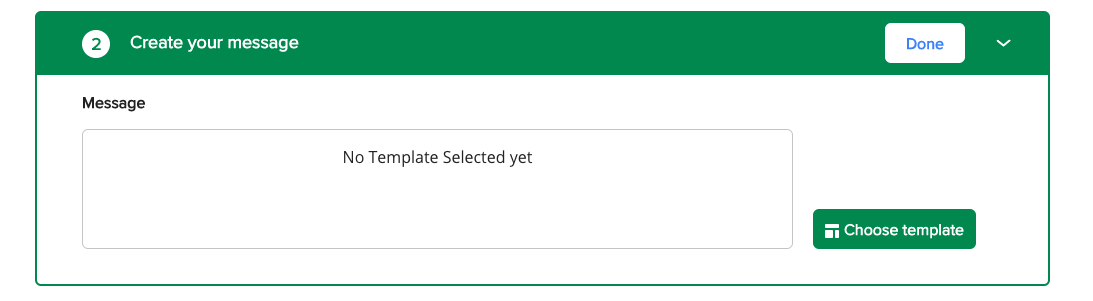
Choose WhatsApp template
Please note that you can either choose to select an already existing approved template here OR create a new template.
If you don’t have a template created for the same, please refer to the example below that can be used in this scenario.
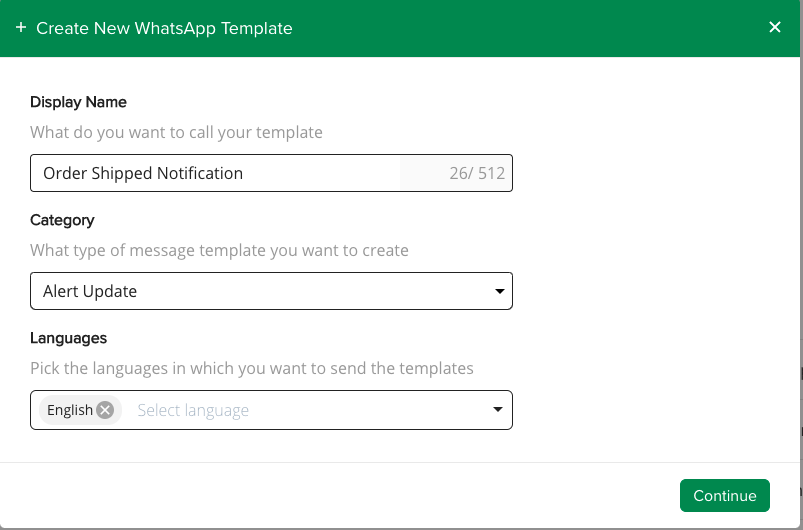
New template creation (in case pre-approved template doesn’t exist, can’t be used)
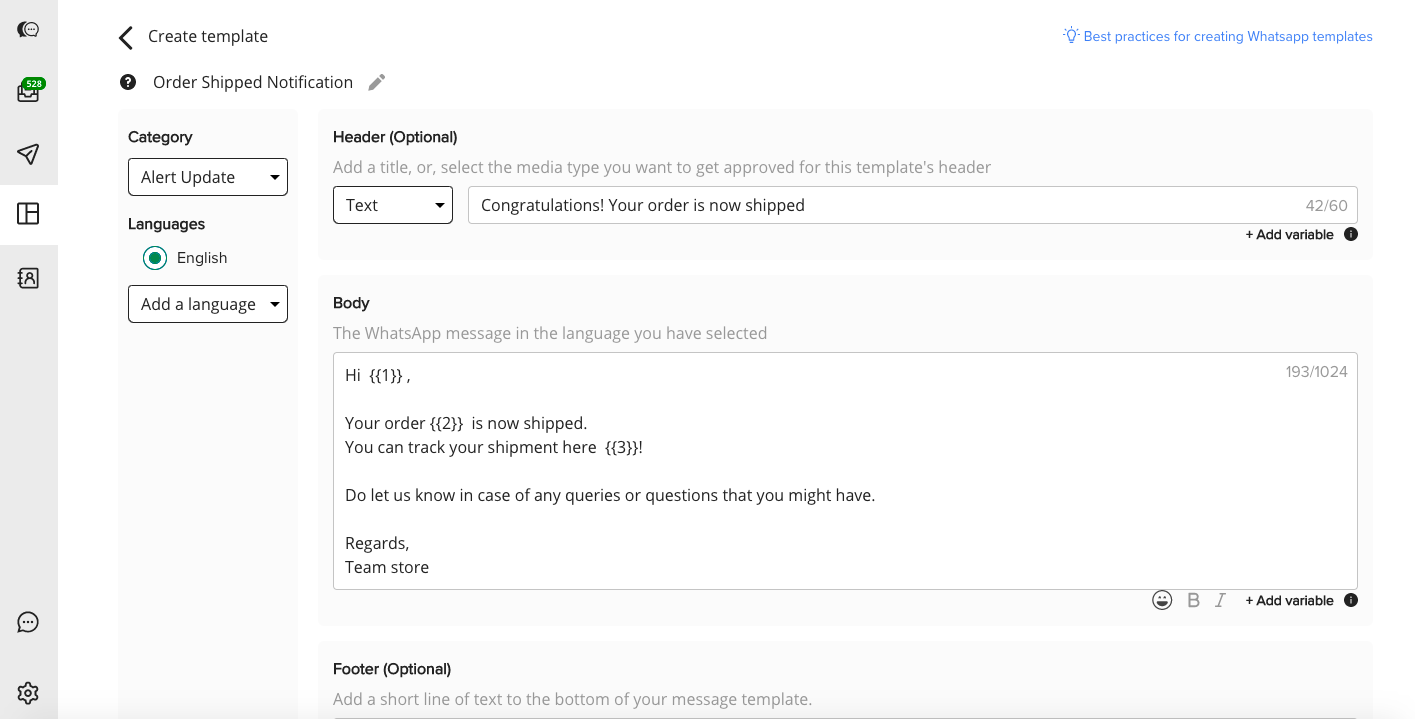
Sample template for Order shipped (Applies to both COD & Non-COD)
Step 4: Post template submission and approval from WhatsApp, this template will be available under the list of approved templates. You can then define the values and set the fall back values as shown below.
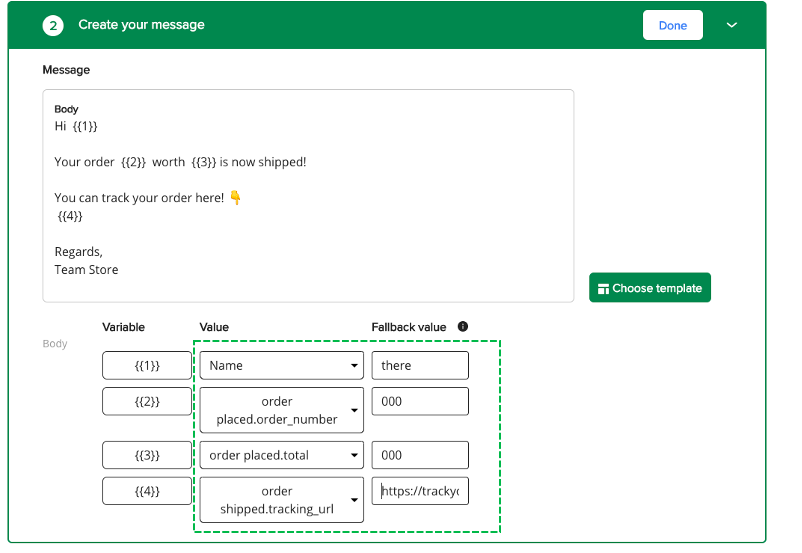
Order shipped campaign (Sample Message template using attributes for your reference)
In this scenario, following are the attributes that can be picked from Shopify “order shipped event” as per your preference:
• Order Number
• Order Date
• Payment Mode
• Total
• Discount
• Discount Codes
• Order URL (Can be used in the message template body or CTA buttons)
• Item count
• Tracking URL (Can be used in the message template body or CTA buttons)
These are dynamic in nature and their addition within the template is done through the “Add variable” option. If you would like to learn more about setting up campaigns on Interakt, you can refer to this.
Step 5: Once the WhatsApp template is approved, you can select the template and take the campaign live.
Step 6: Post this, you will have to schedule your campaign. You can choose to set the campaign live immediately or provide a custom date. You will then need to click on “Send & Set live”.
Note: All sub-fields under order shipped are fetched from Shopify and can be added as a dynamic value in the message template. This can be done by including them in the message body of the template. Once these templates are created they need to be approved by WhatsApp for them to be leveraged in the campaign / notification.
Case 4: Create a notification / campaign based on checkout abandonment
Note: Checkout abandonment is when users drop off at the payment page for your shopify cart after staying there for 15 mins.
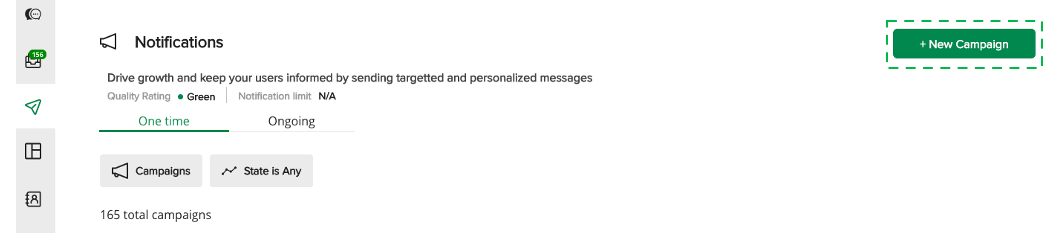
Step 1: Go over to the notifications section and create a new campaign.

Notification Home Page
Step 2: Enter campaign details. This will be an ongoing campaign. Since the intention here is that every time there is a checkout abandonment on your Shopify store, you want a WhatsApp notification to be sent to the user.
While entering user details, add filter “Abandoned checkout”, then select “created on” and within the drop down select “has any value”.
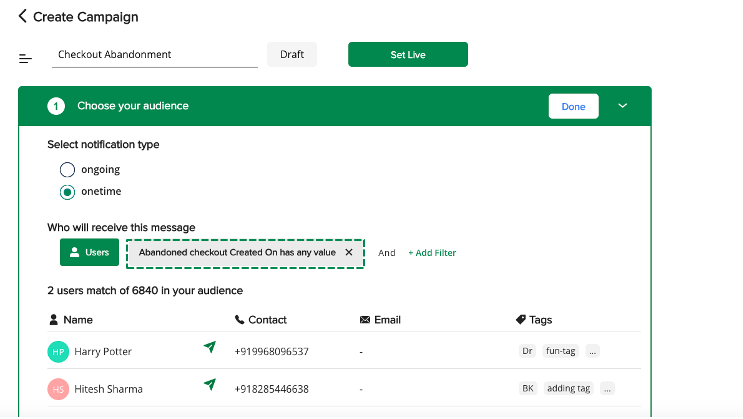
Applying users filter
Step 3: The next step is to choose the approved WhatsApp template that you want to send to your users.
Choose WhatsApp template
Please note that you can either choose to select an already existing approved template here OR create a new template.
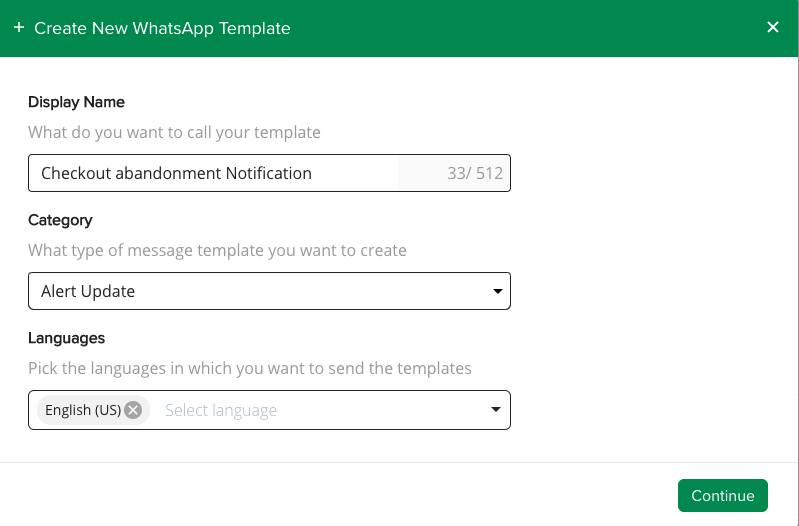
If you don’t have a template created for the same, please refer to the example below that can be used in this scenario.
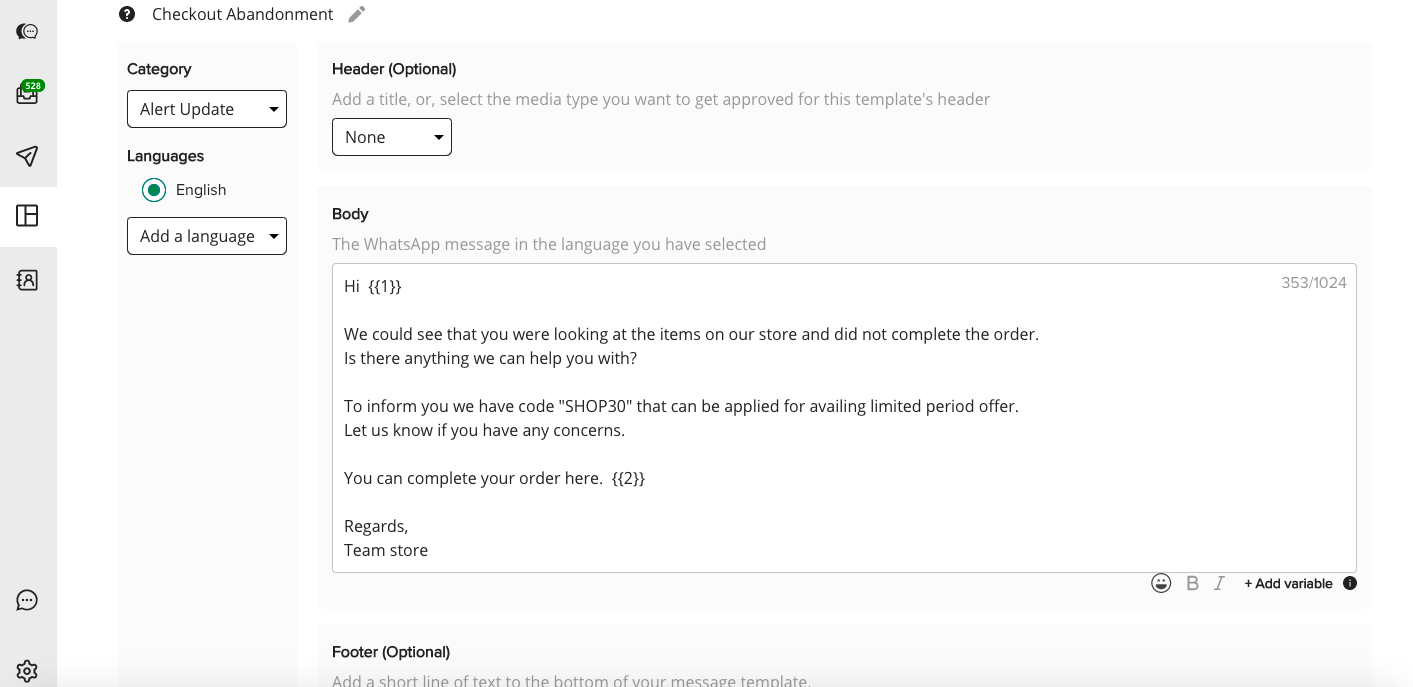
New template creation (in case pre-approved template doesn’t exist, can’t be used)
Sample template for Order shipped (Applies to both COD & Non-COD)
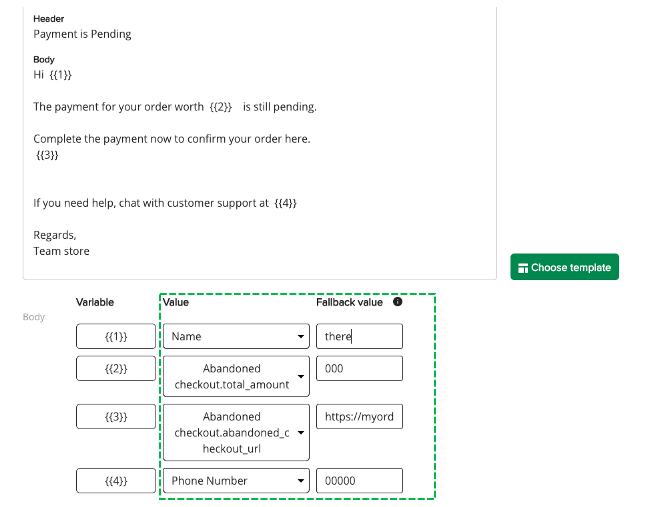
Step 4: Post template submission and WhatsApp approval, this template will be available in the list of approved templates. Once you select the template, you will need to define the values and set the fall back values.
Checkout abandoned campaign (Sample Message template using attributes for your reference)
In this scenario, the following are the attributes that can be picked from Shopify “checkout abandonment event” as per your preference:
• Order Number (which is NA since the order never went through)
• Customer email
• Order Date
• Order Time
• Total Amount (which is the total value of the abandoned checkout cart)
• Discount code
• Item count
• Abandoned Checkout URL (Can be used in the message template body or within CTA buttons)
These attributes are dynamic in nature and their addition within the template is done through the “Add variable” option. In case you want to know how to set up campaigns on Interakt, please refer to this.
Step 5: Once the WhatsApp template is approved, you can set the campaign live.
Step 6: Post this, you will have to schedule your campaign. You can choose to set the campaign live immediately or provide a custom date. You will then need to click on “Send & Set live”.
Note: All sub-fields under order shipped are fetched from Shopify and can be added as a dynamic value in the message template. This can be done by including them in the message body of the template. Once these templates are created they need to be approved by WhatsApp for them to be leveraged in the campaign / notification.
Case 5: Create a notification / campaign based on Order cancellation
Step 1: Order cancellation events are captured on Interakt and automated WA notifications to end users can be set for the same. You can set “cancel” a dummy order from the COD confirmation link or from the shopify dashboard of the store.
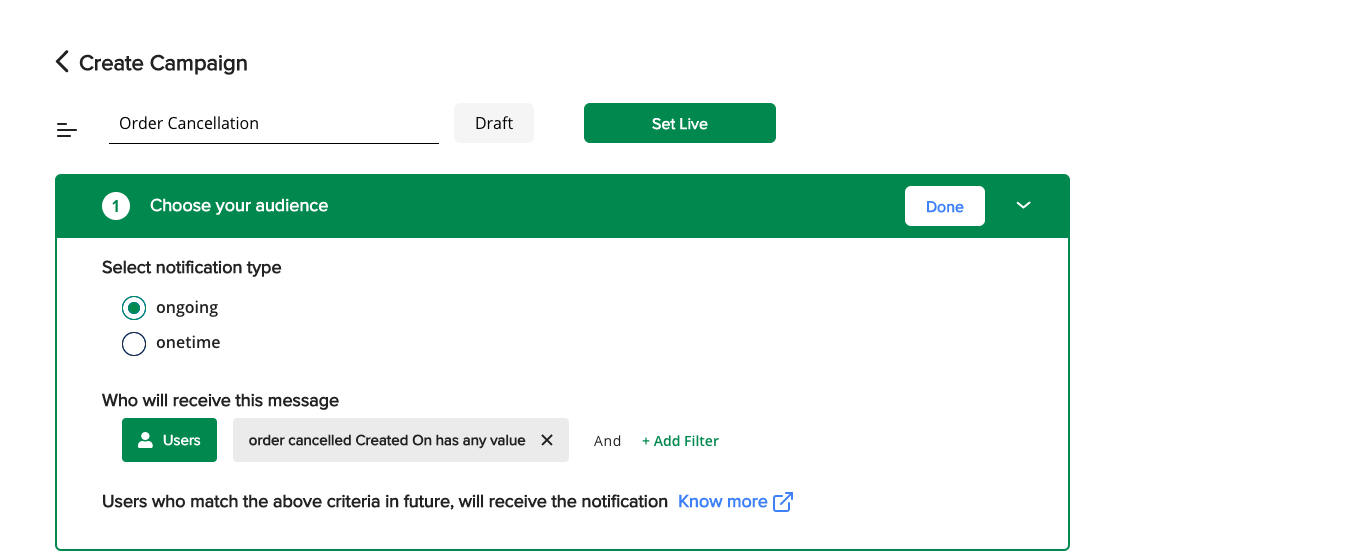
Step 2: Once the order is cancelled. Go over to campaigns and create a new campaign.
Notification Home Page
Step 3: Enter campaign details. This will be an ongoing campaign. Since the intention here is that every time there is an order cancellation on your shopify store, you want a WA notification to be sent to the user.
While entering user details, add filter “order cancelled”, then select “created on” and within the drop down select “has any value”.
Applying user filters
Step 4: The next step is to choose the approved WA template that you want to send to your users.
Choose WhatsApp template
Please note that you can either choose to select an already existing approved template here OR create a new template.
If you don’t have a template created for the same. Please refer to the example below that can be used in this scenario.
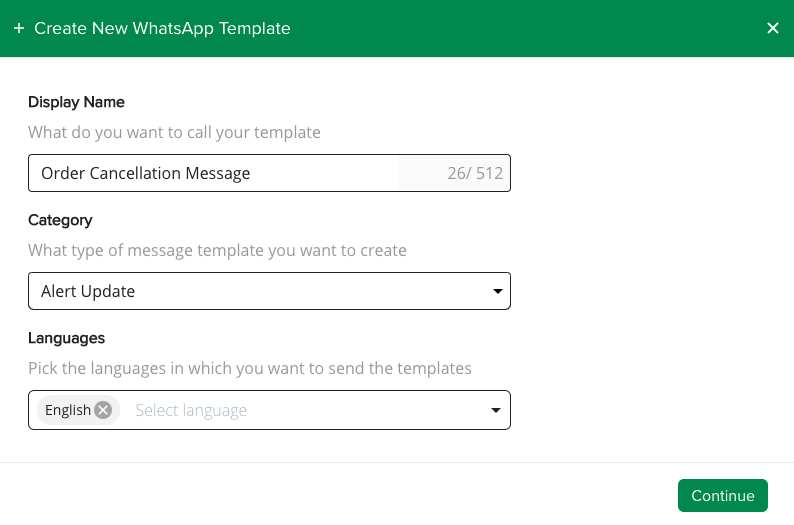
New template creation (in case pre-approved template doesn’t exist, can’t be used)

Sample template for Order Cancelled
Step 5: Post template submission and WA approval. This template will appear in your campaign where you need to define the values and set the fall back values.
Order Cancellation campaign (Sample Message template using attributes for your reference)
In our scenario, the following are the attributes that can be picked from Shopify “order cancellation event” as per your liking.
• Order Number
• Order Date
• Payment Mode
• Order Time
• Total Amount (which is the total value of the abandoned checkout cart)
• Discount code
• Item count
• Order URL (Can be used in the message template or within CTA buttons)
• Cancellation Date
These attributes are dynamic in nature and their addition within the template is done through the “Add variable” option. In case you want a refresher on how to set campaigns, refer to this.
Step 6: Once the WA template is approved. Set campaign live.
Note: All sub-fields under order cancellation are fetched from Shopify and can be added as a dynamic value in the message template. This can be done by including them in the message body of the template or CTA. Once these templates are created they need to be approved by WA for them to be leveraged in the campaign/ notification.


