
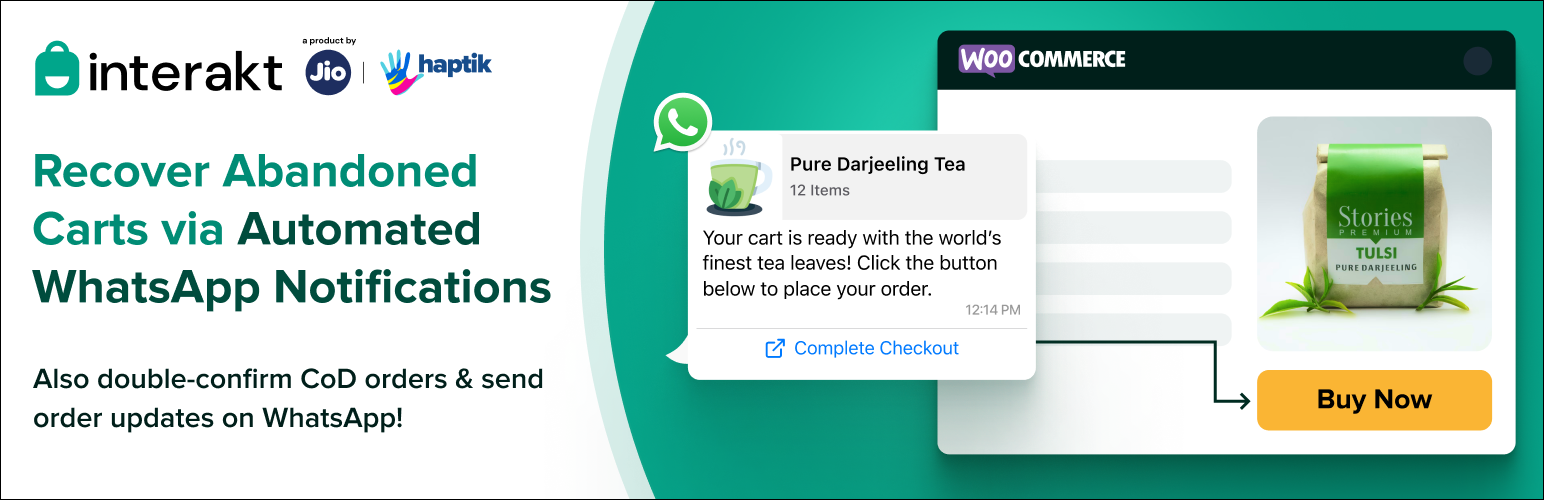
You can now use Interakt’s plugin in your WooCommerce store to automate WhatsApp notifications for abandoned checkouts, CoD double confirmations, shipment confirmations, etc!
1. What can you do with Interakt’s WhatsApp API Woocommerce Plugin?
Interakt’s plugin for Woocommerce helps merchants in the following way:
Automate WhatsApp notifications for:
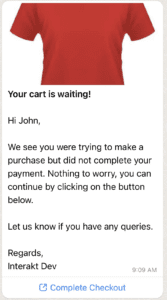
– Recovering checkouts that were abandoned, after the customer entered their phone number in the Order Checkout Form
– Double confirming CoD orders (the WhatsApp notification messages will contain a CTA button which will take the customer to the order details page to confirm the order. Once confirmed, the order’s CoD Confirmation Status will be marked as ‘Confirmed’ in the Woocommerce Orders Section
– Confirming prepaid orders
– Confirming order shipments
– Confirming order delivery
– Confirming order cancellations
Use order-related events sent by the plugin, to send Bulk WhatsApp Campaigns to 1000s of customers (for announcing offers, new product lines, etc)
Additionally, via the Interakt platform, merchants can also:
– Publish a WhatsApp Widget in their WordPress website
– Create a WhatsApp Catalog for their Woocommerce products & send the catalog to 1000s of customers
– Configure WhatsApp Autoreply flows to answer customer queries & help customers browse through their WhatsApp Catalog
– Manager customer chats via a Shared Team Inbox
2. How to Install the Plugin?
Step 1: Create an Interakt account here. Incase you already have an account, continue to Step 2.
Step 2: Go here and download the plugin zip file.
Step 3: In your WordPress admin, go to Plugins -> Add New (you will find Plugins in the left panel)
Step 4: On the top left, click on ‘Upload Plugin’
Step 5: Click on ‘Choose File’ and choose the zip file
Step 6: Then click on ‘Install Now’
Step 7: After the plugin is installed, click on ‘Activate Plugin’
3. How to connect the Plugin to your Interakt account?
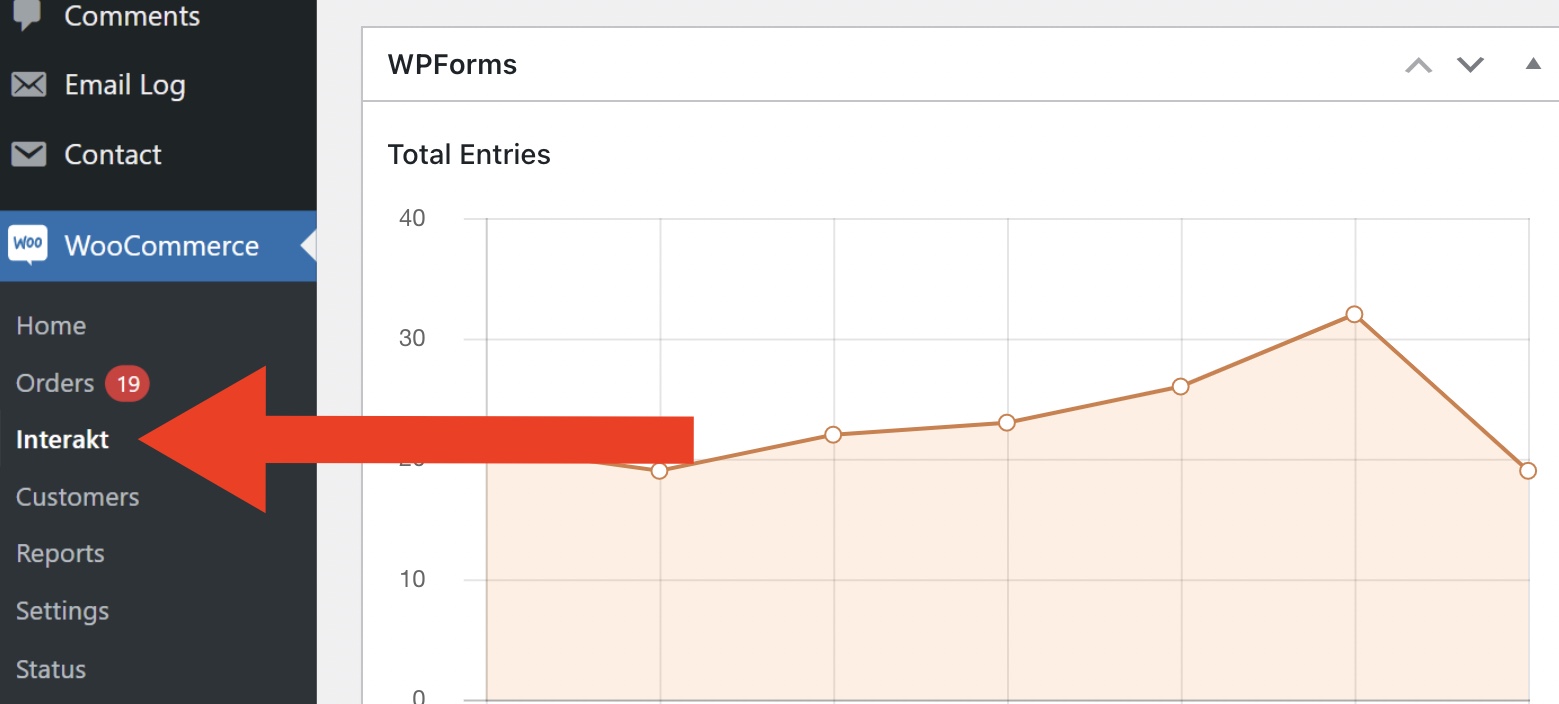
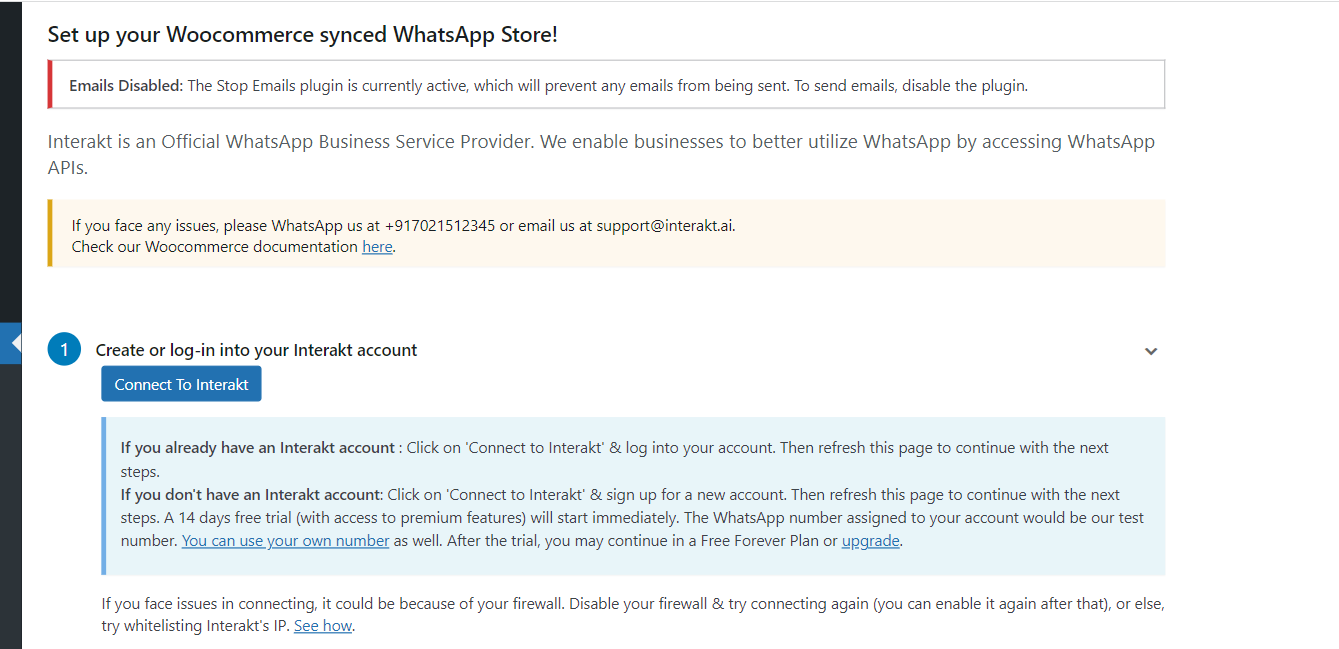
• After activating the plugin, in your WordPress admin, go to WooCommerce. In the WooCommerce menu items, you will find ‘Interakt’.
• Click on ‘Connect to Interakt’
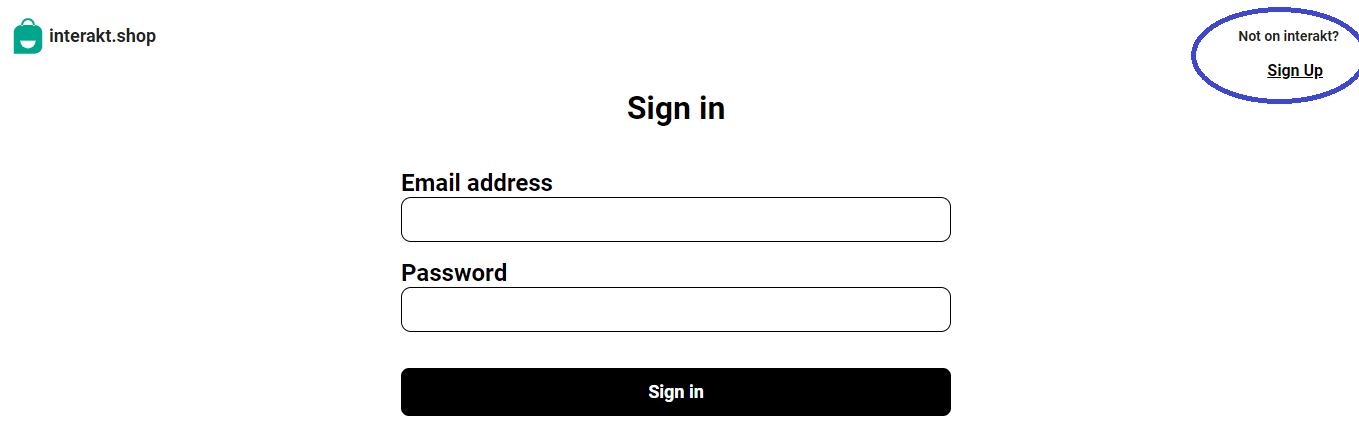
If you don’t have an Interakt account yet
Click on ‘Signup’ at the top right.
Fill out the Signup Form & click on ‘Register with Interakt’. You will be signed in to your Interakt account. On the top right you should see 2 alerts:
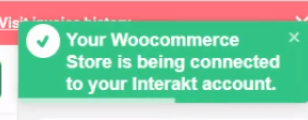
• 1st alert – Your WooCommerce store is being connected to your Interakt account.
• 2nd alert – Your WooCommerce store is now connected to your Interakt account…
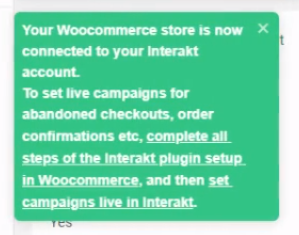
After you see both of the above alerts, go back to the Interakt page in your WooCommerce admin and refresh it. Your Interakt account should now appear as Connected.

If you already have an Interakt account
Log into your account with your credentials. After signing in, on the top right you should see 2 alerts:
• 1st alert – Your WooCommerce store is being connected to your Interakt account.
• 2nd alert – Your WooCommerce store is now connected to your Interakt account…
After you see both of the above alerts, go back to the Interakt page in your WooCommerce admin and refresh it. Your Interakt account should now appear as Connected.
If you don’t see the 2nd alert confirming the connection:
It could be because of your firewall. Disable your firewall & try connecting again (you can enable it again after that), or else, try whitelisting Interakt’s IP with your hosting provider.
How to disable the firewall?
• Login to your WHM (hosting server) as a root
• Search for the Firewall Configuration setting. It can be under the Security settings
• Click on Firewall Disable
• Once it got disabled you can get a warning as “Firewall Status: Disabled and Stopped”. To enable the same you can click Enable under firewall settings.
Firewall settings to disable firewall/ Whitelist IP for some servers
• Hostgator – https://www.hostgator.com/help/article/hg-firewall-plugin
• GoDaddy – https://in.godaddy.com/help/allow-or-block-website-access-27422
• Bluehost – https://www.bluehost.in/hosting/help/308
4. How to configure the Plugin correctly?
After your Interakt account is connected, you next need to specify order statuses & payment methods, for which WhatsApp notifications are to be sent:
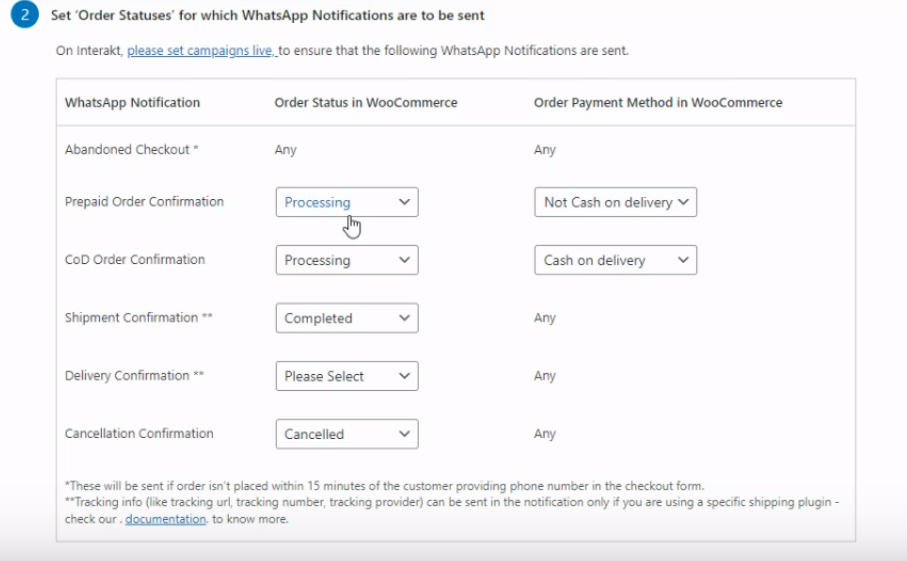
• Abandoned Checkout Notification: Within 15 minutes of the customer filling the phone number, if the order does not appear in your Woocommerce orders panel, OR, it does appear in the order panel, but with statuses like Pending Payment / Failed, then the checkout will be considered as abandoned and an ‘Abandoned checkout’ event will be sent into your Interakt account. In case you want to change the statuses for which an order is to be considered abandoned, you can do so..
• Prepaid Order Confirmation Notification: The default order status is set as ‘Processing’ and the default payment method is set as ‘Not Cash on Delivery’. This means that whenever the status of an order (whose payment method is anything other than ‘Cash on Delivery’) changes to ‘Processing’, the WhatsApp Notification for Prepaid Order Confirmation will be sent.
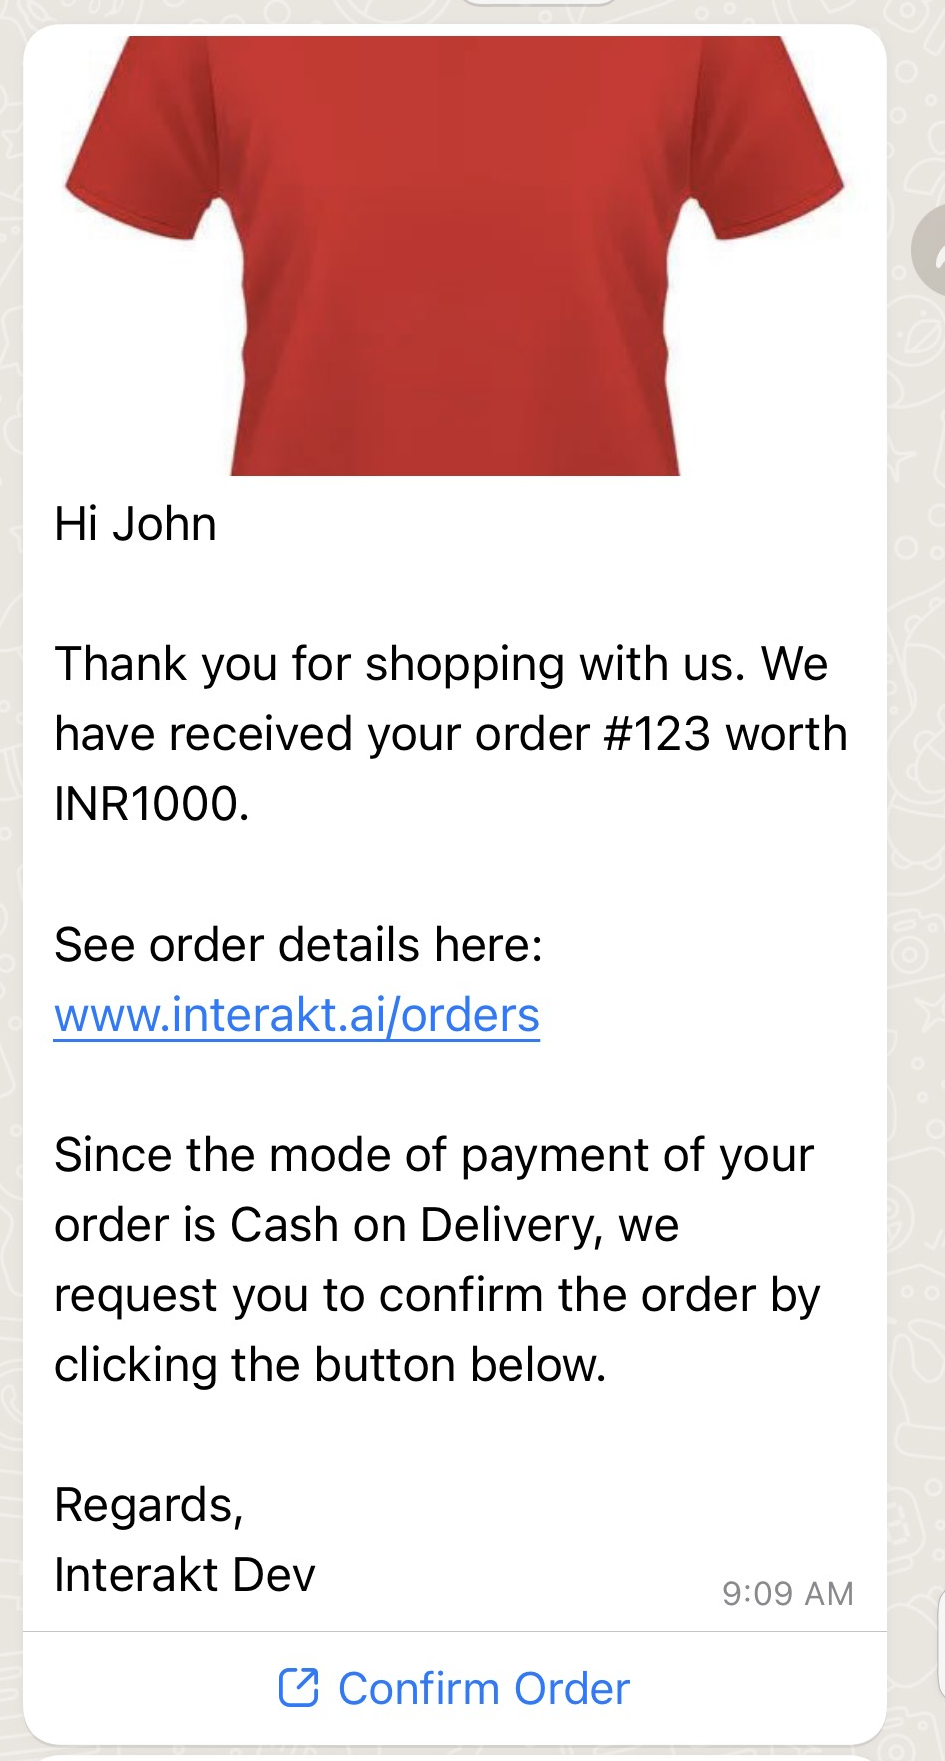
• CoD Order Confirmation Notification: The default order status is set as ‘Processing’ and the default payment method is set as ‘Cash on Delivery’. This means that whenever the status of an order (whose payment method is ‘Cash on Delivery’) changes to ‘Processing’, the WhatsApp Notification for CoD Order Confirmation will be sent.
Note: When the customer clicks on the ‘Confirm Order’ button in the message, the order details page with buttons to ‘Confirm’ and to ‘Cancel’ will open. If the customer again clicks ‘Confirm’, the order will be marked as CoD Confirmed in your WooCommerce Order Panel.
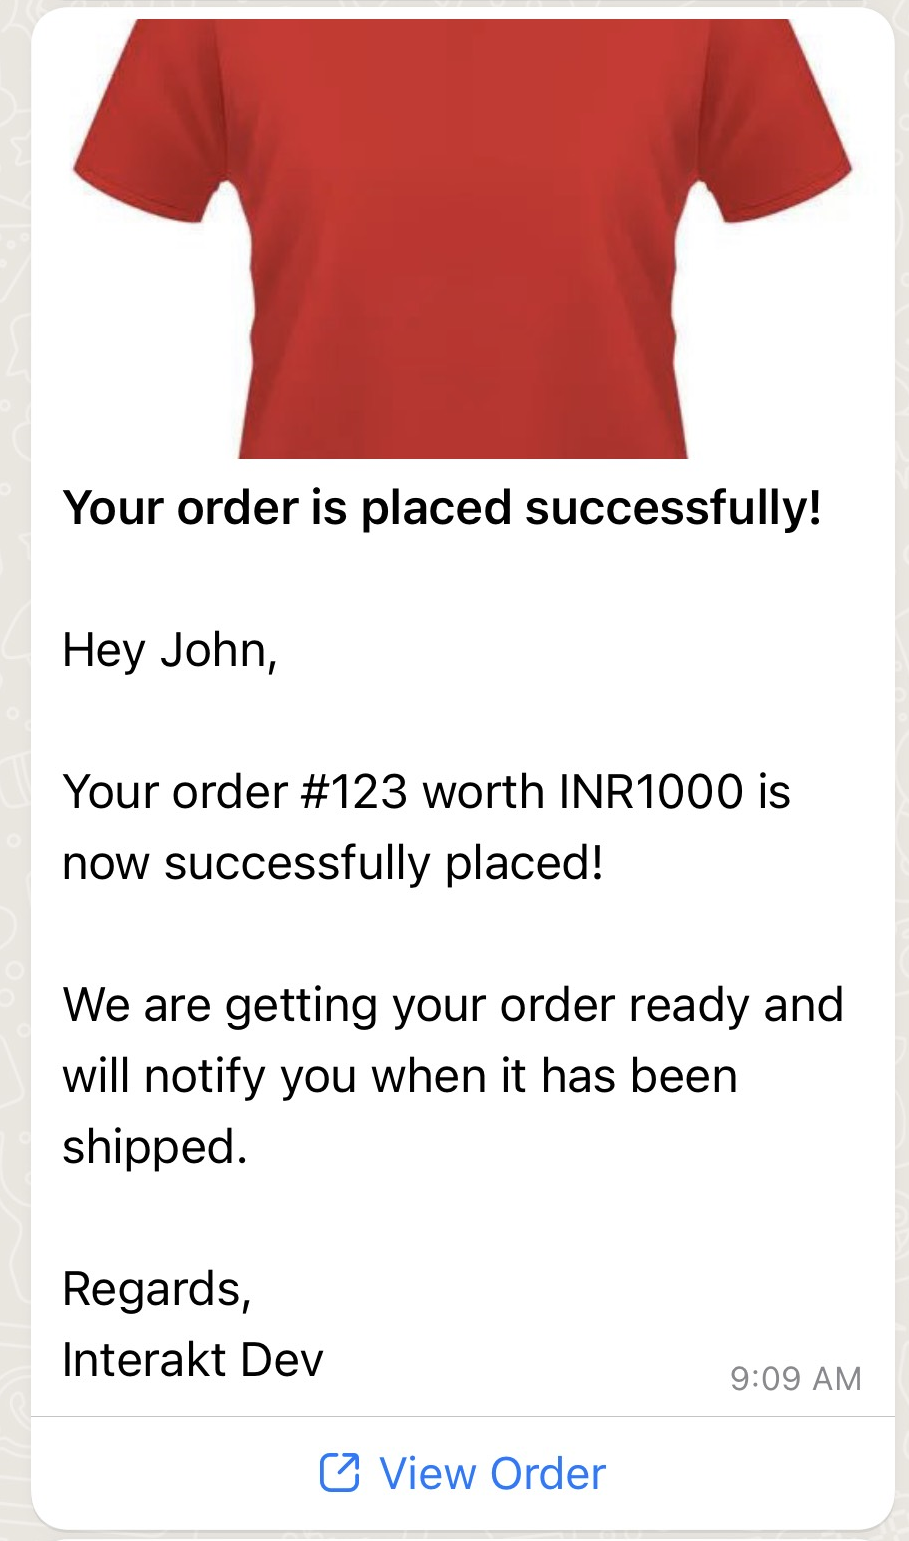
• Shipment Confirmation Notification: The default order status is set as ‘Completed’ (the payment method can be any). This means that whenever the status of an order changes to ‘Completed’, the WhatsApp Notification for Shipment Confirmation will be sent.
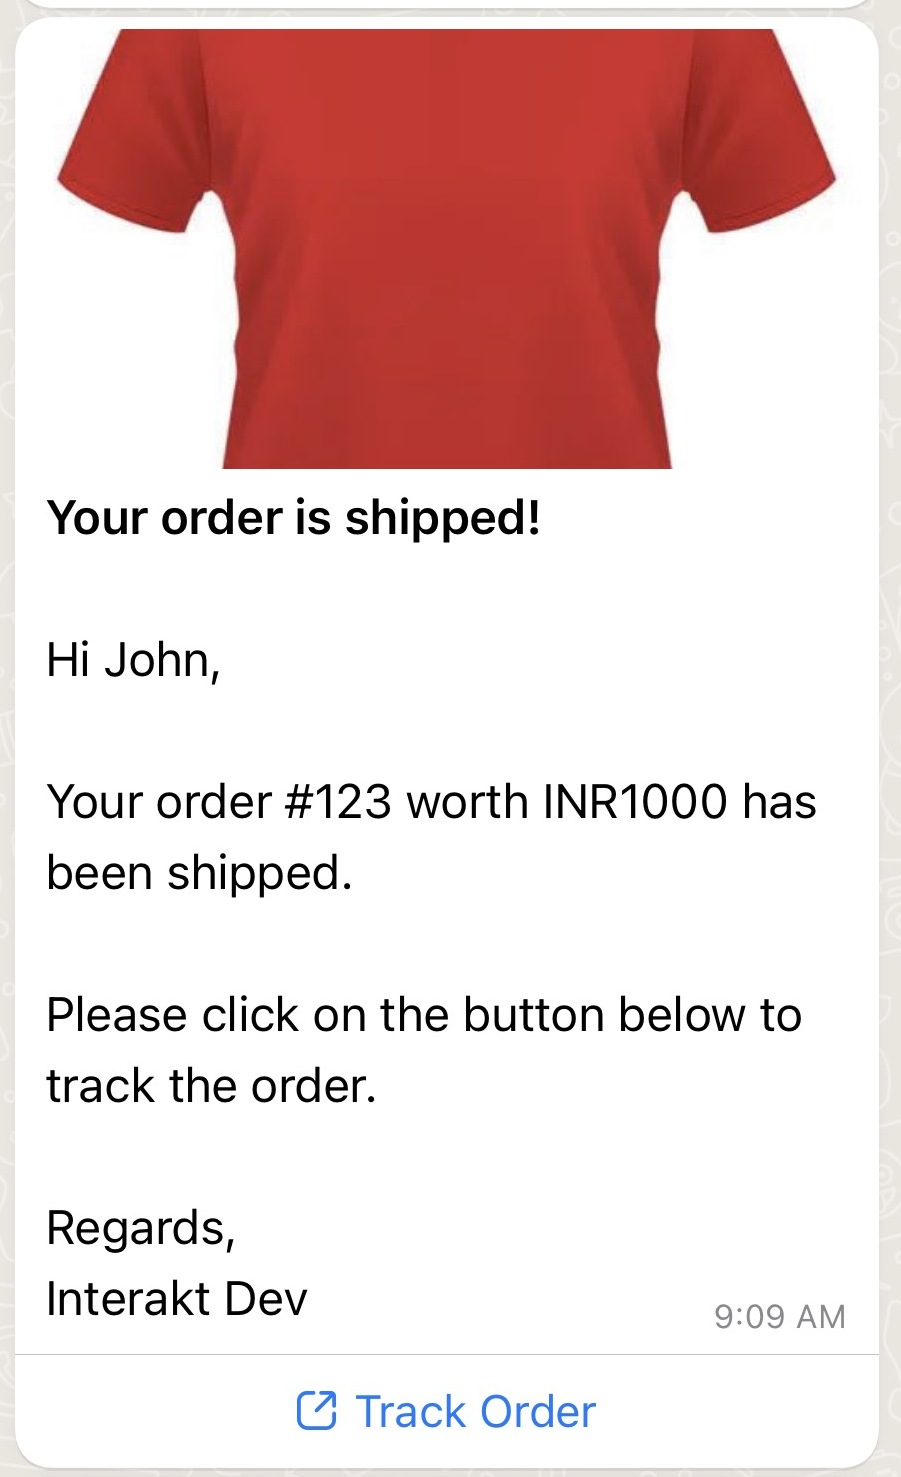
• Note that Tracking info (like tracking URL, tracking number, and tracking provider) can be sent in the notification if you are using the following shipping plugin: https://woocommerce.com/products/shipment-tracking/
In case you are using some other plugin to update the tracking link & tracking number in your WooCommerce admin, you might still be able to send those in the notification. This is how you can verify the same:
– Add the tracking link and tracking number for a test order via the plugin.
– Mark that test order as ‘Completed’ (or any other order status that corresponds to shipment)
– Go to https://app.interakt.ai/contacts/list
– Click on +Add Filter and select ‘Phone Number’ and then select contains
– Type the phone number which you used to place the test order
– The customer name should appear. Click on the customer and on the right-hand panel, go to ‘Events’.
– You will find the ‘Order Shipped’ event in the right panel. Click on it and check if the ‘tracking number’ and ‘tracking link’ details are present in the event.
• Delivery Confirmation Notification: There is no default order status set here. In case you manually or automatically (via a plugin) update the order status upon delivery, please select the relevant status from the dropdown. The WhatsApp notification for Delivery Confirmation will be sent whenever the status changes to that.

• Cancellation Confirmation Notification: The default order status is set as ‘Canceled’ (the payment method can be any). This means that whenever the status of an order changes to ‘Cancelled’, the WhatsApp Notification for Cancellation Confirmation will be sent.

Next, you need to specify the ‘phone number format’ entered by customers on your WooCommerce store’s checkout page:
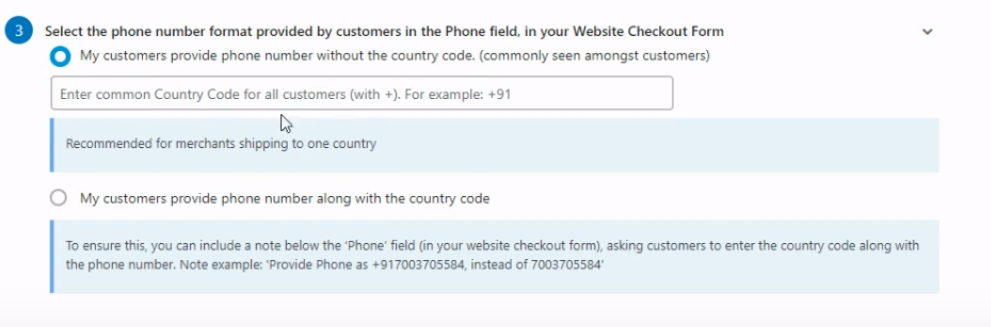
Customers don’t provide the country code; they only provide the phone number – This is most commonly seen. If most of your customers are from a single country, please select this option & provide the relevant country code to be considered for all phone numbers.
Customers provide the country code and the phone number – This could happen if you are either:
• Nudging customers to fill in the phone number with country code i.e. +917003705584 instead of 7003705584.
• Or, if you have included a country code selector in the checkout form.
If you are doing any of the above, select this option.
Next, click on ‘Set Live’ and your Integration will be set live. This means that the plugin will now start sending ‘events’ into your Interakt account whenever there is an abandoned checkout, or whenever, there is an update on an order.


5. How to set live Abandoned Checkout & other campaigns and test the same?
• Go to https://app.interakt.ai/notification and click on ‘New Campaign’

• You will find pre-configured sample campaigns for your WooCommerce store.
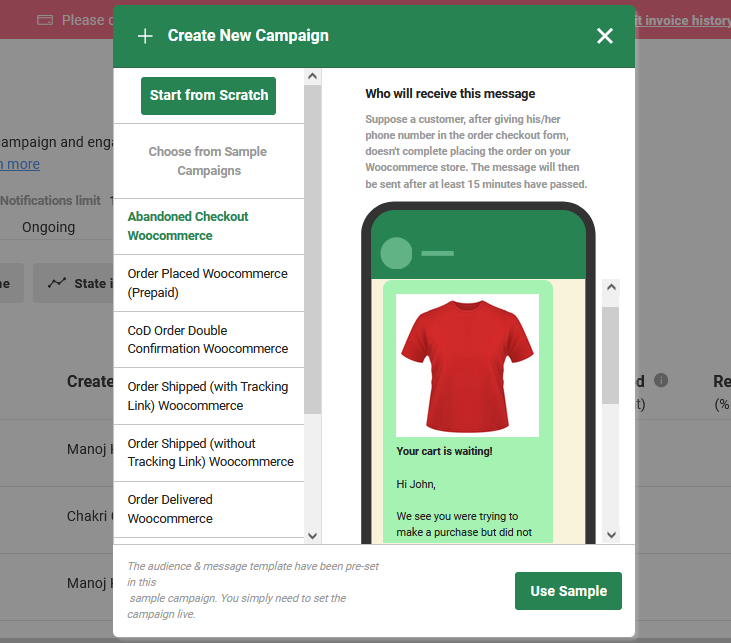
• Select a campaign and click on ‘Use Sample’.
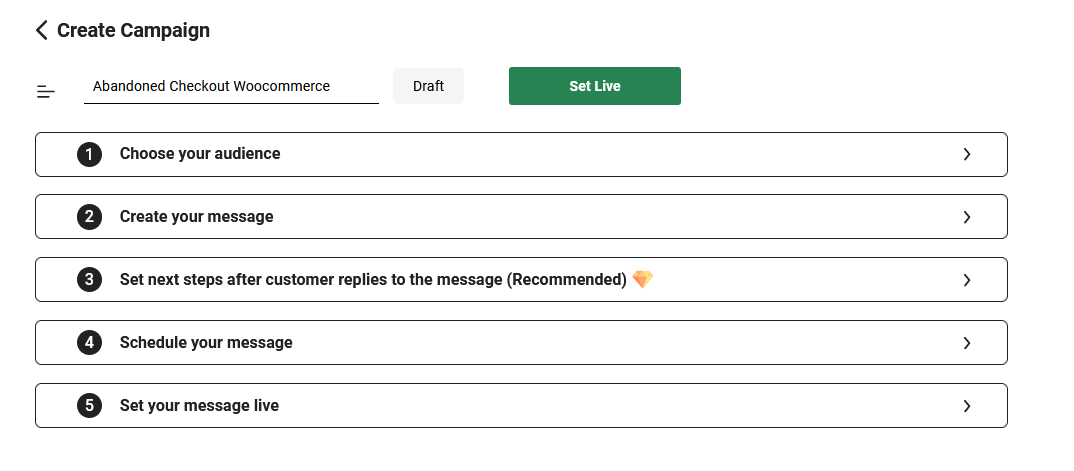
• In the page that opens, click on ‘Set Live’ to set the campaign live. In case you want to change the template, you can do so before setting the campaign live.
Again, go back to the list of sample campaigns, pick the next campaign and set it live in the same way.
How to test as an end customer:
• Abandoned Checkout Notification: Add a pxroduct to the cart and fill out the checkout form. Specially make sure that you fill the Phone Number field (in the same format that you chose while configuring the plugin). Don’t place the order. Wait for at least 15 minutes. You should receive a WhatsApp notification after 15 minutes.
• Prepaid Order Confirmation Notification: Place a prepaid order in your store. You should receive a WhatsApp notification immediately, confirming the order.
• CoD Order Confirmation Notification: Place a CoD order in your store. You should receive a WhatsApp notification immediately. In the notification, click on the ‘Confirm Order’ button. In the page that opens, click on ‘Confirm Order’. Now go to the ‘Orders’ section in your WooCommerce admin. You will see that order marked as ‘CoD Confirmed’.
• Shipment Confirmation Notification: Mark the test order (which you placed above) as ‘completed’ (or any other status that corresponds to shipment) in your WooCommerce admin. You should receive a WhatsApp notification immediately, confirming the shipment.
• Delivery Confirmation Notification: Mark the test order (which you placed above) as ‘delivered’ (or any other status that corresponds to delivery) in your WooCommerce admin. You should receive a WhatsApp notification immediately, confirming the delivery.
• Cancellation Confirmation Notification: Mark the test order (which you placed above) as ‘canceled’ (or any other status that corresponds to the order being canceled) in your WooCommerce admin. You should receive a WhatsApp notification immediately, confirming the cancellation.
6. Common reasons why your WhatsApp Notifications might not be going
Please check:
• If you have followed all steps given here to set the integration live from the plugin page in your Woocommerce Admin.
• If yes, check whether you have followed all steps given here to set live campaigns for Abandoned Checkout, Order Confirmations etc from Interakt.
• If your notifications are still not getting sent, please go to https://app.interakt.ai/notification, click on the particular campaign and in the page that opens, check whether the ‘Attempted’ count has increased. If it has, it means that Interakt did try to send the notification, but for some reason, it failed to get sent. Click on ‘View Details’ in the ‘Failed’ box to check the reason for failure. One common reason for failure could be the following:
• If the image of the product (for which the notification is being attempted) is stored in your WordPress admin in WebP format, the notification will fail since WhatsApp only allows sending JPeG or PnG format images in templates.
1. Hence, you can try changing the images in WordPress/Woocommerce to JPeg / Png format.
2. Or, you could create a new template in Interakt, which doesn’t contain the image. Then pause the existing campaign, duplicate it and change the template in the campaign to the new one.
• If you find that notifications are not even getting attempted, then you need to check if the plugin is sending ‘events’ into your Interakt account. To test this,
– Place a CoD order in your website.
– Then go to https://app.interakt.ai/contacts/list
– Click on ‘Add Filter’ & search for ‘order cod’
– Click on ‘Created On’ → ‘has any value’ → Done.
– Check if the name which you used in the CoD order appears in the list or not.
– If it appears, it implies that events are being sent by the plugin. If not, then get in touch with our support team at [email protected].
7. What are the steps to set up a new WhatsApp API account?
Steps:
• Install the plugin.
• Click on ‘Connect to Interakt’
• In the page that opens, click on ‘Sign Up’
• Fill the form & click on ‘Register with Interakt’ to create an account on Interakt. In the form, please enter your personal WhatsApp number where we can reach out to you for any updates – do not enter the number that you wish to use for your WhatsApp API account.
• You will be logged into your Interakt account in ‘Sandbox mode’ i.e. a temporary WhatsApp number will be assigned from our end to your Interakt account, so that you can test different features of Interakt.
• Click on ‘Connect your own number’ or go to https://app.interakt.ai/signup/whatsapp.
• Read the ‘Important Information’ points and then click on ‘Continue with Facebook’.
– In the popup, you will first be asked to log into / create your Facebook Business account.
– Next, you will be asked to create / select a WhatsApp Business Account within your FB Business account.
– You will have to provide a display name for your WhatsApp API phone number.
– Next, you will need to enter the phone number that you wish to associate with your WhatsApp API account.
– An OTP will be sent to the number and you’ll have to enter the same OTP.
• After OTP verification is done, it will take 7-10 minutes to set up your Interakt account with your new WhatsApp API number.
8. Can I use my existing WhatsApp number as my WhatsApp API number?
We generally recommend using a new number for your WhatsApp Business API account. However if you really want to use your current WhatsApp number, please read below before going ahead:
• You will have to delete the WhatsApp account on that number.
• You can’t use the number on WhatsApp Personal / Business apps while you use the number as a WhatsApp API number.
• Due to WhatsApp’s rules, going back to WhatsApp apps from Interakt is a time taking process & not guaranteed.
• Old chats on your number’s WhatsApp account will get deleted and won’t show up on Interakt.
9. What are the advantages of having a WhatsApp API account?
With a WhatsApp API account, you can fulfill many use cases which are not possible via the normal WhatsApp app today:
• Send bulk WhatsApp campaigns for discounts/offers to your customers. (customers will get the messages even if they haven’t saved your number in their contacts list)
• Send automated notifications for abandoned checkouts, order updates, etc
• Assign chats between team members
• Tag customers, add fields for customers
• Send auto-replies and build automated chat flows on WhatsApp
• Send WhatsApp Catalogs to 1000s of customers via campaigns
• Build credibility via WhatsApp Green Tick
10. What are some things which you can do on normal WhatsApp but not on WhatsApp API?
The following things are not possible on WhatsApp API as of today:
• Messaging a customer 24 hours after the customer’s last reply without using an Approved Template
• Being part of WhatsApp groups
• Putting up WhatsApp statuses
11. What are the messaging restrictions applicable to WhatsApp API numbers?
After connecting a number to your WhatsApp API account:
• Unlimited responses to customer-initiated conversations
• Business Initiated Conversations with 250 unique customers per rolling 24 hrs period. That is, you can send WhatsApp Campaigns to roughly 250 customers per day.
After connecting a number to your WhatsApp API account & also verifying your Facebook Business account:
• Unlimited responses to customer-initiated conversations
• Business Initiated Conversations with 1000 unique customers per rolling 24 hrs period. That is, you can send WhatsApp Campaigns to roughly 1000 customers per day.
• Limit of 1000 can be increased to 10000 / 100000 per rolling 24 hrs period on meeting specific criteria
For example:
Suppose, after connecting your number (and before FB Business Verification) you send a campaign to 200 customers at 2 pm on a particular day. Also, suppose that those 200 customers hadn’t messaged you on WhatsApp in the previous 24 hours. –> this will be considered as Business Initiated Conversations with 200 unique customers.
Till 2 pm on the next day, you can send a campaign to max 50 more customers. (You can still reply to the 200 customers to whom the campaign was initially sent). At 2 pm on the next day, your limit will again be re-instated and you can again send a campaign to 250 customers.
12. What is the exact logic for sending out Abandoned Checkout notifications?
The plugin sends out ‘Abandoned checkout’ events whenever a customer abandons a checkout after having given their phone number in the Order Checkout Form.
Now, after providing the phone number, there could be the following cases:
• The customer abandoned the checkout before starting payment – in this case, the order typically doesn’t appear in the orders panel in your Woocommerce admin. However, the Interakt plugin will detect this order & send an ‘Abandoned checkout’ event into your Interakt account.
• The customer abandoned the checkout after starting payment – in this case, the order appears in the orders panel in your Woocommerce admin. The default order status is ‘Pending Payment’. In Step 2 of the ‘integration steps’ given here, if you have mapped ‘Pending Payment’ against Abandoned Checkout, in that case, the plugin will send the ‘Abandoned checkout’ event into your Interakt account.
Please note that the plugin waits for 15 minutes before sending the event into your Interakt account in both the above cases. After 15 minutes it checks whether the order was placed or not – if not, then it sends the event.
Hence, to sum up, the logic for sending Abandoned Checkout notifications is as follows:
Within 15 minutes of the customer filling the phone number, if the order does not appear in your Woocommerce orders panel, OR, it does appear in the order panel, but with statuses like Pending Payment / Failed, then the checkout will be considered as abandoned and an ‘Abandoned checkout’ event will be sent into your Interakt account.
13. How can I publish a WhatsApp Chat Widget on my WordPress website via Interakt?
Steps:
• Go to https://appdev.interakt.ai/widget/manage
• Design your WhatsApp Widget
• Click on Save Changes
• Go to https://app.interakt.ai/widget/install
• Copy the HTML / Javascript code
• Paste it into your website’s code
14. How can I create a WhatsApp Catalog with my Woocommerce Products & send it to 1000s of customers?
Steps:
• Go to Products in your WordPress Admin and export all products into a CSV file.
• Map the different product fields to the fields given in this sheet. This is the template for creating Facebook Catalogs via Google Sheets.
– – – The mandatory fields are id, title, description, availability, condition, price, link, image_link, brand
– – – If you are using a WhatsApp API number starting with +91, you also need to mandatorily include the field “origin_country” for each product.
– – – If origin_country is not IN, you need to mandatorily include fields for:
Importer_name
Importer_address
Manufacturer_info
(Check this video from 1 min 27 seconds mark to 2 min 15 seconds mark to understand exactly how to fill the above 3 fields in the Google Sheet)
• Log into Facebook Commerce Settings here and start creating a catalog using the ‘Data Feed’ method.
• Follow the steps given in this video (from the 2 min 16 seconds mark) to understand how to create a FB catalog using your Google Sheet.
• After the catalog is created, go to Interakt’s Commerce Settings and complete steps 1C, 1D and 1E to finally connect your Catalog to Interakt.
• Next, create product collections on Facebook.
• Sync those collections to Interakt (2nd Step in Commerce Settings) and choose the top 10 collections. Then click on the button in the 2nd Step to create your ‘Collections List’ message on WhatsApp. Whenever this ‘Collections List’ message is sent to a customer and the customer clicks on a Collection, the corresponding WhatsApp Catalog containing 30 items will get sent automatically.
• You can now start attaching this Product Collections List to your Bulk Campaigns & Welcome / OOO / Delayed Messages:
– – – Attaching Product Collections to Bulk WhatsApp Campaigns
– – – Attaching Product Collections to Welcome / OOO / Delayed Message Flows
15. How can I create WhatsApp Autoreplies to customer FAQs?
Read this article to understand how to set up custom auto-replies to FAQs & include those FAQs in a List Message (which we call the Interaktive List!).
After you have created your Interaktive List, don’t forget to attach it to your Welcome / OOO / Delayed messages.
16. How can I send a bulk WhatsApp campaign to all customers who have Abandoned Checkout in the last 30 days, or, to all customers who have placed an order in the last 60 days?
Steps to send a bulk campaign to customers who have abandoned checkout in the last 30 days:
• Go to https://app.interakt.ai/notification and create a New Campaign from scratch.
• In ‘Choose your audience’, click on +Add Filter and search for ‘Abandoned checkout’
• Click on it and you will see a list.
• Choose ‘Created On’
• Then, select ‘after’ and select the date 30 days back
• Click on Done
This will filter out all those customers who have abandoned checkout over the last 30 days. After that, you’ll have to simply select a template and set the campaign live!
Steps to send a bulk campaign to customers who have placed orders in the last 60 days:
• Go to https://app.interakt.ai/notification and create a New Campaign from scratch.
• In ‘Choose your audience’, click on +Add Filter and search for ‘order placed’
• Click on it and you will see a list.
• Choose ‘Created On’
• Then, select ‘after’ and select the date 60 days back
• Click on Done
Again click on +Add Filter and search for ‘order cod’
• Click on it and you will see a list.
• Choose ‘Created On’
• Then, select ‘after’ and select the date 60 days back
• Click on Done
• Make sure that the joiner between the ‘order placed’ and ‘order cod’ filters is set to OR instead of AND.
This will filter out all those customers who have placed a prepaid or cod order over the last 60 days. After that, you’ll have to simply select a template and set the campaign live!


